2024-1-4 03:58:42 Author: blogs.sap.com(查看原文) 阅读量:9 收藏
Overview:
Hi all,
Here I am going to discuss about how to create object page in UI5 application with step by step procedure (I will take screenshots from my PC from where i have worked on). You will get to know how to create Object page in your UI5 application.
We all know how to create object page in FIORI because we have a standard template for creating object page in FIORI. But Ui5 is a customizable application and we don’t have a standard template for object page in SAP UI5, so here we will try to achieve it in UI5 application.
Introduction to Object page:
The object page floorplan is used to display and categorize all relevant information about an object. Object page can be created using ObjectPageLayout control. ObjectPageLayout layout is composed of a header (title and content), an optional anchor bar, and block content wrapped in sections and subsections that structure the information.

Object page layout structure.
Main elements of object page:
- Dynamic page header.
- Navigation bar
- Content area
- Shell bar
- Breadcrumbs
- Global actions
- Header content
- Footer toolbar
Let’s start with header section, Header section has been divided into two sections.
- Header title
- Header content
- Header title
To add Header title content we use headerTitle control, inside headerTitle we use
ObjectPageDynamicHeaderTitle.
<uxap:headerTitle >
      <uxap:ObjectPageDynamicHeaderTitle id="_IDGenObjectPageDynamicHeaderTitle1" >
            <uxap:expandedHeading>
                  <HBox >
                       <Title id="_IDGenTitle1" text="{company>empName}" wrapping="true"/>
                       <ObjectMarker type="Flagged"></ObjectMarker>
                  </HBox>
            </uxap:expandedHeading>

            <uxap:snappedHeading>
                  <FlexBox id="_IDGenFlexBox1" fitContainer="true" alignItems="Center">
                       <Avatar id="_IDGenAvatar1" src="{company>avatar}" class="sapUiTinyMarginEnd"/>
                       <Title id="_IDGenTitle2" text="{company>empName}" wrapping="true" />
                  </FlexBox>
            </uxap:snappedHeading>

            <uxap:expandedContent>
                  <Text id="_IDGenText1" text="{company>role}"/>
            </uxap:expandedContent>

            <uxap:snappedContent>
                  <Text id="_IDGenText2" text="{company>role}"/>
            </uxap:snappedContent>

            <uxap:snappedTitleOnMobile>
                  <Title id="_IDGenTitle3" text="{company>role}"/>
            </uxap:snappedTitleOnMobile>

            <uxap:actions>
                  <Button id="_IDGenButton1" text="Edit" type="Emphasized"/>
                  <Button id="_IDGenButton2" type="Transparent" text="Delete"/>
                  <Button id="_IDGenButton3" type="Transparent" text="Copy"/>
                  <OverflowToolbarButton id="_IDGenOverflowToolbarButton1" icon="sap-icon://action"
                           type="Transparent" text="Share" tooltip="action"/>
            </uxap:actions>

            <uxap:breadcrumbs>
                <Breadcrumbs id="_IDGenBreadcrumbs1" currentLocationText="Object page example">
                   <Link id="_IDGenLink3" text="page 1 "  press="onPress"></Link>
                   <Link id="_IDGenLink4" text="page 2 "></Link>
                </Breadcrumbs>
            </uxap:breadcrumbs>

      </uxap:ObjectPageDynamicHeaderTitle>
</uxap:headerTitle>2.Header content
To add header content we make use of headerContent control.
<uxap:headerContent>
      <FlexBox id="_IDGenFlexBox2" wrap="Wrap" fitContainer="true">
          <Avatar id="_IDGenAvatar2" class ="sapUiSmallMarginEnd" src="{company>avatar}"
               displaySize="L" />
          <layout:VerticalLayout id="_IDGenVerticalLayout1" class="sapUiSmallMarginBeginEnd">
                  <Link id="_IDGenLink1" text="{company>phoneNo}"/>
                  <Link id="_IDGenLink2" text="{company>email}"/>
          </layout:VerticalLayout>

          <layout:HorizontalLayout id="_IDGenHorizontalLayout1" class="sapUiSmallMarginBeginEnd">
                  <Image id="_IDGenImage1" src="{company>avatar}" width="100px" height="100px"/>
                  <Image id="_IDGenImage2" src="{company>avatar}" width="100px" height="100px"
                       class="sapUiSmallMarginBegin"/>
          </layout:HorizontalLayout>

          <layout:VerticalLayout id="_IDGenVerticalLayout2" class="sapUiSmallMarginBeginEnd">
                  <Label id="_IDGenLabel1" text="Hii Hello! I am {company>empName} and I am
                        {company>role}"/>
                     <VBox id="_IDGenVBox1">
                           <Label id="_IDGenLabel2" text="Achieved goals"/>
                           <ProgressIndicator id="_IDGenProgressIndicator1" percentValue="
                               {company>progress}" displayValue="{company>progress}%"/>
                     </VBox>
          </layout:VerticalLayout>

          <layout:VerticalLayout id="_IDGenVerticalLayout3" class="sapUiSmallMarginBeginEnd">
                 <Label id="_IDGenLabel3" text="{company>place}"/>
          </layout:VerticalLayout>
      </FlexBox>
</uxap:headerContent>
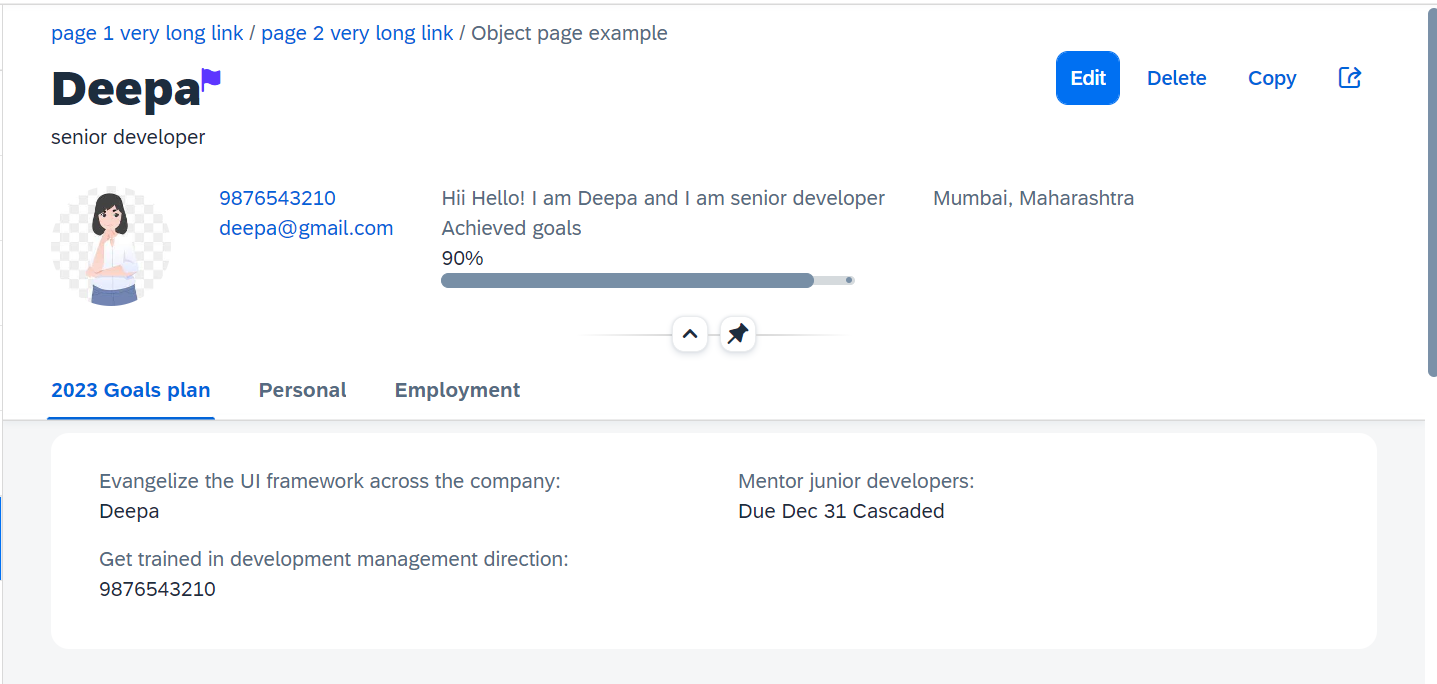
Here is the output of Object page for Header title and header content.

Output of object page.
3.Section
Section is a combination of multiple subsection, which can be created with the help of blocks .The blocks are used to group the app content that is displayed in the sections and subsections of the ObjectPageLayout.
Here, I have shared folder structure for your reference.

In the above image you can observe folder shared blocks, it consists of subfolders employment, goals and person block and each subfolder consists of view and respective controller you can refer below view and controller code. These views we place it as a section in our object page.
webapp/Sharedblocks/goals/Info.view.xml
<mvc:View xmlns:mvc="sap.ui.core.mvc" xmlns:forms="sap.ui.layout.form" xmlns="sap.m">
	<forms:SimpleForm editable="false" layout="ColumnLayout">

			<Label text="Evangelize the UI framework across the company" />
			<Text text="{company>empName}"/>

			<Label text="Get trained in development management direction" />
			<Text text="{company>phoneNo}"/>

			<Label text="Mentor junior developers" />
			<Text text="Due Dec 31 Cascaded"/>

	</forms:SimpleForm>
</mvc:View>
webapp/Sharedblocks/goals/Info.js
sap.ui.define(["sap/ui/core/library", 'sap/uxap/BlockBase'], function (coreLibrary, BlockBase) {
	"use strict";

	debugger
	var ViewType = coreLibrary.mvc.ViewType;

	var Blockedgoals = BlockBase.extend("assignment.SharedBlocks.goals.Info", {
		metadata: {

		}
	});
	return Blockedgoals;
});
Any control can be a block. However, the blocks that extend sap.uxap.BlockBase provide additional features:
- Lazy loading: Only the blocks that are currently displayed and those in their direct proximity are instantiated
- Column layout: Blocks provide information to the subsection only on the width they should be using for an optimal experience
- To know more about Object page blocks click here.
webapp/Sharedblocks/PersonBlocks/PersonBlock.view.xml
<mvc:View xmlns:mvc="sap.ui.core.mvc" xmlns:core="sap.ui.core" xmlns:forms="sap.ui.layout.form"
		   xmlns="sap.m">
	<forms:SimpleForm editable="false" layout="ColumnLayout">
		<core:Title text="Main Payment Method"/>

		<Label text="Bank Transfer"/>
		<Text text="Sparkasse Heimfeld, Germany"/>
	</forms:SimpleForm>
</mvc:View>
webapp/Sharedblocks/PersonBlocks/PersonBlock.js
sap.ui.define(['sap/uxap/BlockBase'],
	function (BlockBase) {
		"use strict";
     var oBlockPhoneNumber = BlockBase.extend("assignment.SharedBlocks.PersonBlocks.PersonBlock", {
			metadata: {}
		});
		return BlockPhoneNumber;

	});
webapp/Sharedblocks/employment/Employment.view.xml
<mvc:View xmlns:mvc="sap.ui.core.mvc" xmlns:forms="sap.ui.layout.form" xmlns="sap.m">
	<forms:SimpleForm labelSpanL="4" labelSpanM="4" editable="false"
	   labelSpanS="4" emptySpanL="0" emptySpanM="0" emptySpanS="0"
	   maxContainerCols="2" layout="ResponsiveGridLayout" width="100%">

		<Label text="Job classification"/>
		<Text text=" {company>role} (UIDEV-SR)"/>

		<Label text=""/>

		<Label text="Pay Grade"/>
		<Text text="Salary Grade {company>grade} (GR-14)"/>

		<Label text=""/>

		<Label text="Job title"/>
		<Text text="developer"/>

		<Label text=""/>

		<Label text="Local Job Title"/>
		<Text text="{company>role}"/>

	</forms:SimpleForm>

</mvc:View>
webapp/Sharedblocks/employment/Employment.js
sap.ui.define(['sap/uxap/BlockBase'],
	function (BlockBase) {
		"use strict";

	var oBlockPhoneNumber = BlockBase.extend("assignment.SharedBlocks.employment.Employment", {
			metadata: {}
		});
		return BlockPhoneNumber;
	});
Once you create view and controller import them in our object page as shown in the below image.

Importing views to object page
Here is the final output.

Note:- We are writing headerTitle, ObjectPageDynamicHeaderTitle and section inside ObjectPageLayout Controller.
To bind respective model data object to Object page layout fetch the id of objectPageLayout control in your controller as shown in below code and bind it using element binding.
 onItemPress:function(oEvent){
        var sSpath = oEvent.getParameter('listItem').getBindingContextPath();
        let oObjectPage = this.getView().byId("objectPageLayoutId");
        objectPage.bindElement("company>"+spath+"/");
       }
Kind regards,
Ganesh koppad.
如有侵权请联系:admin#unsafe.sh