1.Starlink
星链(Starlink)计划的设计理念,是通过约 4000 枚相互链接的卫星和依据地理分布的地面基站,构筑一个覆盖全球的廉价太空通信系统。
Starlink 采用的是国际电联规定的Ku、Ka频率,5G的频率是500MHz,卫星通信Ku波段加起来有1GHz。
一个卫星相当于很多基站,Starlink采用的是高通量技术,高通量卫星可以从一颗卫星上发射几十个覆盖波束,每个覆盖一小片,就像移动蜂窝似的,这样不同小区的频率就可以复用了,又提升几十倍的容量。
传统的卫星所有的终端最终都要落在地面站,通过地面站连入互联网。如果按照这个估算,这4000个卫星想要跑起来至少得4000个地面站。但是如果未来卫星的网络足够大,就没有那么多需要落地的信息了——全部由星间链路完成了。也就是,你通信的对端和你都是直连卫星的了。
感觉很多人对偏远地区定义有所误解,信号走Starlink的卫星会多出一段上下行延迟,额外路程就按340km轨道高度的两倍算,走地面光缆的速度大概是真空光通讯的2/3,也就是说即使是平原直线,信号源1400km之外理论上都是Starlink占优势。在北京上杭州,深圳,香港的网站都算是访问偏远地区,Starlink比起地面网络延迟更短更占优势。
其次,地面光缆在复杂地形上的布线成本是极其昂贵的,并不是什么地方都又平整人口又多。被复杂地形隔开的两个人口密集区,要快速数据通信怎么办?跨越青藏高原和喜马拉雅山几百公里无人区上建设起来的的成都-拉萨-日喀则-乃维拉-勒克瑙-新德里中印光缆,现在是将来也注定是建设维护成本极其昂贵的。在此之前要从斯里兰卡-新加坡-香港的海底光缆中转,绕的圈子和带宽限制更不用说了。但是Starlink成型以后,新德里和成都的直接通讯一点额外成本都没有。
Starlink 官网:
2.固件拆解
Starlink 用户终端 (UT) 的昵称是Dishy McFlatface,安装测试了一下Starlink 用户终端 ,发现下载速度高达 268 Mbps,上传速度高达 49 Mbps,速度还是不错的。


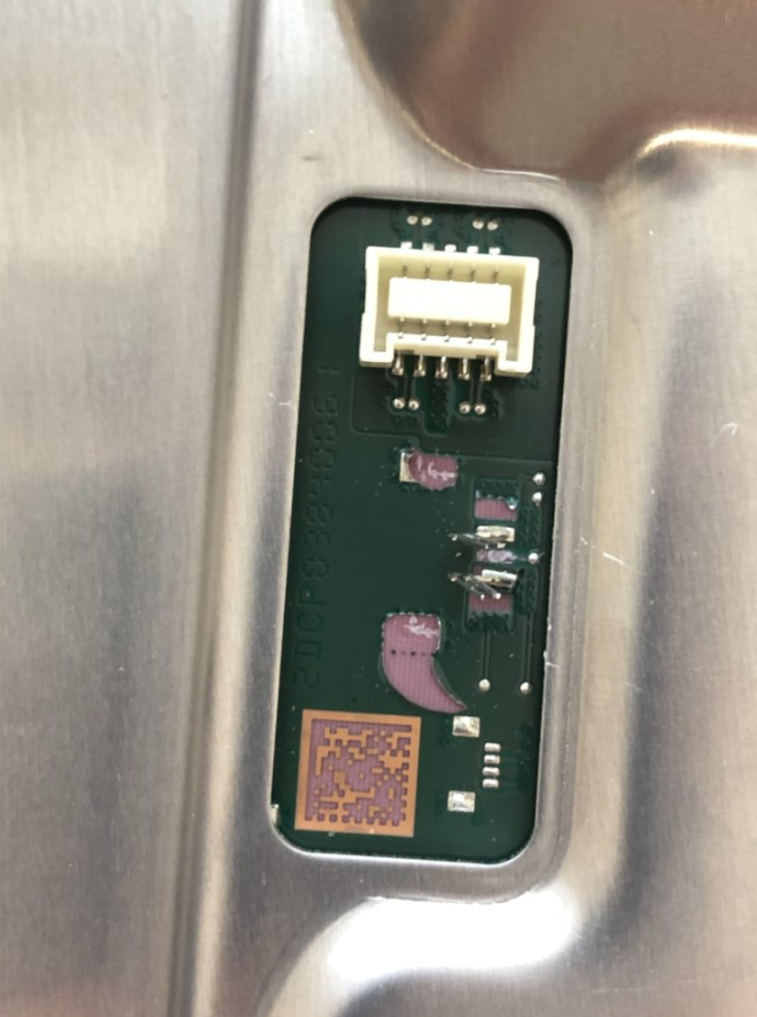
拆解Starlink 用户终端,我们主要关心SoC和固件文件,取下塑料盖后,可以看到覆盖在PCB上的金属屏蔽层,有一个以太网连接口,还有一个4针的 JST SH。

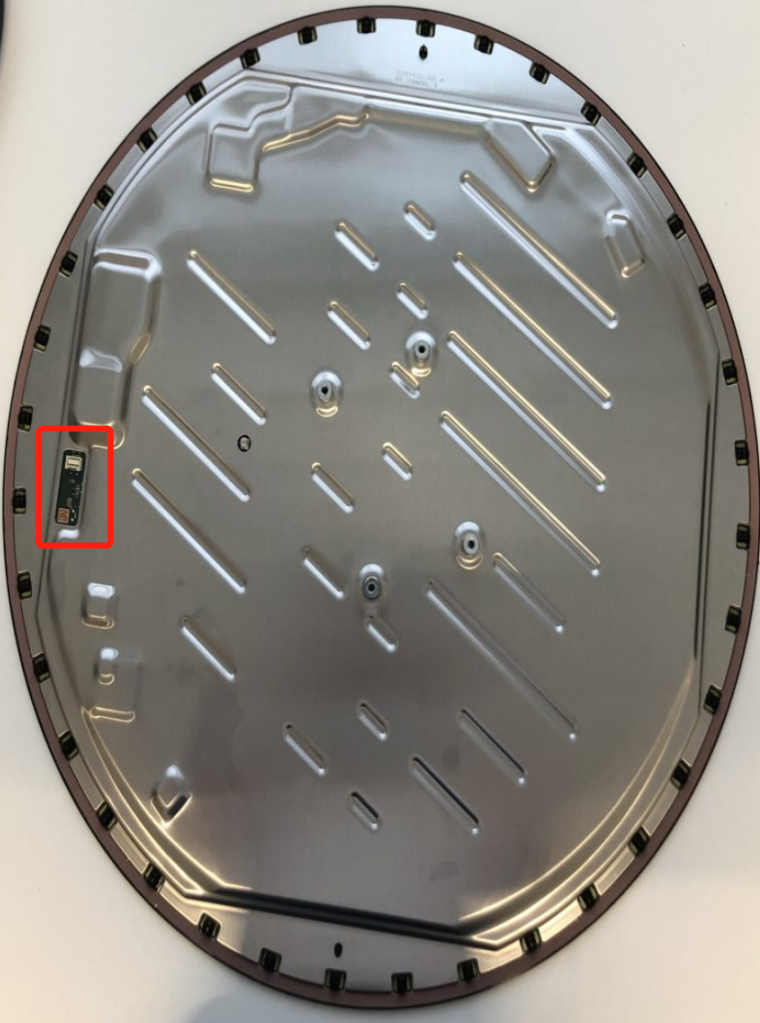

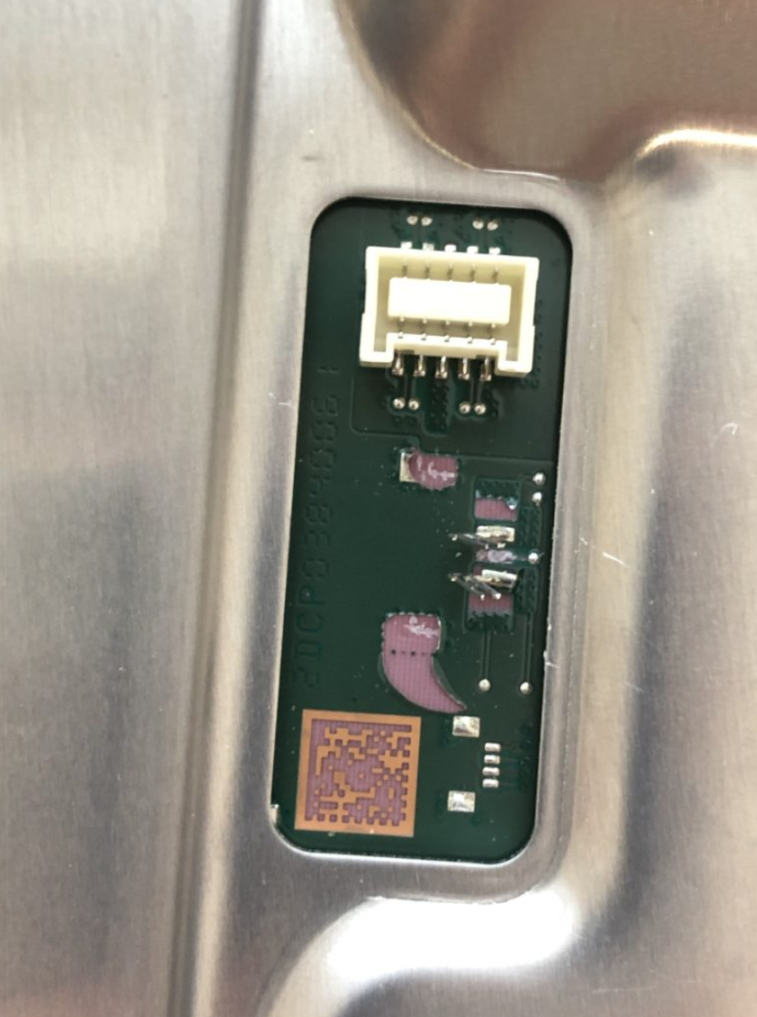
通过USB转TTL转换器将UT连接上,可以看到一些UT的启动信息,UT使用T-Boot引导加载程序,输入falcon后会中断引导过程,可以访问U-Boot CLI。
U-Boot 2020.04-gddb7afb (Apr 16 2021 - 21:10:45 +0000)

Model: Catson
DRAM:  1004 MiB
MMC:   Fast boot:eMMC: 8xbit - div2
stm-sdhci0: 0
In:    nulldev
Out:   serial
Err:   serial
CPU ID: 0x00020100 0x87082425 0xb9ca4b91
Detected Board rev: #rev2_proto2
sdhci_set_clock: Timeout to wait cmd & data inhibit
FIP1: 3 FIP2: 3
BOOT SLOT B
Net:   Net Initialization Skipped
No ethernet found.

                                                          *
                                                 +
                                       +    +
                                +     +
                           +      +
+ + + + +              +     +
  +        +       +     +
     +       + +      +
        +   +      +
          +      + +
      +      +        +
   +       +    +        +
 +       +         +        +
+ + + + +             + + + + +

Board: SPACEX CATSON UTERM

======================================
= Type 'falcon' to stop boot process =
======================================
继续执行引导过程,U-Boot会通过存储在eMMC上的ulmage FIT镜像文件加载内核、ramdisk、FDT。会检查内核、ramdisk、FDT的完整性(SHA256)和真实性(RSA 2048)。
UT从ROM引导加载程序到引导Linux系统初始化都实现了完整的可信引导链(TF-A)。
switch to partitions #0, OK
mmc0(part 0) is current device

MMC read: dev # 0, block # 98304, count 49152 ... 49152 blocks read: OK
## Loading kernel from FIT Image at a2000000 ...
   Using '[email protected]' configuration
   Verifying Hash Integrity ... sha256,rsa2048:dev+ OK
   Trying '[email protected]' kernel subimage
     Description:  compressed kernel
     Created:      2021-04-16  21:10:45 UTC
     Type:         Kernel Image
     Compression:  lzma compressed
     Data Start:   0xa20000dc
     Data Size:    3520634 Bytes = 3.4 MiB
     Architecture: AArch64
     OS:           Linux
     Load Address: 0x80080000
     Load Size:    unavailable
     Entry Point:  0x80080000
     Hash algo:    sha256
     Hash value:   5efc55925a69298638157156bf118357e01435c9f9299743954af25a2638adc2
   Verifying Hash Integrity ... sha256+ OK
## Loading ramdisk from FIT Image at a2000000 ...
   Using '[email protected]' configuration
   Verifying Hash Integrity ... sha256,rsa2048:dev+ OK
   Trying '[email protected]' ramdisk subimage
     Description:  compressed ramdisk
     Created:      2021-04-16  21:10:45 UTC
     Type:         RAMDisk Image
     Compression:  lzma compressed
     Data Start:   0xa2427f38
     Data Size:    8093203 Bytes = 7.7 MiB
     Architecture: AArch64
     OS:           Linux
     Load Address: 0xb0000000
     Load Size:    unavailable
     Entry Point:  0xb0000000
     Hash algo:    sha256
     Hash value:   57020a8dbff20b861a4623cd73ac881e852d257b7dda3fc29ea8d795fac722aa
   Verifying Hash Integrity ... sha256+ OK
   Loading ramdisk from 0xa2427f38 to 0xb0000000
WARNING: 'compression' nodes for ramdisks are deprecated, please fix your .its file!
## Loading fdt from FIT Image at a2000000 ...
   Using '[email protected]' configuration
   Verifying Hash Integrity ... sha256,rsa2048:dev+ OK
   Trying '[email protected]' fdt subimage
     Description:  rev2 proto 2 device tree
     Created:      2021-04-16  21:10:45 UTC
     Type:         Flat Device Tree
     Compression:  uncompressed
     Data Start:   0xa23fc674
     Data Size:    59720 Bytes = 58.3 KiB
     Architecture: AArch64
     Load Address: 0x8f000000
     Hash algo:    sha256
     Hash value:   cca3af2e3bbaa1ef915d474eb9034a770b01d780ace925c6e82efa579334dea8
   Verifying Hash Integrity ... sha256+ OK
   Loading fdt from 0xa23fc674 to 0x8f000000
   Booting using the fdt blob at 0x8f000000
   Uncompressing Kernel Image
   Loading Ramdisk to 8f848000, end 8ffffe13 ... OK
ERROR: reserving fdt memory region failed (addr=b0000000 size=10000000)
   Loading Device Tree to 000000008f836000, end 000000008f847947 ... OK
WARNING: ethact is not set. Not including ethprime in /chosen.

Starting kernel ...
可以看到内核命令参数、分区基地址、分区长度,还可以看到SoC包含4个CPU内核。
[    0.000000] 000: Detected VIPT I-cache on CPU0
[    0.000000] 000: Built 1 zonelists, mobility grouping on.  Total pages: 193536
[    0.000000] 000: Kernel command line: rdinit=/usr/sbin/sxruntime_start mtdoops.mtddev=mtdoops console=ttyAS0,115200 quiet alloc_snapshot trace_buf_size=5M rcutree.kthread_prio=80 earlycon=stasc,mmio32,0x8850000,115200n8 uio_pdrv_genirq.of_id=generic-uio audit=1 SXRUNTIME_EXPECT_SUCCESS=true blkdevparts=mmcblk0:[email protected](BOOTFIP_0),[email protected](BOOTFIP_1),[email protected](BOOTFIP_2),[email protected](BOOTFIP_3),[email protected](BOOTTERM1),[email protected](BOOTTERM2),[email protected](BOOT_A_0),[email protected](BOOT_B_0),[email protected](BOOT_A_1),[email protected](BOOT_B_1),[email protected](UBOOT_TERM1),[email protected](UBOOT_TERM2),[email protected](SXID),[email protected](KERNEL_A),[email protected](CONFIG_A),[email protected](KERNEL_B),[email protected](CONFIG_B),[email protected](SX_A),[email protected](SX_B),[email protected](VERSION_INFO_A),[email protected](VERSION_INFO_B),0x00020000
[    0.000000] 000: audit: enabled (after initialization)
[    0.000000] 000: Dentry cache hash table entries: 131072 (order: 9, 2097152 bytes, linear)
[    0.000000] 000: Inode-cache hash table entries: 65536 (order: 7, 524288 bytes, linear)
[    0.000000] 000: mem auto-init: stack:off, heap alloc:off, heap free:off
[    0.000000] 000: Memory: 746884K/786432K available (6718K kernel code, 854K rwdata, 1648K rodata, 704K init, 329K bss, 39548K reserved, 0K cma-reserved)
[    0.000000] 000: SLUB: HWalign=64, Order=0-3, MinObjects=0, CPUs=4, Nodes=1
[    0.000000] 000: ftrace: allocating 23664 entries in 93 pages
[    0.000000] 000: rcu: Preemptible hierarchical RCU implementation.
[    0.000000] 000: rcu:        RCU event tracing is enabled.
[    0.000000] 000: rcu:        RCU restricting CPUs from NR_CPUS=8 to nr_cpu_ids=4.
[    0.000000] 000: rcu:        RCU priority boosting: priority 80 delay 500 ms.
[    0.000000] 000: rcu:        RCU_SOFTIRQ processing moved to rcuc kthreads.
[    0.000000] 000:     No expedited grace period (rcu_normal_after_boot).
[    0.000000] 000:     Tasks RCU enabled.
[    0.000000] 000: rcu: RCU calculated value of scheduler-enlistment delay is 100 jiffies.
[    0.000000] 000: rcu: Adjusting geometry for rcu_fanout_leaf=16, nr_cpu_ids=4
[    0.000000] 000: NR_IRQS: 64, nr_irqs: 64, preallocated irqs: 0
[    0.000000] 000: random: get_random_bytes called from start_kernel+0x33c/0x4b0 with crng_init=0
[    0.000000] 000: arch_timer: cp15 timer(s) running at 60.00MHz (virt).
[    0.000000] 000: clocksource: arch_sys_counter: mask: 0xffffffffffffff max_cycles: 0x1bacf917bf, max_idle_ns: 881590412290 ns
[    0.000000] 000: sched_clock: 56 bits at 60MHz, resolution 16ns, wraps every 4398046511098ns
[    0.008552] 000: Calibrating delay loop (skipped), value calculated using timer frequency..
[    0.016871] 000: 120.00 BogoMIPS (lpj=60000)
[    0.021129] 000: pid_max: default: 32768 minimum: 301
[    0.026307] 000: Mount-cache hash table entries: 2048 (order: 2, 16384 bytes, linear)
[    0.034005] 000: Mountpoint-cache hash table entries: 2048 (order: 2, 16384 bytes, linear)
[    0.048359] 000: ASID allocator initialised with 32768 entries
[    0.050341] 000: rcu: Hierarchical SRCU implementation.
[    0.061390] 000: smp: Bringing up secondary CPUs ...
[    0.078677] 001: Detected VIPT I-cache on CPU1
[    0.078755] 001: CPU1: Booted secondary processor 0x0000000001 [0x410fd034]
[    0.095799] 002: Detected VIPT I-cache on CPU2
[    0.095858] 002: CPU2: Booted secondary processor 0x0000000002 [0x410fd034]
[    0.112970] 003: Detected VIPT I-cache on CPU3
[    0.113025] 003: CPU3: Booted secondary processor 0x0000000003 [0x410fd034]
[    0.113160] 000: smp: Brought up 1 node, 4 CPUs
[    0.113184] 000: SMP: Total of 4 processors activated.
UT完成启动后会出现登录提示:
Development login enabled: no

SpaceX User Terminal.
user1 login:
通过爆破猜测没有拿到登录凭证,只能换别的方式尝试了,UART shell不太可能能拿到。
3.eMMC 芯片
UT的后盖上有很多胶水,通过热风枪、撬片、异丙醇慢慢把后盖拆开了。先用热风枪加热一个角,然后用撬片慢慢弄开,再添加异丙醇使用热风枪继续加热,加快溶解就可以取下金属后盖了,这样就得到了完整的UT PCB。

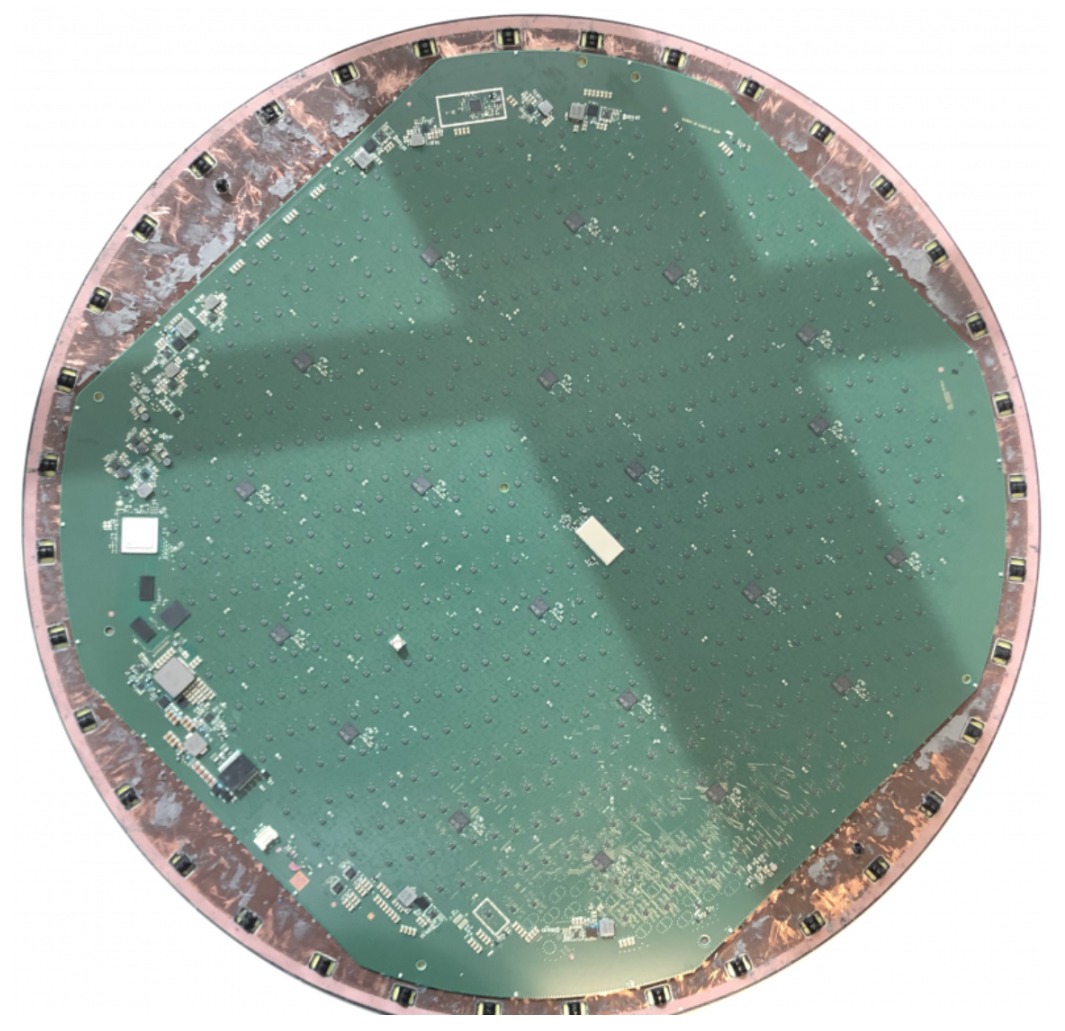
可以看到如下芯片(ST GLLCCOCA6BF),SoC使用的是eMMC芯片,存储介质是易失性 DRAM 存储和非易失性flash。
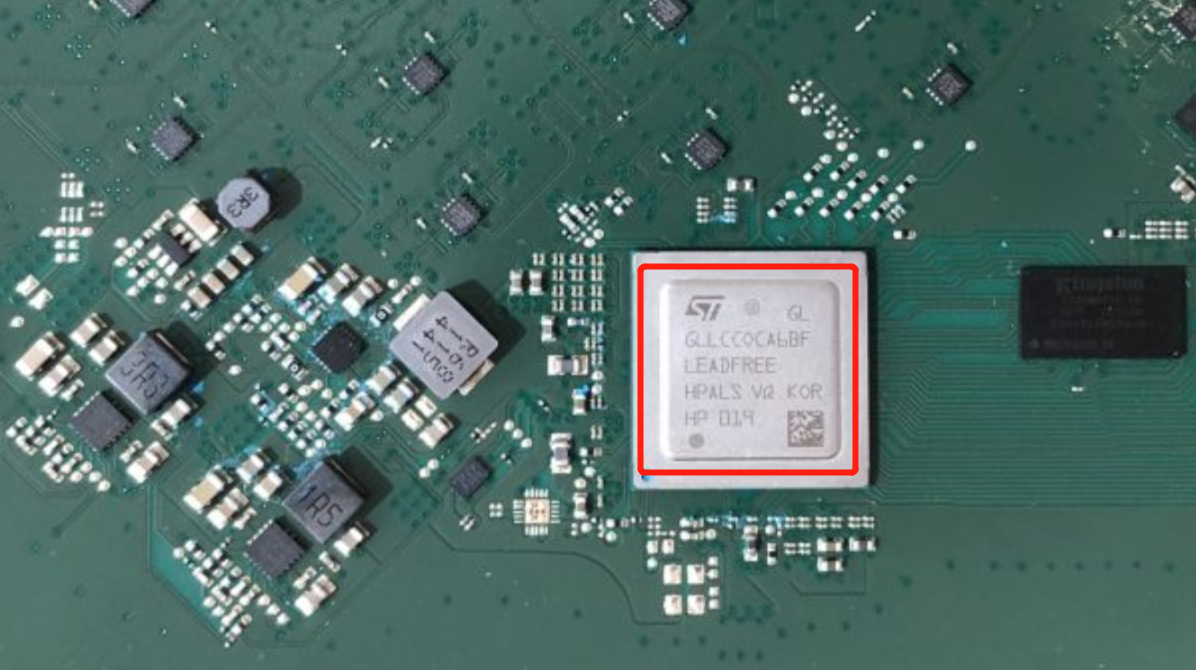
下面就是要识别eMMC的引脚点了,eMMC包括闪存和控制器,与SD比较类似,UT中使用的是带有封装标记 JY976 的 Micron eMMC 芯片,eMMC 芯片的部件号为 MTFC4GACAJCN-1M,尝试通过电信号转储eMMC,拆焊芯片可能会损坏UT和eMMC芯片。
eMMC芯片和SD卡相似的地方在于:eMMC 芯片最多支持 8 条数据线, SD 卡最多支持 4 条数据线。eMMC 芯片和 SD 卡都支持仅使用单条数据线,但代价是读、写速度较低。
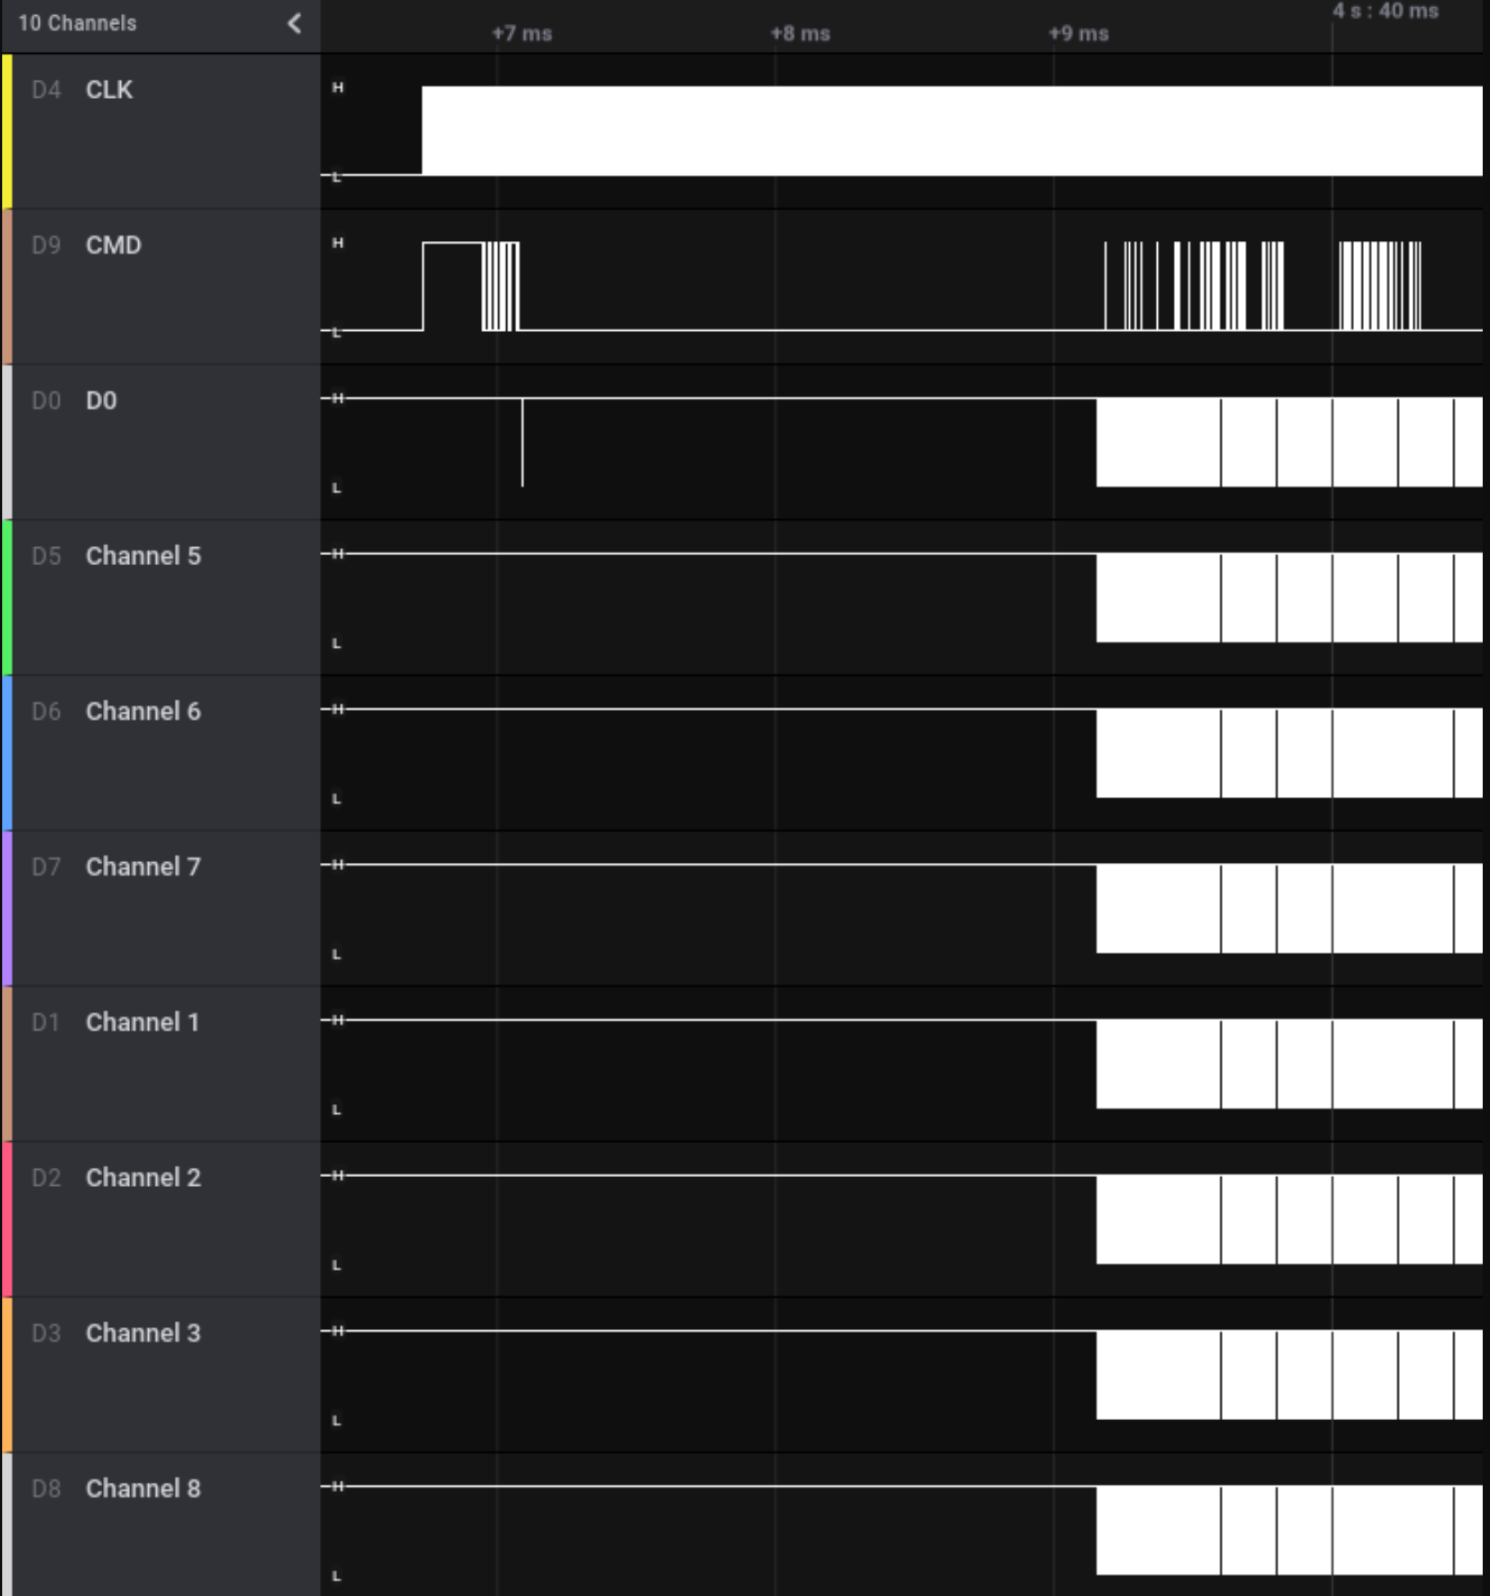
在线读取eMMC芯片需要识别CLK时钟信号、CMD命令信号、D0数据信号,SoC上的10个测试点可能包含以上信号点,所有10个测试点都串联了一个30欧姆的电阻。将一条短线焊接到每个测试点上,在UT启动的时候通过逻辑分析仪捕获信号。CLK信号是唯一会重复发送的信号,CMD是时钟信号翻转后的第一个激活的信号,D0发送数据的第一条数据信号,其余7条线路不需要确定。

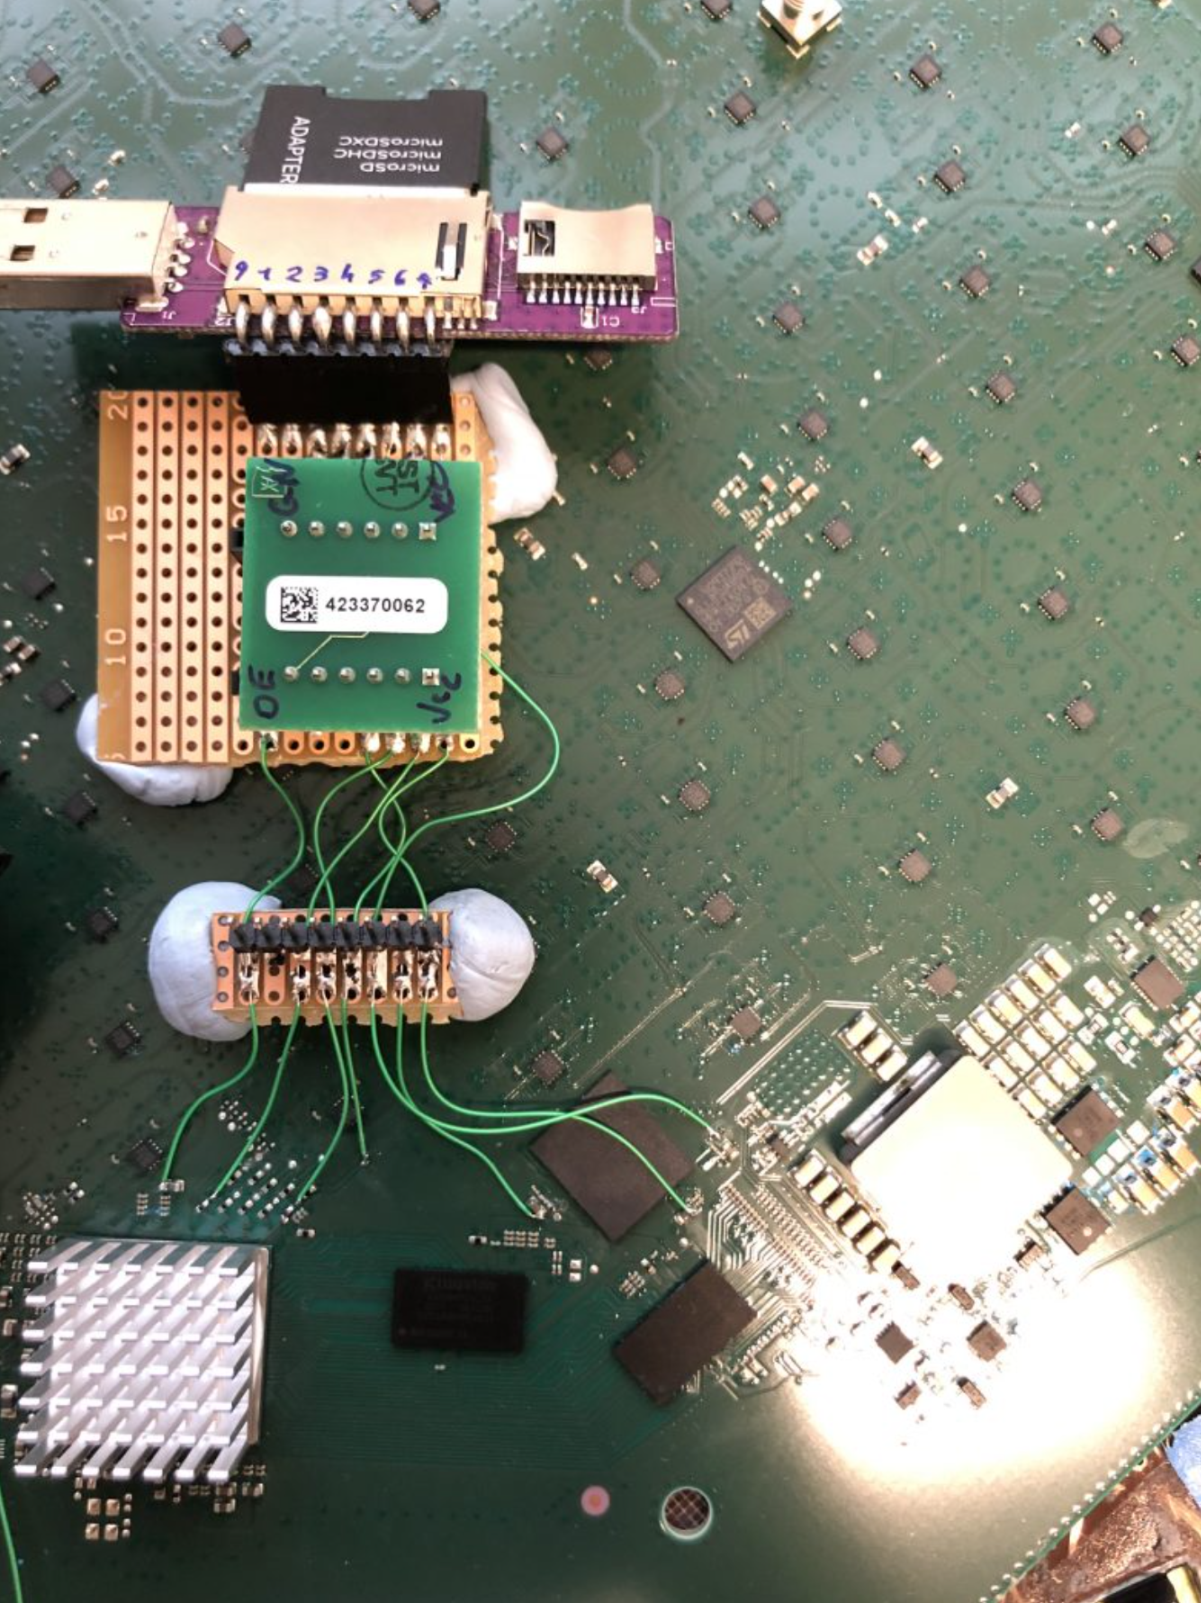
将读取器连接到eMMC芯片已识别的测试点上,读取器需要支持 1.8V IO,用于手机维修的读取器就可以,比如easy-JTAG 和 Medusa Pro。
eMMC 可以通过附近的两个去耦电容器供电,3.3V 由 SD 读卡器提供,1.8V 由我们的电源提供。
Binwalk无法提取完整的文件系统,需要手动进行分析,从引导日志中可以看到,U-Boot从块98304 开始加载 49152 个数据块。这意味着 U-Boot 从地址 0x3000000 开始读取 0x1800000 字节(块大小为 512 (0x200) 字节)。
从U-Boot的输出中发现,这块数据是FIT Image,使用dumpimage 工具读取FIT Image头信息没有成功,但是发现SpaceX 在 Github 上发布了 GPL 合规的 U-Boot 的修改版本:
https : //github.com/SpaceExplorationTechnologies
分析发现固件的某些部分以包含纠错码的自定义格式存储着ECC数据。
spacex_catson_boot.h中有设备启动的信息,下面的代码段是从 eMMC( mmc read8)读取数据的方法、startkernel 的定义。
#define SPACEX_CATSON_COMMON_BOOT_SETTINGS \
    "kernel_boot_addr=" __stringify(CATS_KERNEL_BOOT_ADDR) "\0" \
    "kernel_load_addr=" __stringify(CATS_KERNEL_LOAD_ADDR) "\0" \
    "kernel_offset_a=" __stringify(CATS_KERNEL_A_OFFSET) "\0" \
    "kernel_offset_b=" __stringify(CATS_KERNEL_B_OFFSET) "\0" \
    "kernel_size=" __stringify(CATS_KERNEL_A_SIZE) "\0" \
    "setup_burn_memory=mw.q " __stringify(CATS_TERM_SCRATCH_ADDR) " 0x12345678aa640001 && " \
        "mw.l " __stringify(CATS_TERM_LOAD_ADDR) " 0xffffffff " __stringify(CATS_BOOTTERM1_SIZE) " && " \
        "mw.l " __stringify(CATS_TERM_TOC_SER_ADDR) " " __stringify(CATS_TERM_TOC_SER_VAL) "\0" \
    "startkernel=unecc $kernel_load_addr $kernel_boot_addr && bootm $kernel_boot_addr${boot_type}\0" \
    "stdin=nulldev\0"


#define SPACEX_CATSON_BOOT_SETTINGS \
    SPACEX_CATSON_COMMON_BOOT_SETTINGS \
    "_emmcboot=mmc dev " __stringify(CATS_MMC_BOOT_DEV) " " __stringify(CATS_MMC_BOOT_PART) " && " \
        "mmc read8 $kernel_load_addr ${_kernel_offset} $kernel_size && " \
        "run startkernel\0" \
    "emmcboot_a=setenv _kernel_offset $kernel_offset_a && run _emmcboot\0" \
    "emmcboot_b=setenv _kernel_offset $kernel_offset_b && run _emmcboot\0"
startkernel会将加载的内核地址传递给unecc,unecc会对eMMC读取的数据进行数据纠错。
U_BOOT_CMD(
    unecc, 3, 0, do_unecc,
    "Unpacks an ECC volume; increments internal ECC error counter on error",
    "< source > < target > \n"
    "\tReturns successfully if the given source was successfully\n"
    "\tunpacked to the target. This will fail if the given source\n"
    "\tis not an ECC volume. It will succeed if bit errors were\n"
    "\tsuccessfully fixed.\n"
    "\t< source > and < target > and  should both be in hexadecimal.\n"
);
UNCC命令调用UNECC.C中实现的DO_UNECC函数,最终会调用ECC.C中定义的ECC_DECODE_ONE_PASS函数。
/**
 * Decodes an ECC protected block of memory. If the enable_correction
 * parameter is zero, it will use the MD5 checksum to detect errors and will
 * ignore the ECC bits. Otherwise, it will use the ECC bits to correct any
 * errors and still use the MD5 checksum to detect remaining problems.
 *
 * @data:       Pointer to the input data.
 * @size:       The length of the input data, or 0 to read until the
 *          end of the ECC stream.
 * @dest:       The destination for the decoded data.
 * @decoded[out]:   An optional pointer to store the length of the decoded
 *          data.
 * @silent:     Whether to call print routines or not.
 * @enable_correction:  Indicates that the ECC data should be used
 *          to correct errors. Otherwise the MD5 checksum
 *          will be used to check for an error.
 * @error_count[out]:   Pointer to an integer that will be incremented
 *          by the number of errors found. May be NULL.
 *          Unused if !enable_correction.
 *
 * Return: 1 if the block was successfully decoded, 0 if we had a
 * failure, -1 if the very first block didn't decode (i.e. probably
 * not an ECC file)
 */
static int ecc_decode_one_pass(const void *data, unsigned long size, void *dest,
                   unsigned long *decoded, int silent,
                   int enable_correction, unsigned int *error_count)
ecc.h 有几个相关定义:
#else /* !NPAR */
#define NPAR            32
#endif /* NPAR */

/*
 * These options must be synchronized with the userspace "ecc"
 * utility's configuration options. See ecc/trunk/include/ecc.h in the
 * "util" submodule of the platform.
 */
#define ECC_BLOCK_SIZE      255
#define ECC_MD5_LEN     16
#define ECC_EXTENSION       "ecc"
#define ECC_FILE_MAGIC      "SXECCv"
#define ECC_FILE_VERSION    '1'
#define ECC_FILE_MAGIC_LEN  (sizeof(ECC_FILE_MAGIC) - 1)
#define ECC_FILE_FOOTER_LEN sizeof(file_footer_t)
#define ECC_DAT_SIZE        (ECC_BLOCK_SIZE - NPAR - 1)

#define ECC_BLOCK_TYPE_DATA '*'
#define ECC_BLOCK_TYPE_LAST '$'
#define ECC_BLOCK_TYPE_FOOTER   '!'
Binwalk能够获取表示特定文件开始的Magic值,但是文件的每个块都有额外的数据,因此Binwalk无法进行提取,编写python脚本删除额外的ECC数据后就可以用dumpimage提取FIT image了。
下面是一部分转储的image输出文件,FIT包含13个引导配置,所有配置都使用了相同的内核和 initramfs 映像。
FIT description: Signed dev image for catson platforms
Created:         Fri Apr 16 23:10:45 2021
 Image 0 ([email protected])
  Description:  compressed kernel
  Created:      Fri Apr 16 23:10:45 2021
  Type:         Kernel Image
  Compression:  lzma compressed
  Data Size:    3520634 Bytes = 3438.12 KiB = 3.36 MiB
  Architecture: AArch64
  OS:           Linux
  Load Address: 0x80080000
  Entry Point:  0x80080000
  Hash algo:    sha256
  Hash value:   5efc55925a69298638157156bf118357e01435c9f9299743954af25a2638adc2

Image 12 ([email protected])
  Description:  rev2 proto 2 device tree
  Created:      Fri Apr 16 23:10:45 2021
  Type:         Flat Device Tree
  Compression:  uncompressed
  Data Size:    59720 Bytes = 58.32 KiB = 0.06 MiB
  Architecture: AArch64
  Load Address: 0x8f000000
  Hash algo:    sha256
  Hash value:   cca3af2e3bbaa1ef915d474eb9034a770b01d780ace925c6e82efa579334dea8

 Image 15 ([email protected])
  Description:  compressed ramdisk
  Created:      Fri Apr 16 23:10:45 2021
  Type:         RAMDisk Image
  Compression:  lzma compressed
  Data Size:    8093203 Bytes = 7903.52 KiB = 7.72 MiB
  Architecture: AArch64
  OS:           Linux
  Load Address: 0xb0000000
  Entry Point:  0xb0000000
  Hash algo:    sha256
  Hash value:   57020a8dbff20b861a4623cd73ac881e852d257b7dda3fc29ea8d795fac722aa

Default Configuration: '[email protected]'
 Configuration 0 ([email protected])
  Description:  default
  Kernel:       [email protected]
  Init Ramdisk: [email protected]
  FDT:          [email protected]
  Sign algo:    sha256,rsa2048:dev
  Sign value:   bb34cc2512d5cd3b5ffeb5acace0c1b3dd4d960be3839c88df57c7aeb793ad73a74e87006efece4e9f1e31edbb671e2c63dc4cdcb1a2f55388d83a11f1074f21a1e48d81884a288909eb0c9015054213e5e74cbcc6a6d2617a720949dcac3166f1d01e3c2465d8e7461d14288f1a0abef22f80e2745e7f8499af46e8c007b825d72ab494f104df57433850f381be793bfe06302473269d2f45ce2ff2e8e4439017c0a94c5e7c6981b126a2768da555c86b2be136d4f5785b83193d39c9469bd24177be6ed3450b62d891a30e96d86eee33c2cbfc549d3826e6add36843f0933ced7c8e23085ee6106e3cc2af1e04d2153af5f371712854e91c8f33a4ea434269
从 U-Boot 代码 ( spacex_catson_uterm.c) 可以清楚地看出,引导配置是根据 5 个 GPIO 引脚的状态决定的。
/**
   * Check board ID GPIOs to find board revision.
   * The board IDs are mapped as follows
   * id_b0:pio12[2]
   * id_b1:pio12[3]
   * id_b2:pio12[0]
   * id_b3:pio12[1]
   * id_b4:pio20[4]
   */
  u32 pio12 = readl(BACKBONE_PIO_A_PIO2_PIN);
  u32 pio20 = readl(BACKBONE_PIO_B_PIO0_PIN);
  u32 board_id = (((pio12 >> 2) & 1) << 0) |
             (((pio12 >> 3) & 1) << 1) |
         (((pio12 >> 0) & 1) << 2) |
         (((pio12 >> 1) & 1) << 3) |
         (((pio20 >> 4) & 1) << 4);
  /*
   * https://confluence/display/satellites/User+Terminal%3A+Catson+ID+Bits
   */
  switch (board_id)
  {
    case 0b11111:
      board_rev_string = BOARD_REV_1_1P3;
      break;
    case 0b11100:
      board_rev_string = BOARD_REV_1_2P1;
      break;
    case 0b11000:
      board_rev_string = BOARD_REV_1_2P2;
      break;
    case 0b10100:
      board_rev_string = BOARD_REV_1_3P0;
      break;
    case 0b10000: /* rev1 pre-production */
      board_rev_string = BOARD_REV_1_PRE_PROD;
      break;
    case 0b11110: /* rev1 production */
      board_rev_string = BOARD_REV_1_PROD;
      break;
    case 0b00001:
      board_rev_string = BOARD_REV_2_0P0;
      break;
    case 0b00010:
      board_rev_string = BOARD_REV_2_1P0;
      break;
    case 0b00011:
      board_rev_string = BOARD_REV_2_2P0;
      break;
  }
}

printf("Detected Board rev: %s\n", board_rev_string);
公开售卖的 Starlink UT 禁用了登录提示:
root:*:10933:0:99999:7:::
bin:*:10933:0:99999:7:::
daemon:*:10933:0:99999:7:::
sync:*:10933:0:99999:7:::
halt:*:10933:0:99999:7:::
uucp:*:10933:0:99999:7:::
operator:*:10933:0:99999:7:::
ftp:*:10933:0:99999:7:::
nobody:*:10933:0:99999:7:::
sshd:*:::::::
UT中包含STMicroelectronics STSAFE组件,可能是用于远程验证 UT 的。SoC上使用的是四核 Cortex-A53 处理器,每个核都被分配了一个特定的任务。
############################
# System Information
############################
#
# The user terminal phased-array computers are Catson SoCs with a quad-core
# Cortex-A53.
#
# We dedicate one core to control, while leaving the other three to handle
# interrupts and auxiliary processes.
#
#   CPU 0: Control process.
#   CPU 1: Lower-MAC RX process.
#   CPU 2: Lower-MAC TX process.
#   CPU 3: PhyFW and utility core - interrupts, auxiliary processes, miscellaneous
已经能够在Starlink UT上获取 root shell了,但是此技术现在还不会公开。
参考资料:
[1] MikeOnSpace – Starlink Dish TEARDOWN! – Part 1 – https://youtu.be/QudtSo5tpLk
[2] Ken Keiter – Starlink Teardown: DISHY DESTROYED! – https://youtu.be/iOmdQnIlnRo
[3] The Signal Path – Starlink Dish Phased Array Design, Architecture & RF In-depth Analysis – https://youtu.be/h6MfM8EFkGg
[4] MikeOnSpace – Starlink Dish TEARDOWN! – Part 2 – https://youtu.be/38_KTq8j0Nw
[5] Colin O’Flynn – Starlink Dishy (Rev2 HW) Teardown Part 1 – UART, Reset, Boot Glitches – https://youtu.be/omScudUro3s
[6] Brendan I. Koerner – The Teens Who Hacked Microsoft’s Xbox Empire – https://www.wired.com/story/xbox-underground-videogame-hackers/
[7] Jack Rhysider – Darknet Diaries EP 45: XBOX UNDERGROUND (PART 1) – https://darknetdiaries.com/episode/45/
本文翻译自:https://www.esat.kuleuven.be/cosic/blog/dumping-and-extracting-the-spacex-starlink-user-terminal-firmware/如若转载,请注明原文地址
如有侵权请联系:admin#unsafe.sh