2022-7-25 12:42:0 Author: code.tutsplus.com(查看原文) 阅读量:12 收藏
As Android developers, we tend to focus primarily on the functionality of our apps. Functionality alone, however, is rarely enough. On Google Play, which hosts well over a million apps today, looks are just as important as functionality, if not more. If you find that hard to believe, I suggest you take a quick look at the apps in the Top Charts section of Google Play.
There are two approaches to modifying the look of Android apps. The first approach involves directly modifying the properties of views in layout XML files. This approach is feasible only if you are working on a simple app that has a small number of views and activities. The second approach involves creating and using custom styles and themes. If you are familiar with web development, the first approach is akin to using inline CSS styles, and the second approach is akin to using style sheets.
In this tutorial, you'll learn how to create custom styles and themes for your Android apps. You'll also learn how to use Android Studio's tools and shortcuts that facilitate style creation.
1. Creating Styles
Styles are obviously applied to UI components. Therefore, let's start by creating a new empty activity and adding two views to its layout XML file.
<View android:layout_width="100dp"
    android:layout_height="100dp"
    android:layout_margin="5dp"
    android:background="#009688"
    android:id="@+id/box1" />

<View android:layout_width="100dp"
    android:layout_height="100dp"
    android:background="#00BCD4"
    android:layout_margin="5dp"
    android:id="@+id/box2" />
As you can see in the above code, properties such as layout_width and layout_margin are explicitly included in the definition of each view.
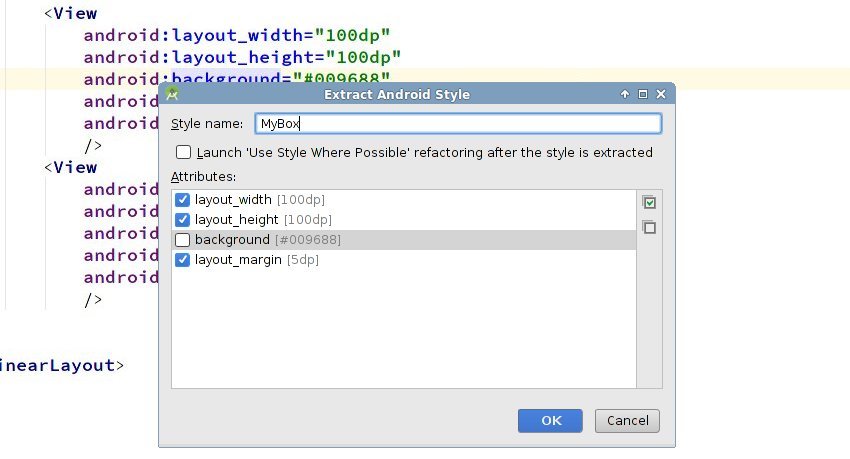
To create a new style for the first view, right click on it and select Refactor > Extract > Style.
You will now see a dialog where you can give a name to the style and also select the attributes that should be included in it. Let the name be MyBox and select all the attributes except background.


When you press OK, you'll see that the code for the first view has changed.
<View android:background="#009688"
    android:id="@+id/box1"
    style="@style/MyBox" />
The view now has a style attribute that points to the MyBox style. You can take a look at the definition of the style by opening res/values/styles.xml.
<style name="MyBox">
    <item name="android:layout_width">100dp</item>
    <item name="android:layout_height">100dp</item>
    <item name="android:layout_margin">5dp</item>
</style>
Once a style has been created, it can be applied to any view. For example, here's how you would apply MyBox to the second view:
<View android:background="#00BCD4"
    android:id="@+id/box2"
    style="@style/MyBox" />
With the styles applied, here's what the two views look like in an activity:


2. Extending Styles
Android allows you to create styles that use other styles as a foundation. In other words, it allows you to extend existing styles.
There are two different syntaxes you can follow while extending a style. The first syntax is often called the implicit syntax and uses a dot notation. For example, here's how you create two derived styles, called TEAL and CYAN, using MyBox as the parent style:
<style name="MyBox.TEAL">
    <item name="android:background">#009688</item>
</style>

<style name="MyBox.CYAN">
    <item name="android:background">#00BCD4</item>
</style>
As you might have guessed, both MyBox.TEAL and MyBox.CYAN have all the properties of MyBox. In addition to those, they have the android:background property.
The second syntax for creating a derived style is usually referred to as the explicit syntax. It involves using a parent attribute whose value is set to the name of the parent style. Here's a code snippet that defines a style called TealBox.
<style name="TealBox" parent="MyBox">
    <item name="android:background">#009688</item>
</style>
Applying derived styles is no different from applying normal ones.
<View android:id="@+id/box1"
    style="@style/TealBox" />

<View android:id="@+id/box2"
    style="@style/MyBox.CYAN" />
Most developers use the implicit syntax while extending their own styles, and the explicit syntax while extending platform styles.
3. Creating Themes
All this while, we've only been applying styles to views that are inside an activity. Android allows you to apply styles to entire activities and applications too. When a style is applied to an activity or application, it becomes a theme.
By default, all apps created using the latest version of Android Studio use a theme called AppTheme. AppTheme is a descendant of the well-known AppCompat theme, a large and very comprehensive theme that can affect the looks of almost all the commonly used views.
You can find the definition of AppTheme in styles.xml:
<!-- Base application theme. -->
<style name="AppTheme" parent="Theme.AppCompat.Light.DarkActionBar">
    <item name="colorPrimary">@color/colorPrimary</item>
    <item name="colorPrimaryDark">@color/colorPrimaryDark</item>
    <item name="colorAccent">@color/colorAccent</item>
</style>
AppTheme follows Material Design. Therefore, in order to create your own themes that conform to the Material Design spec, using AppTheme as a parent is always a good idea. Alternatively, you could directly use Theme.AppCompat as a parent.
Although you can always create themes by writing XML code—remember, they are just styles—in this tutorial, I'm showing you how to use Android Studio's Theme Editor to do all the hard work for you.
To open the Theme Editor, open the Tools menu and select Android > Theme Editor.
On the right-hand side of the Theme Editor window, you have controls not only to modify themes, but also to create new ones. The left-hand side shows you a preview of the results of the modifications you make to the themes.


To create a new theme, click on the Theme drop-down menu and select the Create New Theme option.
In the dialog that pops up, set the name of the new theme to MyTheme and press OK.


At this point, styles.xml will have a new line that looks like this:
<style name="MyTheme" parent="AppTheme" />
Let us now modify MyTheme using the Theme Editor. To keep things simple, in this tutorial we'll be modifying the values of the colorPrimary, colorPrimaryDark, and colorAccent attributes only.
To modify the value of colorPrimary, click on the colorPrimary button. The Theme Editor will now show you a dialog containing a color picker. Choose any color you want, but make sure that you give it a new name. If you forget to do so, the Theme Editor will overwrite the color used by AppTheme.


Follow the same steps to modify the values of colorPrimaryDark and colorAccent. The Theme Editor will automatically use the color you chose for colorPrimary to suggest appropriate colors for both colorPrimaryDark and colorAccent.
The definition of MyTheme would now look like this:
<style name="MyTheme" parent="AppTheme" >
    <item name="colorPrimary">@color/colorPrimaryMyTheme</item>
    <item name="colorPrimaryDark">@color/colorPrimaryDarkMyTheme</item>
    <item name="colorAccent">@color/colorAccentMyTheme</item>
</style>
4. Applying Themes
Before we apply the theme we created, let us add a few commonly used views to the activity. Doing so will make it easier for us to notice the effects of the theme.
The following code creates a normal Button, a borderless Button, a colored Button, a Checkbox, a RadioButton, a Switch, a Seekbar, a TextView, and an EditText.
<Button android:layout_width="match_parent"
    android:layout_height="wrap_content"
    android:text="normal"
    android:id="@+id/normal_button" />

<Button android:layout_width="match_parent"
    android:layout_height="wrap_content"
    android:text="borderless"
    android:id="@+id/borderless_button"
    style="@style/Widget.AppCompat.Button.Borderless" />

<Button android:layout_width="match_parent"
    android:layout_height="wrap_content"
    android:text="colored"
    android:id="@+id/colored_button"
    style="@style/Widget.AppCompat.Button.Colored" />

<CheckBox android:layout_width="match_parent"
    android:layout_height="wrap_content"
    android:text="New CheckBox"
    android:id="@+id/checkBox" />

<RadioButton android:layout_width="match_parent"
    android:layout_height="wrap_content"
    android:text="New RadioButton"
    android:id="@+id/radioButton" />

<Switch android:layout_width="match_parent"
    android:layout_height="wrap_content"
    android:text="New Switch"
    android:id="@+id/switchButton" />

<SeekBar android:layout_width="match_parent"
    android:layout_height="wrap_content"
    android:id="@+id/seekBar" />

<TextView android:layout_width="match_parent"
    android:layout_height="wrap_content"
    android:text="New Text"
    android:id="@+id/textView" />

<EditText android:layout_width="match_parent"
    android:layout_height="wrap_content"
    android:id="@+id/editText"
    android:hint="Input" />
With all the newly added views, the layout will look like this:


If you've read the Material Design spec, I'm sure you can tell that the activity currently uses shades of indigo for colorPrimary and colorPrimaryDark. For colorAccent, it uses a shade of pink. Those are the default colors specified by Android Studio. You can find their hex equivalents in your project's res/values/colors.xml.
To apply MyTheme, the theme we created in the previous step, to your activity, open your project's manifest file and add an android:theme attribute to the activity's definition. Set its value to @style/MyTheme.
<activity android:name=".MainActivity"
    android:theme="@style/MyTheme">
    <intent-filter>
        <action android:name="android.intent.action.MAIN" />
        <category android:name="android.intent.category.LAUNCHER" />
    </intent-filter>
</activity>
Similarly, you can apply the theme to your entire application by setting the value of the android:theme attribute of the application's definition to @style/MyTheme.
If you take a look at your activity now, it should look very different.


Conclusion
In this tutorial, you learned how to create and apply custom Android styles and themes. Feel free to use this knowledge to give new and better looks to your apps. However, try not to get too carried away—most Android users today are so accustomed to Material Design that deviating from its guidelines can annoy them.
To learn more about styles and themes, I suggest you go through the Styles and Themes Guide.
如有侵权请联系:admin#unsafe.sh