Critical errors on any system can be extremely frustrating. But if you’ve recently encountered the “There has been a critical error on your website” message on your WordPress site, don’t fret!
In many cases, critical errors are the result of conflicts in plugins, theme files, or PHP related issues. This is one of the most common errors WordPress administrators can encounter and there are a number of ways you can resolve it.
In today’s post, I’ll go over the steps you can take to quickly find and fix the critical error on your WordPress site to get your site back up and running. I’ll also outline why the error happens in the first place and how to avoid critical errors in the future.
Let’s dig in!
Contents:
- What is the critical error in WordPress?
- Why does the critical error happen?
- How to fix the critical error message on WordPress
What is the critical error in WordPress?
The “There Has Been a Critical Error on Your Website” message in WordPress means there’s a fatal PHP error on your site during code execution. This happens when a PHP script stops running and is unable to complete its process.
This error essentially tells you that WordPress has either failed to load core files or some other additional plugin or theme functionality, which can be attributed to resource limitations, code-related errors, or even malware.
Why does the critical WordPress error happen?
The reasons for this issue can usually be traced back to one of the following problems:
- Issues in the WordPress Core Files: If any of your WordPress core files have become corrupted or are missing you will likely receive critical errors. These messages can also occur if you have unsuccessfully updated your website or tampered with any core files.
- Broken Theme Files or Plugin Malfunction: In some cases, corrupted WordPress themes or plugin files can also result in website errors. Many of the best WordPress plugins and themes are thoroughly tested and are not as likely to result in errors. But plugin conflicts and custom code can certainly result in critical error messages.
- Syntax Errors: Custom code can inadvertently lead to issues that break normal PHP code execution, especially if they contain accidental syntax errors or paths with unsafe characters. Check for any recent modifications or changes in your website environment to locate possible syntax errors in your code.
- Malware Infections: Some malware infections can lead to critical errors in WordPress. You’ll want to scan your website for malware and clean up any malicious code that’s present in the environment.
- PHP Memory Limits: Website owners often encounter critical errors when trying to upload media or performing tasks, which can indicate that PHP has reached its predefined limits while executing a specific script.
- Outdated PHP Version: If your site is using a PHP version lower than 7.4, you’ll likely be on the receiving end of critical website errors. And if you’re using PHP 5.x, you’ll absolutely want to upgrade as soon as possible to avoid conflicts.
- Incompatible PHP Version: Some websites rely on the usage of old, legacy, or sometimes custom code that was designed using an older version of PHP. Upgrading the PHP to a more recent (and safer) version can sometimes cause older websites to break.
How to fix the critical error message on WordPress
There are a number of steps you’ll need to take to pinpoint the root cause of the issue and fix the critical error in WordPress. Let’s get started!
1 – Check Your Admin Email Inbox for Instructions
If you have access to your admin email, the first step is to check your inbox.
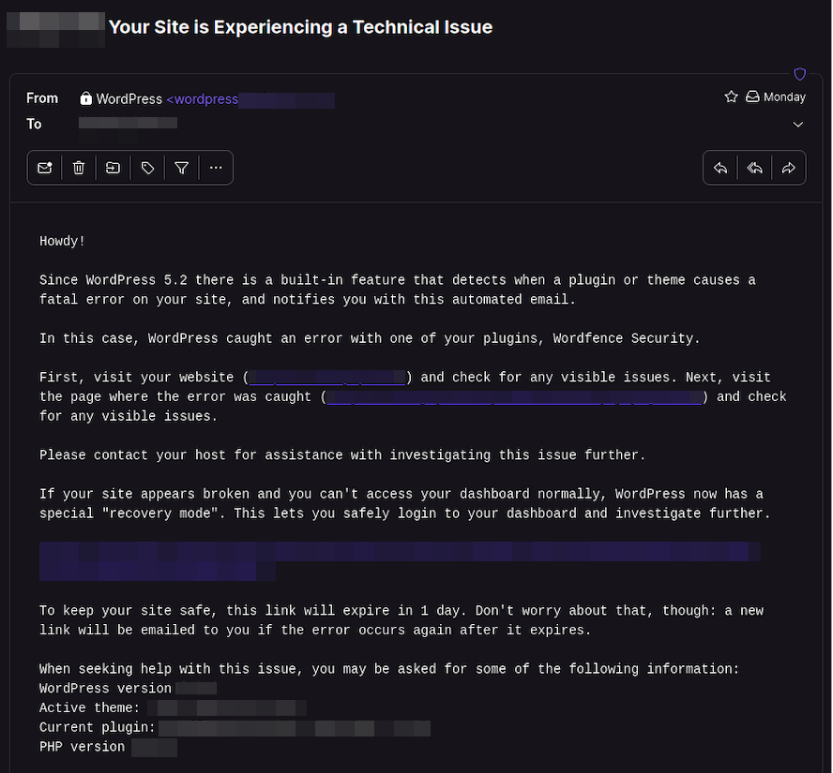
You should receive an email from WordPress with crucial information about the problem. This email notification will contain the subject line “Your Site Is Experiencing a Technical Issue” and include details about any plugin conflicts or issues that WordPress has identified.
From this email, you’ll also find a convenient link that allows you to access your WordPress website in recovery mode (first introduced in WordPress 5.2) to fix the problem:
To access your website in recovery mode:
- Click on the link for recovery mode in the email.
- Log in with your credentials.
- Navigate to your WordPress dashboard.
Congrats, you’ve just enabled recovery mode! From here, you’ll find notifications about the critical error, what caused it, and how to fix it. In many cases, this information will help you identify which plugin is causing a conflict.
Deactivate the component that’s causing the issue and try reinstalling a clean fresh version of the component. Alternatively, you can try installing a reputable alternative, or reaching out to the plugin developers to see if they can assist you. You can also exit recovery mode at any time to check and see if your WordPress website is working normally.
If you can’t access the troubleshooting email or it didn’t provide enough information to resolve the issue, then you’ll want to go to the next step and try enabling debugging for your site.
2 – Enable Debugging in WordPress
WordPress websites come bundled with a WordPress debug tool that makes it easy to see root causes for website errors – a feature known as WP_DEBUG.
To get started, enable WP_Debug to troubleshoot your website errors.
- Open your wp-config.php file: Log in to your FTP account and search for wp-config.php in your root WordPress directory.
- Find WP_DEBUG: Navigate to the line in your wp-config file where WP_DEBUG has been defined. If it’s disabled, it will look like this: define(‘WP_DEBUG’, false);
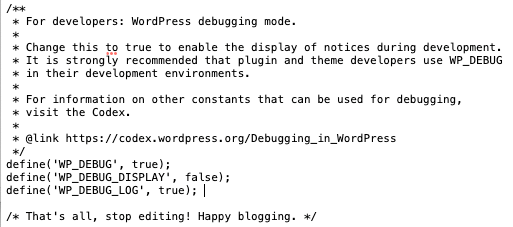
- Enable WP_DEBUG: Update your wp-config file with the following code:
define('WP_DEBUG', true);
define('WP_DEBUG_DISPLAY', false);
define('WP_DEBUG_LOG', true);
The parameter define(‘WP_DEBUG_LOG’, true); creates a file debug.log in the ./wp-content directory that you can reference at your leisure.
3 – Backup Your Website
Before making any changes to your website core files, you’ll want to backup your website. Correcting critical WordPress errors can sometimes get complicated and you don’t want to compound the issues you’re running into.
If you use SSH, you can easily backup your WordPress website for free with WP-CLI. Check out this short video for a tutorial:
4 – Check for Issues in the WordPress Core Files
Visit your website and then check the debug.log file in the ./wp-content directory for any PHP errors. Most often, these errors will reference the wp-includes or wp-admin files.
Here’s an example of a core file error you might encounter:
Fatal error: require(): Failed opening required '/home/user/public_html/wp-admin/custom-header.php'
If you happen to find an error here, then you’ll need to take steps to download and unzip the core files and replace the corrupted versions on your site. You can manually update individual core files or update the entire /wp-includes/ or /wp-admin/ folders in the WP installation directory.
5 – Check for Recently Modified Theme or Plugin Files
Conflicts between plugins or themes can sometimes lead to critical errors in WordPress.
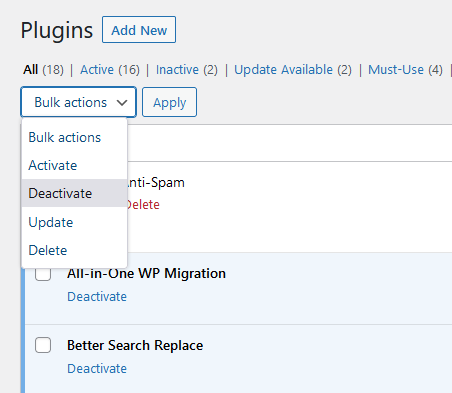
If you’ve recently installed or updated a new plugin or theme, try temporarily disabling these components from your admin panel.
 Next, enable them one by one to identify the source of the problem.
But my admin panel doesn’t load! What now?
The easiest way to modify your WordPress theme is inside your admin panel. But if your Admin panel isn’t loading, you can try reverting to a default theme from your database.
Before you get started, you’ll need to identify which default WordPress theme you have installed. Go to your File Manager then wp-content > themes folder. Jot down any default themes you find — for example “twentytwenty”, or “twentytwentyone”.
Now you’re ready to revert your theme.
To revert to a default theme in the WordPress database:
- Open your database in phpMyAdmin.
- From the menu on the left, click on your _options table.
- Locate the template and stylesheet rows. These are most commonly found on page 2.
- Replace the option_value for template with the default theme that is installed in your website. (ie. “twentytwenty”)
- Press enter to save.
- Replace the option_value for stylesheet with the default theme that is installed in your website.
- Press enter to save.
Next, check your website to identify if the theme is the culprit. You can also try reinstalling a fresh copy of your original theme to see if the issue is resolved.
If the theme is not the source of the problem, try your plugins next.
Rename wp-content/plugins to plugins-disabled. If that fixes the issue, then you know it’s one or more plugins on your website. You can troubleshoot further by renaming each individual plugin directory.
And if renaming the entire plugins directory doesn’t fix the issue, then you know that your plugins aren’t the root cause of the problem.
6 – Increase the PHP Memory Limit in WordPress
Your web server has a limited amount of memory (or RAM). Since WordPress sets a limit on the amount of memory each PHP script can use, this can result in critical errors when the limit is exceeded.
If your WordPress debug logs indicate something to the tune of “memory exhausted“, PHP’s memory limit is likely the culprit.
To increase your PHP limit:
- Open your wp-config.php file.
- Navigate to the bottom of the file and define your memory limit: define( ‘WP_MEMORY_LIMIT’, ‘128M’ );
- Save the file.
Next, check your website to see if the critical error resolves. You can also try increasing the memory limit to 256MB if the problem persists.
Be careful when increasing your PHP memory limits, however. If you set the memory limit too high, misconfigured scripts could slow down your website or you could run afoul of any memory limits imposed by your hosting provider.
7 – Update your PHP version
Up to date versions of WordPress require PHP version 7.4 as a bare minimum. So if you’re using an older version of PHP resolving the critical error may be as simple as upgrading PHP to version 7.4 or greater.
WordPress offers a handy chart showing which versions of PHP are going to work with the version of WordPress that you are using.
You can check which version you’re using by navigating to your WordPress dashboard then Tools > Site Health > Info. From here, expand the Server section to find details about your PHP version.
8 – Scan for Malware
Malware often leads to critical website errors, especially if strange PHP scripts are wreaking havoc in your environment. So, you’ll want to scan your website at the web page and server level to identify indicators of compromise, backdoors, and malicious scripts which may be causing problems.
You can scan your website for malware for free with SiteCheck. This can help you identify if there’s any outward signs of an infection in your external website source code.
Not all infections are outward facing. So you’ll want to also scan your website for malware at the server level to help identify any malicious PHP scripts, backdoors, and credit card skimmers that aren’t found at the page level.
If any malware is detected, you’ll need to clean up the infection to help resolve the critical error. You can check out our hacked WordPress guide for step-by-step instructions or reach out to our team for assistance with this step.
Conclusion
Critical errors in WordPress can occur for a myriad of reasons — but in many cases, they’re the result of conflicts in plugins, theme files, or PHP related issues.
If you have a pre-existing website back up, one of the fastest ways to resolve the problem is to simply roll back your site to its last known good configuration. But you may want to scan your website for indicators of compromise or malware that may have resulted in syntax errors, malicious PHP scripts, plugin conflicts or other issues which may be interrupting normal PHP execution.


