1 ECK 简介Kubernetes 是目前最受欢迎的容器编排技术,越来越多的应用开始往 Kubernetes 中迁移。Kubernetes 现有的 ReplicaSet、Deployment、Ser 2023-3-1 08:2:41 Author: Docker中文社区(查看原文) 阅读量:32 收藏
1 ECK 简介
Kubernetes 是目前最受欢迎的容器编排技术,越来越多的应用开始往 Kubernetes 中迁移。Kubernetes 现有的 ReplicaSet、Deployment、Service 等资源对象已经可以满足无状态应用对于自动扩缩容、负载均衡等基本需求。但是对于有状态的、分布式的应用,通常拥有各自的一套模型定义规范,例如 Prometheus,Etcd,Zookeeper,Elasticsearch 等等。部署这些分布式应用往往需要熟悉特定领域的知识,并且在扩缩容和升级时需要考虑如何保证应用服务的可用性等问题。为了简化有状态、分布式应用的部署,Kubernetes Operator 应运而生。
Kubernetes Operator 是一种特定的应用控制器,通过 CRD(Custom Resource Definitions,自定义资源定义)扩展 Kubernetes API 的功能,可以用它来创建、配置和管理特定的有状态应用,而不需要直接去使用 Kubernetes 中最原始的一些资源对象,比如 Pod,Deployment,Service 等等。
Elastic Cloud on Kubernetes(ECK) 是其中的一种 Kubernetes Operator,方便我们管理 Elastic Stack 家族中的各种组件,例如 Elasticsearch,Kibana,APM,Beats 等等。比如只需要定义一个 Elasticsearch 类型的 CRD 对象,ECK 就可以帮助我们快速搭建出一套 Elasticsearch 集群。
通过 ECK 我们还可以轻松实现:
管理和监控多个集群。 集群版本升级。 自动扩缩容。 冷热架构。 备份和快照。 自定义配置和插件。 默认提供安全保护。
2 版本支持
ECK 支持在以下平台和版本中运行:
Kubernetes 1.17-1.21 OpenShift 3.11, 4.3-4.7 Google Kubernetes Engine (GKE), Azure Kubernetes Service (AKS), and Amazon Elastic Kubernetes Service (EKS)
以下版本的 Elack Stack 组件支持通过 ECK 部署:
Elasticsearch, Kibana, APM Server: 6.8+, 7.1+ Enterprise Search: 7.7+ Beats: 7.0+ Elastic Agent: 7.10+ (standalone), 7.14+ (Fleet) Elastic Maps Server: 7.11+
3 Kubernetes 环境准备
ECK 需要部署在 Kubernetes 集群中,因此我们首先为下面的实验准备一套 Kubernetes 集群,这里选择通过阿里云 ACK 服务部署 Kubernetes 集群。阿里云容器服务 Kubernetes 版(Alibaba Cloud Container Service for Kubernetes,ACK)提供高性能的容器应用管理服务,支持企业级 Kubernetes 容器化应用的生命周期管理,可以在几分钟内快速部署出一套高可用的 Kubernetes 集群。
3.1 部署 Kubernetes 集群
进入阿里云 Kubernetes 容器服务控制台[1],点击创建集群。
设置集群名称,选择地域和可用区。
勾选使用 EIP 暴露 API Server。ACK 会创建一个 EIP,并挂载到公网 SLB 上。将 Master 节点的 6443 端口(对应 API Server)暴露出来。
付费类型选择按量付费,这里选择部署 3 台 8C16G 的节点。只需创建 Worker 节点,Master 节点由容器服务创建并托管。
为了缩短部署时间,这里勾选掉不需要的组件。
确认集群配置无误后,接受服务条款,点击创建集群。
等待集群创建成功。
查看 Worker 节点状态。
3.2 配置 kubectl 连接 kubernetes 集群
3.2.1 安装 kubectl
如果是 Linux 系统可以使用以下命令安装 kubectl,其他操作系统安装可以参照 kubectl 安装[2]。
curl -LO "https://dl.k8s.io/release/$(curl -L -s https://dl.k8s.io/release/stable.txt)/bin/linux/amd64/kubectl"
curl -LO https://dl.k8s.io/release/v1.22.0/bin/linux/amd64/kubectl
3.2.2 配置 kubectl
点击 集群信息 -> 连接信息 -> 公网访问,复制集群公网访问凭证到本地电脑的 $HOME/.kube/config 文件中。
客户端访问 kubernetes 集群,查看集群节点情况:
> kubectl get node
NAME                    STATUS   ROLES    AGE   VERSION
cn-hangzhou.10.1.1.48   Ready    <none>   11m   v1.20.4-aliyun.1
cn-hangzhou.10.1.1.49   Ready    <none>   11m   v1.20.4-aliyun.1
cn-hangzhou.10.1.1.50   Ready    <none>   11m   v1.20.4-aliyun.1
4 ECK 安装
ECK 有两种安装方式,一种是通过 YAML 资源文件安装,另一种是通过 Helm Chart 安装,接下来分别介绍这两种安装方式。
4.1 方式一:通过 YAML 资源文件安装
执行以下命令应用 ECK 的资源文件:
kubectl apply -f https://download.elastic.co/downloads/eck/1.7.0/crds.yaml
kubectl apply -f https://download.elastic.co/downloads/eck/1.7.0/operator.yaml
确认 elastic-operator 成功运行:
> kubectl get pod -n elastic-system
NAME                 READY   STATUS    RESTARTS   AGE
elastic-operator-0   1/1     Running   0          3m23s
4.2 方式二:通过 Helm Chart 安装
首先使用以下命令安装 Helm 命令行工具,更多安装方式可以参考安装 Helm[3]。
curl -fsSL -o get_helm.sh https://raw.githubusercontent.com/helm/helm/master/scripts/get-helm-3
chmod 700 get_helm.sh
./get_helm.sh
添加 Elastic 的 Helm Chart 仓库。
helm repo add elastic https://helm.elastic.co
helm repo update
在 elastic-system 命名空间中安装 ECK。
helm install elastic-operator elastic/eck-operator -n elastic-system --create-namespace
确认 elastic-operator 成功运行:
> kubectl get pod -n elastic-system
NAME                 READY   STATUS    RESTARTS   AGE
elastic-operator-0   1/1     Running   0          2m13s
5 克隆实验项目
为了方便大家快速上手 ECK,本文中的所有实验都配套准备了相应的资源文件。使用以下命令克隆项目到本地:
git clone https://github.com/cr7258/eck
项目的目录结构如下:
deploy-eck  -- ECK 部署
quickstart  -- 快速开始
hot-warm    -- Hot-Warm 架构部署
autoscaling -- 自动扩缩容
snapshot    -- 快照
istio       -- 集成 Istio
在下面的章节中,将会分为 5 个部分来介绍实验项目:
1.通过最精简的配置快速搭建一套 Elasticsearch + Kibana + Filebeat (EFK) 的日志系统,让大家能够快速上手 ECK。 2.通过 ECK 部署一套生产环境常用的 Hot-Warm 架构的 Elasticsearch 集群,结合 ILM 索引生命周期管理,合理分配集群资源,降低数据的存储成本。 3.利用快照管理功能定时对 Elasticsearch 集群中的数据进行备份。 4.使用 Autoscaling 自动缩放功能根据 Elasticsearch 节点资源的使用情况动态调整节点数量和资源配额。 5.将 ECK 接入 Istio 服务网格,实现对 Elasticsearch 集群的流量管理,TLS 加密和流量可视化等功能。
6 在 ECK 上部署 Elastic Stack 组件
6.1 快速开始
在快速开始实验中,将会以最精简的资源文件部署一套 EFK 日志系统,Filebeat 负责读取 Kubernetes 集群中容器产生的日并写入 Elasticsearch 集群,Kibana 接入 Elasticsearch 集群的数据为用户提供可视化页面的展示。
6.1.1 部署 Elasticsearch
在部署 Elasticsearch 集群的时候需要为每个节点提供持久化存储,阿里云容器服务 ACK 在系统初始化的时候会默认创建 5 个 StorageClass,分别为:
alicloud-disk-efficiency:高效云盘。 alicloud-disk-ssd:SSD 云盘。 alicloud-disk-essd:ESSD 云盘。 alicloud-disk-available:优先创建 SSD 云盘;如果 SSD 云盘售尽,则创建高效云盘。 alicloud-disk-topology: 使用延迟绑定的方式创建云盘。前 4 种可以在单可用区使用,这种更适合在多可用区使用。
> kubectl get storageclasses.storage.k8s.io
NAME                       PROVISIONER                       RECLAIMPOLICY   VOLUMEBINDINGMODE      ALLOWVOLUMEEXPANSION   AGE
alicloud-disk-available    diskplugin.csi.alibabacloud.com   Delete          Immediate              true                   57m
alicloud-disk-efficiency   diskplugin.csi.alibabacloud.com   Delete          Immediate              true                   57m
alicloud-disk-essd         diskplugin.csi.alibabacloud.com   Delete          Immediate              true                   57m
alicloud-disk-ssd          diskplugin.csi.alibabacloud.com   Delete          Immediate              true                   57m
alicloud-disk-topology     diskplugin.csi.alibabacloud.com   Delete          WaitForFirstConsumer   true                   57m
我们可以根据自己的需求选择合适的 StorageClass,注意并不是所有云盘类型每种实例都支持,请根据实例规格选择相应的云盘,请参见实例规格族文档[4]。
我们通过定义一个 Elasticsearch 类型的资源文件来部署一个 3 节点的 Elasticsearch 集群,集群名称为 my-elasticsearch,版本为 7.14.0,使用高效云盘作为持久化存储。
apiVersion: elasticsearch.k8s.elastic.co/v1
kind: Elasticsearch
metadata:
  name: my-elasticsearch
spec:
  version: 7.14.0
  nodeSets:
  - name: my-elasticsearch
    count: 3
    volumeClaimTemplates:
    - metadata:
        name: elasticsearch-data
      spec:
        accessModes:
        - ReadWriteOnce
        resources:
          requests:
            storage: 20Gi
        storageClassName: alicloud-disk-efficiency
使用以下命令应用 Elasticsearch 资源文件:
kubectl apply -f elasticsearch.yaml
Kubernetes 集群会根据 StorageClass 创建对应的 PVC 和 PV,PV 对应的是实际的云盘,在云服务器 ECS[5] -> 云盘界面中可以看到。
查看 Elasticsearch 集群状态,此时集群状态已经为健康(green)。
> kubectl get elasticsearches
NAME               HEALTH   NODES   VERSION   PHASE   AGE
my-elasticsearch   green    3       7.14.0    Ready   45m
查看 Elasticsearch 集群对应的 Pod,通过 Pod 名称可以看到其实 Elasticsearch 资源是用 StatefulSet 对象来管理的。
> kubectl get pod
NAME                                     READY   STATUS    RESTARTS   AGE
my-elasticsearch-es-my-elasticsearch-0   1/1     Running   0          45m
my-elasticsearch-es-my-elasticsearch-1   1/1     Running   0          45m
my-elasticsearch-es-my-elasticsearch-2   1/1     Running   0          45m
ECK 默认会为 elastic 用户创建一个随机密码,存放在名为 {Elasticsearch 资源名}-es-elastic-user 的 Secret 中,使用以下命令获取密码。
PASSWORD=$(kubectl get secret my-elasticsearch-es-elastic-user -o go-template='{{.data.elastic | base64decode}}')
echo $PASSWORD
#elastic 用户密码
v786AKc0pTZ6u643CkU8x6Gm
通过 kubectl port-forward 的方式将 Elasitcsearch Service 服务转发到本地 9200 端口,便于我们本地访问测试。
kubectl port-forward service/my-elasticsearch-es-http 9200
在本地通过 https://localhost:9200 访问 Elasticsearch,看到以下输出表示可以成功访问到 Elasticsearch。
curl -u "elastic:$PASSWORD" -k "https://localhost:9200"
{
"name" : "my-elasticsearch-es-my-elasticsearch-0",
"cluster_name" : "my-elasticsearch",
"cluster_uuid" : "NpdxyFDOQTuRampVwkMwiw",
"version" : {
"number" : "7.14.0",
"build_flavor" : "default",
"build_type" : "docker",
"build_hash" : "dd5a0a2acaa2045ff9624f3729fc8a6f40835aa1",
"build_date" : "2021-07-29T20:49:32.864135063Z",
"build_snapshot" : false,
"lucene_version" : "8.9.0",
"minimum_wire_compatibility_version" : "6.8.0",
"minimum_index_compatibility_version" : "6.0.0-beta1"
},
"tagline" : "You Know, for Search"
}
6.1.2 部署 Kibana
定义一个 Kibana 类型的资源文件,关联前面创建的名为 my-elasticsearch 的 Elasticsearch 类型的资源。
apiVersion: kibana.k8s.elastic.co/v1
kind: Kibana
metadata:
  name: my-kibana
spec:
  version: 7.14.0
  count: 1
  elasticsearchRef:
    name: my-elasticsearch
使用以下命令应用 Kibana 资源文件:
kubectl apply -f kibana.yaml
查看 Kibana 状态:
>  kubectl get kibana
NAME        HEALTH   NODES   VERSION   AGE
my-kibana   green    1       7.14.0    8m45s
查看此时已经创建的 Pod:
>  kubectl get pod
NAME                                     READY   STATUS    RESTARTS   AGE
my-elasticsearch-es-my-elasticsearch-0   1/1     Running   0          68m
my-elasticsearch-es-my-elasticsearch-1   1/1     Running   0          68m
my-elasticsearch-es-my-elasticsearch-2   1/1     Running   0          68m
my-kibana-kb-545cc5d598-h9nkc            1/1     Running   0          8m47s
通过 kubectl port-forward 的方式将 Kibana Service 服务转发到本地 5601 端口,便于我们本地访问测试。
kubectl port-forward service/my-elasticsearch-kibana-kb-http 5601
浏览器输入 https://localhost:5601 访问 Kibana,用户名 elastic,密码为前面从 secret 中获取到的。
6.1.3 部署 Beats
Beat 类型的资源是以 DaemonSet 的方式部署在每个 Kubernetes 集群节点上的,Filebeat 读取节点上容器对应的日志文件并写入 Elasticsearch。
apiVersion: beat.k8s.elastic.co/v1beta1
kind: Beat
metadata:
  name: my-filebeat
spec:
  type: filebeat
  version: 7.14.0
  elasticsearchRef:
    name: my-elasticsearch
  config:
    filebeat.inputs:
    - type: container
      paths:
      - /var/log/containers/*.log
  daemonSet:
    podTemplate:
      spec:
        securityContext:
          runAsUser: 0
        containers:
        - name: filebeat
          volumeMounts:
          - name: varlogcontainers
            mountPath: /var/log/containers
          - name: varlogpods
            mountPath: /var/log/pods
          - name: varlibdockercontainers
            mountPath: /var/lib/docker/containers
        volumes:
        - name: varlogcontainers
          hostPath:
            path: /var/log/containers
        - name: varlogpods
          hostPath:
            path: /var/log/pods
        - name: varlibdockercontainers
          hostPath:
            path: /var/lib/docker/containers
使用以下命令应用 Beats 资源文件:
kubectl apply -f beats.yaml
查看 Beats 状态:
> kubectl get beats
NAME          HEALTH   AVAILABLE   EXPECTED   TYPE       VERSION   AGE
my-filebeat   green    3           3          filebeat   7.14.0    10m
查看目前创建的 Pod,到目前为止,一套 EFK 日志系统已经搭建成功。
> kubectl get pod
NAME                                     READY   STATUS    RESTARTS   AGE
my-elasticsearch-es-my-elasticsearch-0   1/1     Running   0          86m
my-elasticsearch-es-my-elasticsearch-1   1/1     Running   0          86m
my-elasticsearch-es-my-elasticsearch-2   1/1     Running   0          86m
my-filebeat-beat-filebeat-mk79c          1/1     Running   0          10m
my-filebeat-beat-filebeat-tmg8p          1/1     Running   0          10m
my-filebeat-beat-filebeat-tzpz6          1/1     Running   0          10m
my-kibana-kb-545cc5d598-h9nkc            1/1     Running   0          26m
容器的日志数据此时已经在源源不断地写入 Elasticsearch 中,打开 Kibana 界面创建 index pattern 匹配 Filebeat 采集日志的索引名(默认索引名以 filebeat 开头)。
选择时间字段,后续可以根据时间段来筛选日志。
在 Discover 页面就可以看到 Filebeat 采集的日志了。
6.1.4 清理现场
kubectl delete -f quickstart/
6.2 Hot-Warm 架构
为了保证 Elasticsearch 的读写性能,官方建议使用 SSD 固态硬盘。然而面对海量的数据,如果全部使用 SSD 硬盘来存储数据将需要很大的成本。并且有些数据是有时效性的,例如热点新闻,日志等等,对于这些数据我们可能只关心最近一段时间的数据,如果把所有的数据都存储在 SSD 硬盘中将造成存储空间的浪费。
为了解决上述问题,我们可以采用 Hot-Warm 冷热分离的架构来部署 Elasticsearch 集群。我们可以使用性能好、读写快的节点作为 Hot 节点;使用性能相对差些的大容量节点作为 Warm 节点;使用廉价的存储节点作为 Cold 节点,存储时间较早的冷数据。
在 Elasticsearch 中可以通过 Index Lifecycle Management(索引生命周期管理,简称 ILM) 根据时间自动将索引迁移到相应的节点上。
6.2.1 部署 Hot-Warm 架构 Elasticsearch 集群 和 Cerebro
定义一个 Elasticsearch 类型的资源文件部署一个冷热分离的 Elasticsearch 集群:
3 个 Master 节点,不存储数据,负责集群元数据的管理,集群范围的操作(创建或删除索引,跟踪集群节点,分片分配等等)。Master 节点因为没有读写数据的压力,因此选择最便宜的高效云盘。 3 个 Hot 节点,新的数据都会首先写入 Hot 节点,承受较大的读写压力,选择使用读写性能最好的 ESSD 硬盘。 3 个 Warm 节点,选择读写性能稍差的 SSD 硬盘。 3 个 Cold 节点,选择最便宜的高效云盘。
apiVersion: elasticsearch.k8s.elastic.co/v1
kind: Elasticsearch
metadata:
  name: hot-warm-elasticsearch
spec:
  #禁用 https
  http:
    tls:
      selfSignedCertificate:
        disabled: true
  version: 7.14.0
  nodeSets:
  #master 节点
  - name: master
    count: 3
    config:
      node.roles: ["master"]
    podTemplate:
      spec:
        containers:
        - name: elasticsearch
          resources:
            #限制资源使用
            limits:
              memory: 1Gi
              cpu: 1
    volumeClaimTemplates:
    - metadata:
        name: elasticsearch-data
      spec:
        accessModes:
        - ReadWriteOnce
        resources:
          requests:
            storage: 20Gi
        storageClassName: alicloud-disk-efficiency #挂载高效云盘
  # hot 节点
  - name: hot
    count: 3
    config:
      node.attr.data: hot #节点属性
      node.roles: ["data","ingest"]
    podTemplate:
      spec:
        containers:
        - name: elasticsearch
          resources:
            limits:
              memory: 2Gi
              cpu: 2
    volumeClaimTemplates:
    - metadata:
        name: elasticsearch-data
      spec:
        accessModes:
        - ReadWriteOnce
        resources:
          requests:
            storage: 20Gi
        storageClassName: alicloud-disk-essd #挂载 ESSD
  # warm 节点
  - name: warm
    count: 3
    config:
      node.attr.data: warm #节点属性
      node.roles: ["data","ingest"]
    podTemplate:
      spec:
        containers:
        - name: elasticsearch
          resources:
            limits:
              memory: 2Gi
              cpu: 1
    volumeClaimTemplates:
    - metadata:
        name: elasticsearch-data
      spec:
        accessModes:
        - ReadWriteOnce
        resources:
          requests:
            storage: 60Gi
        storageClassName: alicloud-disk-ssd  #挂载 SSD
  # cold 节点
  - name: cold
    count: 3
    config:
      node.attr.data: cold #节点属性
      node.roles: ["data","ingest"]
    podTemplate:
      spec:
        containers:
        - name: elasticsearch
          resources:
            limits:
              memory: 2Gi
              cpu: 1
    volumeClaimTemplates:
    - metadata:
        name: elasticsearch-data
      spec:
        accessModes:
        - ReadWriteOnce
        resources:
          requests:
            storage: 100Gi
        storageClassName: alicloud-disk-efficiency  #挂载高效云盘
为了方便我们观察索引在节点上的迁移情况,这里额外安装了 Cerebro,在 Cerebro 上可以很直观地看到索引在每个节点的分布情况。由于通过 ECK 安装的 Elasticsearch 默认都使用了自签名证书来进行 HTTPS 加密,而 Cerebro 默认只能连接受信任的 HTTPS 或者 HTTP 站点,因此我们在定义 Elasticsearch 资源文件时选择禁用 HTTPS,让 Cerebro 通过 HTTP 访问 Elasticsearch 集群。
apiVersion: apps/v1
kind: Deployment
metadata:
  name: cerebro
  labels:
    app: cerebro
spec:
  replicas: 1
  selector:
    matchLabels:
      app: cerebro
  template:
    metadata:
      labels:
        app: cerebro
    spec:
      containers:
      - name: cerebro
        image: lmenezes/cerebro:0.9.4
        ports:
        - containerPort: 9000
使用以下命令应用本实验的资源文件:
kubectl apply -f hot-warm/
查看创建的相关 Pod:
❯ kubectl get pod
NAME                                  READY   STATUS    RESTARTS   AGE
cerebro-99484576f-pwx85               1/1     Running   0          6h19m
hot-warm-elasticsearch-es-cold-0      1/1     Running   0          113s
hot-warm-elasticsearch-es-cold-1      1/1     Running   0          112s
hot-warm-elasticsearch-es-cold-2      1/1     Running   0          112s
hot-warm-elasticsearch-es-hot-0       1/1     Running   0          113s
hot-warm-elasticsearch-es-hot-1       1/1     Running   0          113s
hot-warm-elasticsearch-es-hot-2       1/1     Running   0          113s
hot-warm-elasticsearch-es-master-0    1/1     Running   0          113s
hot-warm-elasticsearch-es-master-1    1/1     Running   0          113s
hot-warm-elasticsearch-es-master-2    1/1     Running   0          113s
hot-warm-elasticsearch-es-warm-0      1/1     Running   0          113s
hot-warm-elasticsearch-es-warm-1      1/1     Running   0          113s
hot-warm-elasticsearch-es-warm-2      1/1     Running   0          113s
hot-warm-kibana-kb-7d5747887d-n8dzd   1/1     Running   0          82s
开启端口转发,将 Kibana 和 Cerebro 的服务转发到本地,方便我们访问。
kubectl port-forward pod/cerebro-99484576f-pwx85 9000
kubectl port-forward service/hot-warm-kibana-kb-http 5601
获取 elastic 用户密码:
PASSWORD=$(kubectl get secret hot-warm-elasticsearch-es-elastic-user  -o go-template='{{.data.elastic | base64decode}}')
echo $PASSWORD
#elastic 用户密码
js373o37ZKu3DKDo69co97Ds
浏览器输入 http://localhost:5601 访问 Kibana 界面,后续定义 ILM 策略和写入文档我们都在 Kibana 上操作。
浏览器输入 http://localhost:9200 访问 Cerebro 界面,连接信息输入 http://hot-warm-elasticsearch-es-http:9200 接入 Elasticsearch 集群。由于 Cerebro 和 Elasticsearch 集群都是部署在 Kubernetes 同一命名空间下的,Cerebro 可以直接通过 Elasticsearch 对应的 Service 来访问 Elasticsearch 集群。
输入 elastic 用户名和密码。
查看 Elasticsearch 节点上的索引分布,此时还没有写入数据。
6.2.2 设置 ILM 策略,设置索引模板
Elasticsearch 默认的 ILM 刷新时间为 10 分钟,为了便于我们实验演示,将刷新时间改为 1s。
PUT _cluster/settings
{
  "persistent": {
    "indices.lifecycle.poll_interval":"1s"
  }
}
定义 ILM 策略,其中包含 4 个生命周期阶段:
Hot 阶段:将索引优先级设置为一个较高的值 100,以便节点在恢复运行后(例如重启)在 Hot 阶段的索引能够在 Warm 和 Cold 阶段的索引之前恢复。当索引主分片文档数达到 5 个或者索引主分片总容量达到 5mb 时,rollover 滚动更新索引。 Warm 阶段:20s 后索引进入 Warm 阶段,将索引收缩到 1 个主分片,强制合并为 1 个段,并将索引的优先级调低为 50,然后通过 allocate 操作将索引移动到 Warm 节点。 Cold 阶段:40s 后索引是进入 Cold 阶段,将索引的优先级调为最低值 0,并设置索引为只读状态,然后通过 allocate 操作将索引移动到 Cold 节点。 Delete 阶段:60s 后删除该索引。
PUT _ilm/policy/hot-warm-ilm
{
  "policy": {
    "phases": {
      "hot": {
        "actions": {
          "rollover": {
            "max_size":"5mb",
            "max_docs": "5"
          },
          "set_priority": {
            "priority":100
          }
        }
      },
      "warm": {
        "min_age":"20s",
        "actions": {
          "forcemerge": {
            "max_num_segments":1
          },
          "shrink": {
            "number_of_shards":1
          },
          "allocate": {
            "include": {
              "data": "warm"
            }
          },
          "set_priority": {
            "priority":50
          }
        }
      },
      "cold": {
        "min_age":"40s",
        "actions": {
          "set_priority": {
            "priority":0
          },
          "readonly": {},
          "allocate": {
            "include": {
              "data": "cold"
            }
          }
        }
      },
      "delete": {
        "min_age":"60s",
        "actions": {
          "delete": {}
        }
      }
    }
  }
}
ECK 在创建 Elasticsearch 集群时,会根据我们指定的属性为节点添加属性,例如 node.attr.data: hot,我们后续就可以通过 node.attr.data 来区分冷热节点。属性名是可以自己定义的,比如还可以叫 node.attr.my-data。
定义一个索引模板,所有通配符匹配 hot-warm-index* 的索引,都会应用该模板的规则。该索引模板调用了刚刚创建的 ILM 策略,并且将新索引分配到 Hot 节点上,主分片数设置为 3,副本分片为 1。当索引触发 rollover 滚动更新新的索引时,以 hot-warm-index 作为别名。
PUT /_template/hot-warm-index-template
{
  "index_patterns" : [
      "hot-warm-index*"
    ],
    "settings" : {
      "index" : {
        "lifecycle" : {
          "name" : "hot-warm-ilm",
          "rollover_alias" : "hot-warm-index"
        },
        "routing" : {
          "allocation" : {
            "include" : {
              "data" : "hot"
            }
          }
        },
        "number_of_shards" : 3,
        "number_of_replicas": 1
      }
    }
}
为 hot-warm-index 别名创建第一个索引 hot-warm-index-000001,后续在 rollover 滚动更新索引时,索引名会根据最后的序号递增,例如 hot-warm-index-000002、hot-warm-index-000003、hot-warm-index-000004 ...。指定第一个索引分配到 Hot 节点上,索引别名为 hot-warm-index。一个别名中的所有索引只能有一个索引可以写入数据,"is_write_index": true 自动设置最新滚动更新的索引可写。
PUT hot-warm-index-000001
{
  "aliases": {
    "hot-warm-index": {
      "is_write_index": true
    }
  }
}
往索引中插入 5 条数据。
POST _bulk
{"index":{"_index":"hot-warm-index"}}
{"name":"Erlend","age":16}
{"index":{"_index":"hot-warm-index"}}
{"name":"Brynjar","age":18}
{"index":{"_index":"hot-warm-index"}}
{"name":"Fox","age":18}
{"index":{"_index":"hot-warm-index"}}
{"name":"Frank","age":23}
{"index":{"_index":"hot-warm-index"}}
{"name":"Sam","age":18}
6.2.3 观察索引迁移
接下来在 Cerebro 上观察索引的迁移过程,点击页面右上角将刷新时间改为 5s。可以看到在插入 5 条文档后触发了索引的 rollover 操作,新创建了索引 hot-warm-index-000002,现在两个索引都在 Hot 节点上。
20s 后,hot-warm-index-000001 索引被迁移到了 Warm 节点上,主分片的数量降为 1。
40s 后,hot-warm-index-000001 索引被迁移到了 Cold 节点上,此时索引变为只读状态。
60s 后,hot-warm-index-000001 索引被删除。
6.2.4 清理现场
kubectl delete -f hot-warm/
7 ECK 进阶配置
7.1 快照
Elasticsearch 拥有副本机制来保障集群的高可用,然而无法解决如下情况的数据丢失:
主副本所在机器存储全部损坏。 误删除索引数据。 升级失败,数据无法回滚。
定期对数据做备份,按需恢复可以很好的解决上述问题。Elasticsearch 提供了 Snapshot 和 Restore API 用于对集群数据的备份与恢复。
本实验中使用阿里云的 OSS 来存储快照数据。阿里云的 OSS 对象存储兼容 S3,因此可以通过 Elasticsearch 的 S3 插件将快照备份至阿里云 OSS。另外阿里云也专门提供了 elasticsearch-repository-oss 插件来备份 Elasticsearch 到阿里云 OSS,但是需要手动下载 zip 压缩包来安装,感兴趣的可以参考 elasticsearch-repository-oss[6]。
7.1.1 创建 OSS Bucket
登录阿里云 OSS 控制台[7],点击创建 Bucket。
进入 RAM 访问控制[8] 页面创建一个用户 eck-oss 用于 OSS API 操作。
创建完用户会显示用户的 AccessKey ID 和 AccessKey Secret,记住这两个值,稍后在 Elasticsearch 中配置 keystore 时会用到。
为刚刚创建的用户 eck-oss 授予 OSS 完全的访问权限。
7.1.2 部署 Elasticsearch
使用 initContainer 在 Elasticsearch 初始化的时候执行 bin/elasticsearch-plugin install 命令安装 S3 存储插件。
apiVersion: elasticsearch.k8s.elastic.co/v1
kind: Elasticsearch
metadata:
  name: snapshot-elasticsearch
spec:
  version: 7.14.0
  nodeSets:
  - name: snapshot-elasticsearch
    count: 3
    volumeClaimTemplates:
    - metadata:
        name: elasticsearch-data
      spec:
        accessModes:
        - ReadWriteOnce
        resources:
          requests:
            storage: 20Gi
        storageClassName: alicloud-disk-essd
    podTemplate:
      spec:
        initContainers:
        - name: install-plugins
          command:
          - sh
          - -c
          - |
            bin/elasticsearch-plugin install --batch repository-s3
执行以下命令部署快照实验的资源。
kubectl apply -f snapshot/
查看创建的 pod。
> kubectl get pod
NAME                                                 READY   STATUS    RESTARTS   AGE
snapshot-elasticsearch-es-snapshot-elasticsearch-0   1/1     Running   0          3m23s
snapshot-elasticsearch-es-snapshot-elasticsearch-1   1/1     Running   0          3m22s
snapshot-elasticsearch-es-snapshot-elasticsearch-2   1/1     Running   0          3m22s
snapshot-kibana-kb-699497d468-xsxzw                  1/1     Running   0          52s
转发 Kibana 服务到本地 5601 端口。
kubectl port-forward service/snapshot-kibana-kb-http 5601
获取 Elasticsearch 密码。
PASSWORD=$(kubectl get secret snapshot-elasticsearch-es-elastic-user -o go-template='{{.data.elastic | base64decode}}')
echo $PASSWORD
#elastic 用户密码
0F6wRO7YC6d2zftrkd33I663
往 my-index 索引插入几条数据,之后会创建快照备份这个索引。
PUT _bulk
{"index":{"_index":"my-index"}}
{"name":"Tom","age":18}
{"index":{"_index":"my-index"}}
{"name":"Jack","age":20}
{"index":{"_index":"my-index"}}
{"name":"Mark","age":21}
7.1.3 keystore 添加 OSS 凭证
每台 Elasticsearch 节点都要在 keystore 中添加 OSS 的登录凭证,包括 AccessKey 和 AccessKeySecret。
#分别在每个 Elasticsearch pod 中创建 OSS 的 AccessKey 和 AccessKeySecret
>  kubectl exec -it snapshot-elasticsearch-es-snapshot-elasticsearch-0 bash
[[email protected] elasticsearch]# bin/elasticsearch-keystore add s3.client.default.access_key
Enter value for s3.client.default.access_key: #输入 AccessKeyId
[[email protected] elasticsearch]# bin/elasticsearch-keystore add s3.client.default.secret_key
Enter value for s3.client.default.secret_key: #输入 AccessKeySecret
#elasticsearch-1 和 elasticsearch-2 节点也一样操作一遍
查看在 keystore 中创建的 OSS 登录凭证。
[[email protected] elasticsearch]# bin/elasticsearch-keystore list
keystore.seed
#阿里云 OSS 登录凭证
s3.client.default.access_key
s3.client.default.secret_key
在每一台 Elasticsearch 节点的 keystore 中添加 OSS 登录凭证后,执行以下命令重新加载安全设置,加载过程中无需重启 Elasticsearch。
POST _nodes/reload_secure_settings
{
  "secure_settings_password": ""  #我们没有为 keystore 设置加密密码,因此这里留空
}
7.1.4 创建 repository
创建一个 S3 类型的 repository。base_path 是 OSS 中的目录名,创建 repository 的时候会自动在阿里云 bucket 中创建该目录。
PUT _snapshot/eck-repository
{
    "type": "s3",
    "settings": {
        "bucket": "eck-bucket",
        "base_path": "eck-snapshot",
        "endpoint": "oss-cn-hongkong.aliyuncs.com"
    }
}
查看刚刚创建的 repository,状态为 Connected 表示连接 OSS 正常。
在阿里云 OSS 界面可以看到自动创建了 base_path 中指定的目录名,在这个 repository 中创建的快照都会存在这个目录中。
7.1.5 创建 snapshot
创建 snapshot_1 对 my-index 索引做快照,相关参数含义如下:
indices:做快照的索引。 wait_for_completion=true:是否等待完成快照后再响应,如果为 true 会等快照完成后才响应。(默认为 false,不等快照完成立即响应) ignore_unavailable: 设置为 true 时,当创建快照时忽略不可用的索引。 include_global_state: 设置为 false 时,当某个索引所有的主分片不是全部的都可用时,也继续完成快照。
PUT /_snapshot/eck-repository/snapshot_1?wait_for_completion=true
{
  "indices": "my-index",
  "ignore_unavailable": true,
  "include_global_state": false
}
查看创建的 snapshot:
7.1.6 恢复 snapshot
删除原索引 my-index:
DELETE my-index
从快照 snapshot_1 中恢复 my-index 到 restored-my-index 索引:
POST _snapshot/eck-repository/snapshot_1/_restore
{
  "indices": "my-index",
  "ignore_unavailable": true,
  "rename_pattern": "(.+)",
  "rename_replacement": "restored_$1"
}
查看恢复快照后的数据,可以看到和索引 my-index 删除前的数据一致,成功通过快照恢复了数据。
GET restored_my-index/_search#返回结果
{
  "took" : 2,
  "timed_out" : false,
  "_shards" : {
    "total" : 1,
    "successful" : 1,
    "skipped" : 0,
    "failed" : 0
  },
  "hits" : {
    "total" : {
      "value" : 3,
      "relation" : "eq"
    },
    "max_score" : 1.0,
    "hits" : [
      {
        "_index" : "restored_my-index",
        "_type" : "_doc",
        "_id" : "nZmSXHsBwrlfk6F5cFkI",
        "_score" : 1.0,
        "_source" : {
          "name" : "Tom",
          "age" : 18
        }
      },
      {
        "_index" : "restored_my-index",
        "_type" : "_doc",
        "_id" : "npmSXHsBwrlfk6F5cFkI",
        "_score" : 1.0,
        "_source" : {
          "name" : "Jack",
          "age" : 20
        }
      },
      {
        "_index" : "restored_my-index",
        "_type" : "_doc",
        "_id" : "n5mSXHsBwrlfk6F5cFkI",
        "_score" : 1.0,
        "_source" : {
          "name" : "Mark",
          "age" : 21
        }
      }
    ]
  }
}
7.1.7 创建定时快照
定时对重要的索引做备份可以帮助我们在发生故障时快速恢复数据,Elasticsearch 从 7.5 版本开始提供了 Snapshot Lifecycle Management (快照生命周期管理,简称 SLM) 方便我们对快照的生命周期进行管理。
创建一个定时快照:
我们想在每天的凌晨 1:30 做快照,由于 Elasticsearch 是以 UTC 时间为准,中国的时区是 UTC + 8,倒推 8 小时,因此这里设置时间为每天 17:30。 当创建快照时忽略不可用的索引。 快照保留 30 天。
PUT _slm/policy/daily-snapshot-policy
{
  "name": "<daily-snapshot-policy-{now/d}>",
  "schedule": "0 30 17 * * ?",
  "repository": "eck-repository",
  "config": {
    "ignore_unavailable": true,
    "partial": true
  },
  "retention": {
    "expire_after": "30d"
  }
}
查看创建的定时快照:
7.1.8 清理现场
kubectl delete -f snaphost/
7.2 Autoscaling 自动缩放功能
ECK 可以利用 Elasticsearch 7.11 中引入的 autoscaling API 来自动调整 Pod 的数量和为 Pod 分配的资源。autoscaling API 是为 Elasticsearch Service(公有云)[9]、Elastic Cloud Enterprise(ECE)[10] 和 Elastic Cloud on Kubernetes(ECK)[11] 提供服务的,不能在普通的 Elasticsearch 集群中使用。
7.2.1 启用 Enterprise 订阅功能
安装 ECK 时,默认使用的是 Basic license,用户可以永久免费使用 Basic license,关于 Elastic Stack 不同等级的 Lisence 功能可以参照 Elastic Stack 订阅[12]。想要使用 Elasticsearch Autoscaling 功能需要有 Enterprise license 或者 Enterprise trial license。
为 elstic operator 创建一个 Secret,通过设置 annotation elastic.co/eula: accepted 表示接受 Elastic EULA( End-User License Agreement,最终用户许可协议),原先创建的 elastic operator 可以不用删除重建。
试用期为 30 天,试用期结束后,Platinum 和 Enterprise 功能以降级模式运行。可以选择恢复为 Basic license、延长试用期或购买 Enterprise 订阅。
apiVersion: v1
kind: Secret
metadata:
  name: eck-trial-license
  namespace: elastic-system
  labels:
    license.k8s.elastic.co/type: enterprise_trial
  annotations:
    elastic.co/eula: accepted
使用以下命令应用 Secret 资源文件:
kubectl apply -f autoscaling/trail-secret.yaml
7.2.2 部署 Elasticsearch
定义 Elasticsearch 资源文件,通过 annotations 定义自动缩放策略:
name:用于标识自动缩放策略的名称。 roles:此策略适用的节点角色,Elasticsearch 资源中必须至少存在一个具有完全相同角色集的 NodeSet。 resources 定义计算资源使用量的上限和下限: nodeCount:节点数量的上限和下限。 cpu:每个节点使用 cpu 的上限和下限。 memory:每个节点使用内存的上限和下限。 storage:每个节点存储容量的上限和下限。
当节点使用资源达到阈值时,ECK 首先会尝试为节点增加资源(cpu、内存、存储),当每个节点都达到单个节点使用资源的限制时,ECK 开始横向扩容节点数量。横向扩容是最快速的,因此建议将 cpu、内存、存储资源的 min 和 max 的值设置成一样。
apiVersion: elasticsearch.k8s.elastic.co/v1
kind: Elasticsearch
metadata:
  name: autoscaling-elasticsearch
  annotations:
    elasticsearch.alpha.elastic.co/autoscaling-spec: |
      {
          "pollingPeriod": "10s",
          "policies": [{
              "name": "di",
              "roles": ["data", "ingest" , "transform"],
              "deciders": {
                "proactive_storage": {
                    "forecast_window": "5m"
                }
              },
              "resources": {
                  "nodeCount": { "min": 3, "max": 8 },
                  "cpu": { "min": 2, "max": 2 },
                  "memory": { "min": "2Gi", "max": "2Gi" },
                  "storage": { "min": "20Gi", "max": "20Gi" }
              }
          }]
      }
spec:
  version: 7.14.0
  nodeSets:
    - name: master
      count: 3
      config:
        node:
          roles: [ "master" ]
      volumeClaimTemplates:
      - metadata:
          name: elasticsearch-data
        spec:
          accessModes:
          - ReadWriteOnce
          resources:
            requests:
              storage: 20Gi
          storageClassName: alicloud-disk-efficiency
    - name: di
      config:
        node:
          roles: [ "data", "ingest", "transform" ]
      volumeClaimTemplates:
      - metadata:
          name: elasticsearch-data
        spec:
          accessModes:
          - ReadWriteOnce
          resources:
            requests:
              storage: 20Gi
          storageClassName: alicloud-disk-efficiency
使用以下命令应用 Elasticsearch 资源文件:
kubectl apply -f elasticsearch.yaml
查看创建的 Elasticsearch 节点,刚开始节点数量是指定的最小值,当节点使用资源达到阈值时,才会横向扩容。
> kubectl get pod
NAME                                    READY   STATUS    RESTARTS   AGE
autoscaling-elasticsearch-es-di-0       1/1     Running   0          11m
autoscaling-elasticsearch-es-di-1       1/1     Running   0          11m
autoscaling-elasticsearch-es-di-2       1/1     Running   0          11m
autoscaling-elasticsearch-es-master-0   1/1     Running   0          11m
autoscaling-elasticsearch-es-master-1   1/1     Running   0          11m
autoscaling-elasticsearch-es-master-2   1/1     Running   0          11m
7.2.3 清理现场
kubectl delete -f autoscaling/
7.3 接入 Istio 服务网格
随着云原生概念的火热,应用开始大规模地从单体转向分布式微服务架构,与此同时产生了服务网格的概念。服务网格是用来描述组成这些应用程序的微服务网络以及它们之间的交互关系。随着服务网格的规模和复杂性不断地增长,将会变得越来越难管理,它的需求包括服务发现、负载均衡、故障恢复、度量和监控等等。服务网格通常还有更复杂的运维需求,比如 A/B 测试、金丝雀发布、速率限制、访问控制和端到端认证。
Istio 提供了对整个服务网格的行为洞察和操作控制的能力,以及一个完整的满足微服务应用各种需求的解决方案。
Istio 服务网格从逻辑上分为数据平面和控制平面:
数据平面由一组智能代理(Envoy)组成,以 Sidecar 容器的方式部署在 Pod 中。Envoy 代理负责协调和控制微服务之间的所有网络通信,提供丰富的流量控制功能、网络弹性特性、安全和身份认证以及流量的可观察性。 控制平面管理并配置代理来进行流量路由。Istiod 将控制流量行为的高级路由规则转换为 Envoy 特定的配置,并在运行时将其传播给 Sidecar。
7.3.1 部署 Istio
本实验选择通过 Helm 部署 Istio,更多安装方式参考 Istio 安装[13]。在 istio 目录下已经准备了 Istio 实验所需的相关资源文件。
为 Istio 组件创建命名空间 istio-system:
kubectl create namespace istio-system
安装 Istio base chart,其中包含了 Istio 控制平面用到的集群范围的 RBAC 资源。
helm install istio-base istio/istio-1.11.1/manifests/charts/base \
--set global.jwtPolicy=first-party-jwt -n istio-system
安装 Istio discovery chart,用于部署 istiod 服务:
helm install istiod istio/istio-1.11.1/manifests/charts/istio-control/istio-discovery \
    --set global.hub="docker.io/istio" \
    --set global.tag="1.11.1" \
    -n istio-system
确保 istiod 成功运行:
> kubectl get pod -n istio-system
NAME                      READY   STATUS    RESTARTS   AGE
istiod-75c9fcbbd6-w6tjb   1/1     Running   0          2m23s
7.3.2 安装 ECK
elastic operator 容器也需要被 Istio 接管,首先删除前面实验创建的 ECK。如果使用 YAML 文件安装 ECK,通过以下命令清除:
kubectl delete -f deploy-eck/
如果是使用 Helm Chart 安装 ECK 的,使用以下命令清除:
helm uninstall -n elastic-system elastic-operator
往 elastic operator 所在的命名空间中添加 label istio-injection=enabled,含有该 label 的命名空间中的 Pod 会被 Istio 注入 Sidecar 容器。
kubectl create namespace elastic-system
kubectl label namespace elastic-system istio-injection=enabled
为了使 validating webhook 能在 Istio 下正常工作,需要从代理中排除入站端口 9443。可以通过在 elastic-operator StatefulSet 的资源文件中添加以下注解来实现。
注解我已经在资源文件中添加好了,直接使用以下命令安装 ECK:
kubectl apply -f istio/deploy-eck-istio/
确保 elastic operator 成功运行,可以看到 Pod 中的容器个数为 2 个,Sidecar 容器已经被成功注入 Pod。
> kubectl get pod -n elastic-system
NAME                 READY   STATUS    RESTARTS   AGE
elastic-operator-0   2/2     Running   2          42s
7.3.3 部署 Elasticsearch 集群
默认情况下,Istio 会为具有 Istio Sidecar 代理的工作负载之间的所有流量启用双向 TLS,需要对 Elasticsearch 资源文件进行以下修改才能确保 Elasticsearch 集群正常工作:
1.禁用 elastic operator 使用自签名证书加密 Elasticsearch 集群的 HTTPS 流量,之后会在 Istio Gateway 加密 HTTPS 流量。 2.将 Elasticsearch 集群节点之前的传输端口 9300 排除在代理之外,目前 ECK 不支持关闭 Elasticsearch 传输端口的 X-Pack Security 和 TLS。如果允许 Istio 代理传输端口,则流量会被加密两次,会导致 Elasticsearch 节点之间的通信会中断。 3.可选,仅当 Kubernetes 集群不支持发布第三方安全令牌时才需要设置 automountServiceAccountToken 为 true。
apiVersion: elasticsearch.k8s.elastic.co/v1
kind: Elasticsearch
metadata:
  name: istio-elasticsearch
  namespace: istio-demo
spec:
  #禁用 elaticsearch 本身的 https,通过 istio 管理 tls
  http:
    tls:
      selfSignedCertificate:
        disabled: true
  version: 7.14.0
  nodeSets:
  #master节点
  - name: master
    count: 3
    config:
      node.roles: ["master"]
    podTemplate:
      metadata:
        annotations:
          #将传输端口 9300 排除在代理之外
          traffic.sidecar.istio.io/includeInboundPorts: "*"
          traffic.sidecar.istio.io/excludeOutboundPorts: "9300"
          traffic.sidecar.istio.io/excludeInboundPorts: "9300"
      spec:
        #仅当 Kubernetes 集群不支持发布第三方安全令牌时才需要设置
        #automountServiceAccountToken: true
        containers:
        - name: elasticsearch
          resources:
            #限制资源使用
            limits:
              memory: 1Gi
              cpu: 1
    volumeClaimTemplates:
    - metadata:
        name: elasticsearch-data
      spec:
        accessModes:
        - ReadWriteOnce
        resources:
          requests:
            storage: 20Gi
        storageClassName: alicloud-disk-efficiency
  #data 节点
  - name: data
    count: 3
    config:
      node.roles: ["data"]
    podTemplate:
      metadata:
        annotations:
          traffic.sidecar.istio.io/includeInboundPorts: "*"
          traffic.sidecar.istio.io/excludeOutboundPorts: "9300"
          traffic.sidecar.istio.io/excludeInboundPorts: "9300"
      spec:
        containers:
        - name: elasticsearch
          resources:
            limits:
              memory: 2Gi
              cpu: 2
    volumeClaimTemplates:
    - metadata:
        name: elasticsearch-data
      spec:
        accessModes:
        - ReadWriteOnce
        resources:
          requests:
            storage: 20Gi
        storageClassName: alicloud-disk-efficiency
  #ingest 节点
  - name: ingest
    count: 3
    config:
      node.roles: ["ingest"]
    podTemplate:
      metadata:
        annotations:
          traffic.sidecar.istio.io/includeInboundPorts: "*"
          traffic.sidecar.istio.io/excludeOutboundPorts: "9300"
          traffic.sidecar.istio.io/excludeInboundPorts: "9300"
      spec:
        containers:
        - name: elasticsearch
          resources:
            limits:
              memory: 2Gi
              cpu: 1
    volumeClaimTemplates:
    - metadata:
        name: elasticsearch-data
      spec:
        accessModes:
        - ReadWriteOnce
        resources:
          requests:
            storage: 20Gi
        storageClassName: alicloud-disk-efficiency
  #coordinating 节点
  - name: coordinating
    count: 3
    config:
      node.roles: []
    podTemplate:
      metadata:
        annotations:
          traffic.sidecar.istio.io/includeInboundPorts: "*"
          traffic.sidecar.istio.io/excludeOutboundPorts: "9300"
          traffic.sidecar.istio.io/excludeInboundPorts: "9300"
      spec:
        containers:
        - name: elasticsearch
          resources:
            limits:
              memory: 2Gi
              cpu: 1
    volumeClaimTemplates:
    - metadata:
        name: elasticsearch-data
      spec:
        accessModes:
        - ReadWriteOnce
        resources:
          requests:
            storage: 20Gi
        storageClassName: alicloud-disk-efficiency
使用以下命令应用资源文件部署 Elasticsearh 集群。
kubectl create ns istio-demo
kubectl label namespace istio-demo istio-injection=enabled
kubectl apply -f elasticsearch.yaml
获取 Elasticsearch 集群密码:
PASSWORD=$(kubectl get secret -n istio-demo istio-elasticsearch-es-elastic-user -o go-template='{{.data.elastic | base64decode}}')
echo $PASSWORD
#elastic 用户密码
L733hU98Y467IZMft4DzLq5m
7.3.4 Istio 可视化组件部署
Istio 和几个遥测应用做了集成,遥测能帮你了解服务网格的结构、展示网络的拓扑结构、分析网格的健康状态。使用下面命令部署 Kiali 仪表板,以及 Prometheus、Grafana、Jaeger。
kubectl apply -f istio/istio-1.11.1/samples/addons
通过 kubectl port-forward 的方式将 Kiali Service 服务转发到本地 20001 端口,便于我们本地访问测试。
kubectl port-forward -n istio-system service/kiali 20001
浏览器输入 http://localhost:20001 访问 Kiali 页面。
7.3.5 部署 Istio IngressGateway
修改 Istio IngressGateway Helm Chart 的 values.yaml 配置文件,添加 9200 端口的暴露,文件位于 istio/istio-1.11.1/manifests/charts/gateways/istio-ingress/values.yaml,这里我已经修改好了。
部署 Istio Gatway:
helm install istio-ingress istio-1.11.1/manifests/charts/gateways/istio-ingress \
    --set global.hub="docker.io/istio" \
    --set global.tag="1.11.1" \
    -n istio-system
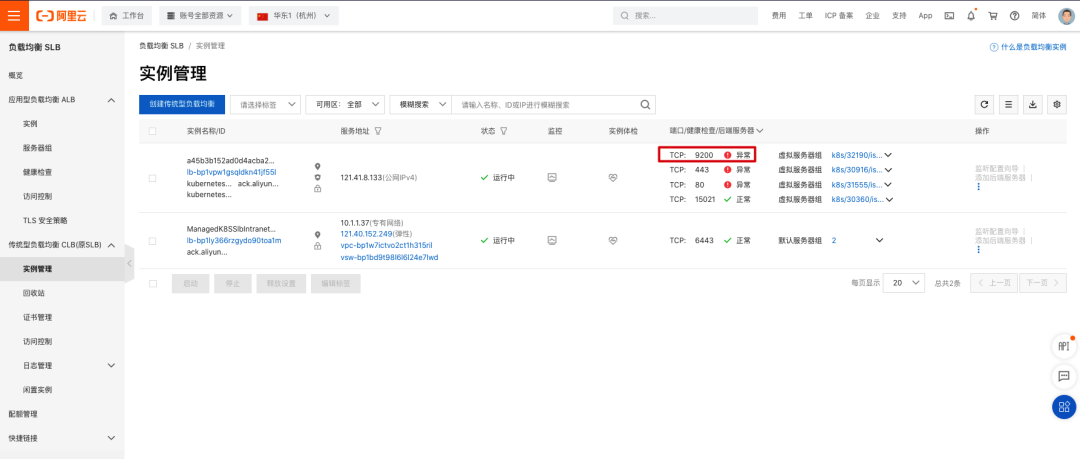
在阿里云 SLB 管理界面[14] 可以看到为 Istio IngressGateway 创建了一个 SLB 负载均衡,此时 9200 端口还没配置相应的转发规则,因此健康检查是失败的。
7.3.6 配置转发规则
本实验中 Elasticsearch 集群中有 4 种角色的节点
Master 节点:负责集群元数据的管理,集群范围的操作(创建或删除索引,跟踪集群节点,分片分配等等),客户端的请求不直接发给 Master 节点。 Ingest 节点:客户端的写入请求都发给 Ingest 节点,由 Ingest 节点处理完(如果有 Ingest Pipeline 的话)后将数据写入 Data 节点。 Coordinating 节点:客户端除了写入请求以外的所有请求都先转发给 Coordinating 节点,Coordinating 节点根据实际情况再向其他节点转发请求。(例如集群操作请求转发给 Master 节点,查询请求转发给 Data 节点) Data 节点:存储数据,客户端的写入请求会经过 Ingest 节点的处理再转发给 Data 节点;客户端的查询请求会经过 Coordinating 节点向 Data 节点发起。
定义一个 Gateway 资源,定义集群外部流量访问集群中 Elasticsearch 服务的入口。集群外部的客户通过 istio.elasticsearch.com 域名和 9200 端口访问集群内部的 Elasticsearch 服务。
apiVersion: networking.istio.io/v1alpha3
kind: Gateway
metadata:
  name: istio-elasticsearch-gateway
  namespace: istio-demo
spec:
  selector:
    istio: ingressgateway
  servers:
  - port:
      number: 9200
      name: http
      protocol: HTTP
    hosts:
       - "istio.elasticsearch.com" #客户端访问的域名
将 VirtualService 绑定到 Gateway 上,使用 Istio 规则来控制从集群外部通过 Gateway 进入的流量。将所有写操作的流量转发至 Ingest 节点,其他操作的流量转发至 Coordinating 节点。
apiVersion: networking.istio.io/v1alpha3
kind: VirtualService
metadata:
  name: istio-elasticsearch-gateway-virtualservice
  namespace: istio-demo
spec:
  hosts:
  - "istio.elasticsearch.com" #客户端访问的域名
  gateways:
  - istio-elasticsearch-gateway  #gateway 的名称
  http:
  - match:  #写入操作的请求分发至 ingest 节点
    - uri:
        regex: .*_doc.* #正则表达式匹配 url,例如创建文档 my-index-istio/doc/1
    - uri:
        prefix: /_bulk #匹配 url 前缀,bulk 批量提交
    route:
      - destination:
          host: istio-elasticsearch-es-ingest #kubernetes 集群中真正存在的 service
  - route:
    - destination:  #其余操作的请求分发至 coordinating 节点
        host: istio-elasticsearch-es-coordinating
使用以下命令应用 Istio 转发规则:
kubectl apply -f gateway.yaml
kubectl apply -f virtualservice.yaml
7.3.7 访问验证
由于在 Gateway 中定义的域名没有 DNS 服务器能解析到 SLB 的公网地址,我们需要在客户端添加 host 记录,在客户端编辑 /etc/hosts,添加以下记录:
121.41.8.133 istio.elasticsearch.com
客户端写入 1000 条数据:
for i in {1..1000};do curl -u elastic:L733hU98Y467IZMft4DzLq5m \
http://istio.elasticsearch.com:9200/my-index-istio/_doc\?pretty \
-X POST -H "Content-Type:application/json" \
-d "{\"name\":\"tom_$i\",\"age\":18}";done#返回结果
{
  "_index" : "my-index-istio",
  "_type" : "_doc",
  "_id" : "1",
  "_version" : 1,
  "result" : "created",
  "_shards" : {
    "total" : 2,
    "successful" : 2,
    "failed" : 0
  },
  "_seq_no" : 0,
  "_primary_term" : 1
}
......
客户端发起 1000 次查询请求:
for i in {1..1000};do curl -u elastic:L733hU98Y467IZMft4DzLq5m \
http://istio.elasticsearch.com:9200/my-index-istio/_count\?pretty;done#返回结果
{
  "count" : 107,
  "_shards" : {
    "total" : 1,
    "successful" : 1,
    "skipped" : 0,
    "failed" : 0
  }
}
......
打开 Kiali 界面查看流量转发情况是否符合我们的预期,双击 istio-ingressgateway 可以只查看和 Gateway 相关的流量。
可以看到流量在经过 Gateway 时分成了两部分,写入流量都转发给了 Ingest 节点的 Service,查询流量都转发给了 Coordinating 节点的 Service。在左上角的 Display 下拉框中我们可以勾选一些我们关心的指标显示,例如:
Response Time(响应时间):这里我们选择 99% 的百分位响应时间,指的是 99% 的请求响应时间,都处在这个值以下,单位为 ms 或者 s。 Throughput(吞吐量):可以选择查看每秒发送的数据包的大小或者每秒接收的数据包的大小,单位为 bps 或者 kbs。 Namespace Boxes(命名空间):用方框标识不同命名空间的资源。 Traffic Distribution(流量分布):流量分布到不同 Service 的百分比。 Traffic Rate(请求速率):每秒的请求次数,单位为 rps。
此时查看阿里云 SLB 页面,Istio IngressGateway 暴露的 9200 端口的健康检查已经正常。
7.3.8 Istio IngressGateway HTTPS 加密
在前面创建 Istio 的 Elasticsearch 集群时我们选择不启用 Elasticsearch 自身的 HTTPS 加密,而交给 Istio 来管理 TLS 加密,现在我们在 Istio IngressGateway 上配置 HTTPS 加密。
创建用于服务签名的根证书和私钥:
openssl req -x509 -sha256 -nodes -days 365 -newkey rsa:2048 \
-subj '/O=elasticsearch Inc./CN=elasticsearch.com' \
-keyout elasticsearch.com.key \
-out elasticsearch.com.crt
为 istio.elasticsearch.com 域名创建证书和私钥:
openssl req -out istio.elasticsearch.com.csr -newkey rsa:2048 -nodes \
-keyout istio.elasticsearch.com.key \
-subj "/CN=istio.elasticsearch.com/O=istio organization"openssl x509 -req -days 365 -CA elasticsearch.com.crt \
-CAkey elasticsearch.com.key -set_serial 0 \
-in istio.elasticsearch.com.csr -out istio.elasticsearch.com.crt
查看创建相关证书文件:
> ls -l
total 20
-rw-r--r-- 1 chengzw chengzw 1212 Aug 30 10:52 elasticsearch.com.crt
-rw------- 1 chengzw chengzw 1708 Aug 30 10:52 elasticsearch.com.key
-rw-r--r-- 1 chengzw chengzw 1074 Aug 30 10:54 istio.elasticsearch.com.crt
-rw-r--r-- 1 chengzw chengzw  948 Aug 30 10:53 istio.elasticsearch.com.csr
-rw------- 1 chengzw chengzw 1704 Aug 30 10:53 istio.elasticsearch.com.key
为 Ingress Gateway 创建 Secret:
kubectl create -n istio-system secret tls istio-elasticsearch-credential \
--key=istio.elasticsearch.com.key \
--cert=istio.elasticsearch.com.crt
修改原先 Istio Gateway 的资源文件,将 credentialName 的值指定为 istio-elasticsearch-credential,这个与刚刚创建的 Secret 名称相同,TLS 模式的设置为 SIMPLE。
apiVersion: networking.istio.io/v1alpha3
kind: Gateway
metadata:
  name: istio-elasticsearch-gateway-tls
  namespace: istio-demo
spec:
  selector:
    istio: ingressgateway
  servers:
  - port:
      number: 9200
      name: https
      protocol: HTTPS #改为 HTTPS 协议
    hosts:
       - "istio.elasticsearch.com" #客户端访问的域名
    tls: #TLS 加密
      mode: SIMPLE
      credentialName: istio-elasticsearch-credential
定义 VirtualService 关联 Gateway。
apiVersion: networking.istio.io/v1alpha3
kind: VirtualService
metadata:
  name: istio-elasticsearch-gateway-virtualservice-tls
  namespace: istio-demo
spec:
  hosts:
  - "istio.elasticsearch.com" #客户端访问的域名
  gateways:
  - istio-elasticsearch-gateway-tls  #gateway 的名称
  http:
  - match:  #写入操作的请求分发至 ingest 节点
    - uri:
        regex: .*_doc.* #正则表达式匹配 url,例如创建文档 my-index-istio/doc/1
    - uri:
        prefix: /_bulk #匹配 url 前缀,bulk 批量提交
    route:
      - destination:
          host: istio-elasticsearch-es-ingest #kubernetes 集群中真正存在的 service
  - route:
    - destination:  #其余操作的请求分发至 coordinating 节点
        host: istio-elasticsearch-es-coordinating
删除原先的 Gateway 和 Virtualservice,创建新的 TLS 加密的 Gateway 和 Virtualservice。
kubectl delete -f gateway.yaml
kubectl delete -f virtualservice.yaml
kubectl apply -f gateway-tls.yaml
kubectl apply -f virtualservice-tls.yaml
由于我们的 HTTPS 证书是自签证书,客户端通过 curl 命令访问 Elasticsearch 时需要加上 -k 参数,表示允许连接不受信任的 HTTPS 连接。
客户端写入数据:
curl -k -u elastic:L733hU98Y467IZMft4DzLq5m \
https://istio.elasticsearch.com:9200/my-index-istio/_doc\?pretty \
-X POST -H "Content-Type:application/json" \
-d "{\"name\":\"tom_$i\",\"age\":18}"#返回结果
{
  "_index" : "my-index-istio",
  "_type" : "_doc",
  "_id" : "1",
  "_version" : 1,
  "result" : "created",
  "_shards" : {
    "total" : 2,
    "successful" : 2,
    "failed" : 0
  },
  "_seq_no" : 0,
  "_primary_term" : 1
}
......
客户端查询数据:
curl -k -u elastic:L733hU98Y467IZMft4DzLq5m \
https://istio.elasticsearch.com:9200/my-index-istio/_count\?pretty#返回结果
{
  "count" : 107,
  "_shards" : {
    "total" : 1,
    "successful" : 1,
    "skipped" : 0,
    "failed" : 0
  }
}
......
现在外部客户端已经可以通过 HTTPS 访问集群内部的 Elasticsearch 服务了。
7.3.9 清理现场
kubectl delete -f gateway-tls.yaml
kubectl delete -f virtualservice-tls.yaml
kubectl delete -f deploy-eck-istio
kubectl delete namespace istio-demo
helm uninstall -n istio-system istio-base istio-ingress istiod
kubectl delete -f istio-1.11.1/samples/addons
kubectl delete namespace istio-system
本文收录于 Elastic Stack 实战手册,更多精彩内容点击以下链接了解: https://developer.aliyun.com/ebook/7687?accounttraceid=19c608569f484c7ba6384bb849bb780bhhfc
8 参考资料
[1] 阿里云 Kubernetes 容器服务控制台: https://cs.console.aliyun.com/ [2] kubectl 安装: https://kubernetes.io/zh/docs/tasks/tools/install-kubectl-macos/ [3] 安装 Helm: https://helm.sh/zh/docs/intro/install/ [4] 实例规格族文档: https://help.aliyun.com/document_detail/25378.html#r6a [5] 云服务器 ECS: https://ecs.console.aliyun.com/ [6] elasticsearch-repository-oss: https://help.aliyun.com/document_detail/170022.html#section-nx5-kz4-1xs [7] 阿里云 OSS 控制台: https://oss.console.aliyun.com/bucket [8] RAM 访问控制: https://ram.console.aliyun.com/users [9] Elasticsearch Service(公有云): https://www.elastic.co/cn/cloud/elasticsearch-service/signup?baymax=docs-body&elektra=docs [10] Elastic Cloud Enterprise(ECE): https://www.elastic.co/guide/en/cloud-enterprise/current/index.html [11] Elastic Cloud on Kubernetes(ECK): https://www.elastic.co/guide/en/cloud-on-k8s/current/index.html [12] Elastic Stack 订阅: https://www.elastic.co/cn/subscriptions [13] Istio 安装: https://istio.io/latest/zh/docs/setup/install/ [14] SLB 管理界面: https://slb.console.aliyun.com/
《Docker中Image、Container与Volume的迁移》
免责声明:本文内容来源于网络,所载内容仅供参考。转载仅为学习和交流之目的,如无意中侵犯您的合法权益,请及时联系Docker中文社区!
如有侵权请联系:admin#unsafe.sh