2023-5-31 09:0:0 Author: research.nccgroup.com(查看原文) 阅读量:26 收藏
Introduction
We are going to walk through the process we took to reverse engineer parts of the Android game Coin Hunt World. Our goal was to identify methods and develop tooling to cheat at the game. Most of the post covers reverse engineering the game’s binary protocol and using that knowledge to create tooling for converting the binary protocol into something more human readable. With the ability to decode and replay packets from this protocol, we will then look into how we can cheat at the game. From this post you should get a sense of the process we took to reverse engineer the game and how to use that knowledge to develop tooling that will assist in understanding the game.
Game Overview
Coin Hunt World is an Android/iOS free-to-play and play-to-earn Geolocation game. The players walk around the real world searching for vaults to unlock. Once unlocked, the player will be asked a question from various categories such as mathematics, entertainment, etc. and if this question is answered correctly they will receive a small amount of cryptocurrency. Unlocking vaults requires keys, which can be obtained by unlocking vaults or completing daily walking challenges. To receive the cryptocurrency, you first must obtain 10,000 Resin to use for connecting Coin Hunt World with Uphold, a digital trading platform. After this has been done, your cryptocurrency will be automatically transferred to your Uphold account every Tuesday.
Lets walk through the normal game flow now, to visually demonstrate what the gameplay looks like. After creating an account, and logging into the game, you are presented as a player in this virtual world.

You can then move around this virtual world looking for vaults to unlock.

Once you find one, a key needs to be used to unlock the vault. At this point the game will let you choose a category and ask you a question related to that category.

If the question is answered correctly the user will receive a reward such as a small amount of cryptocurrency.

Each unlock of a Vault will consume a key but new keys can be earned by completing walking goals each day. There are various other aspects to the game but this describes the core functionality.
From a point of attacking the game, it would be interesting to somehow be able to directly modify the amount of cryptocurrency we have, spoof how much we have walked to earn keys, or to modify our location to open Vaults that we are not physically close to.
Intercepting Network Traffic
Before cheating at the game we first need to understand how it works, and most importantly how the game manages state, such as cryptocurrency or how much we have walked. Before doing any reverse engineering, we wanted to play the game to see how the various functionality works and what the network traffic looks like. To do this we routed our traffic through Burp, and started to use the application. We were kind of surprised at how little network traffic this was giving.

None of these requests appeared to contain details for tracking the state of the game. So it seemed likely that there was another channel for communication.
Wireshark
With no interesting traffic being sent to the proxy, there must be some other communication happening outside of our view currently. So we spun up Wireshark to get a better view of what was going on. This can be done by pushing an ARM version of tcpdump to the Android device, and executing (on MacOS):
adb shell 'su root -c /data/local/tmp/tcpdump -i wlan0 -w -" | /Applications/Wireshark.app/Contents/MacOS/Wireshark -k -iFrom looking at the traffic, a few interesting things come up. There is unencrypted HTTP traffic on port 8000 and some unknown protocol being used over TCP on port 9933. The HTTP traffic is easy to intercept by setting up a rule in iptables to reroute it to our proxy.
iptables -t nat -A OUTPUT -p tcp -m tcp --dport 8000 -j REDIRECT --to-ports 3000This gives a little bit more details but not what we are looking for. It seems like the HTTP traffic is just used to track the user with a POST request to /api/v1/user/tracking containing the longitude and latitude coordinate of the user.
Now lets investigate what is happening on port 9933.
Investigating port 9933
We started by looking at the captured traffic in Wireshark, looking for any patterns in the protocol to help understand it.

From comparing several different packets, we can start to understand the header to some extent. Most of the packets start with the byte 0x80 but some of them have 0xA0. In binary it would look like this:
0x80 – 1000 0000
0xA0 – 1010 0000
There is a noticeable difference between the traffic sent with a 0x80 and 0xA0 headers.

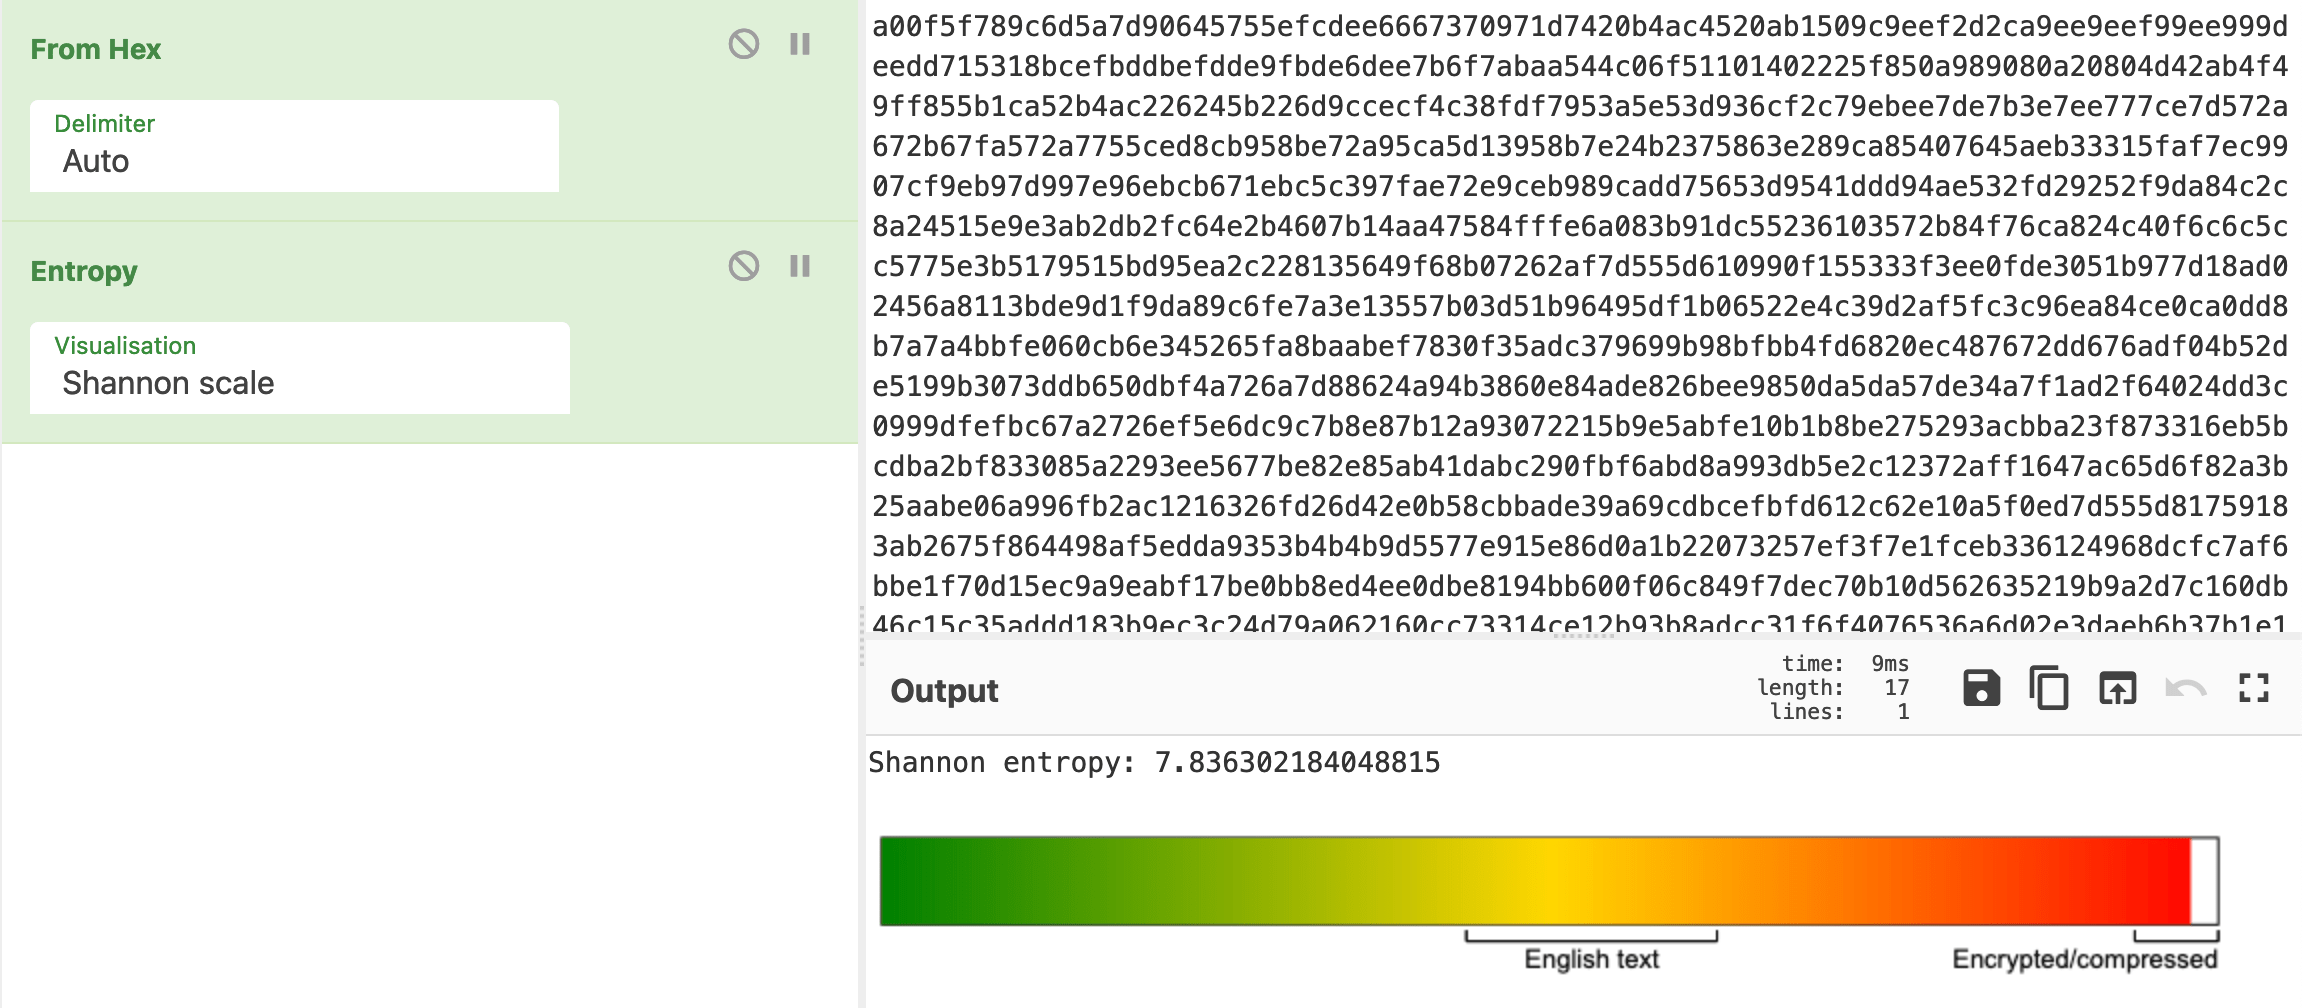
For the 0x80 header, ASCII encoded strings can be observed in the traffic and there are some patterns to how the data is structure but the 0xA0 traffic looks much more confusing and difficult to parse out any meaningful information. We can get an idea of whats happening by calculating the entropy of the traffic. This can easily be done with a free data analysis tool like CyberChef.

From this we can see that the data is very random, which clues us in that this is probably encrypted or compressed traffic. Taking a look at the binary representations of 0x80 and 0xA0 from before, we can make the assumption that the 6th bit of the header is used as a flag to send data in this way.
The meaning of the next two bytes were pretty easy to determine. For large packets this value would be high, and for small packets it would be low. From taking the value and counting out the bytes in a small packet, it ended up matching perfectly. So these 2 bytes are used for the length of the data being transmitted over this protocol.
Other than this, it was difficult for us to understand what the rest was doing. We will need to jump into the code to understand the rest of the protocol data.
Initial Binary Investigation
First we need to get the APK from the device. The location the APK is stored at can be determined with pm path <package_name>.

It turns out that the application is split between 3 APKs. So we will need to inspect each one to get an understanding of the application. Based on the APK names, it looks like we are dealing with a game built with the Unity framework. In order to reverse engineer it, we will need to understand how it works and use the appropriate tooling to get readable code. For a cursory look, we just ran apktool d apk_file.
This will extract the contents of the APK, decode the AndroidManifest.xml file and decode the classes.dex files into Smali code. Smali is the intermediate representation for the Dex format that is used by the Dalvik Virtual Machine (DVM), or more recently, the Android Run Time (ART). Usually, developers will write applications in Java which gets compiled and converted into Dex byte code. Decompiling the Dex byte code back to Java is more error prone and will likely not recompile correctly. Whereas decompiling to Smali will give a more exact representation, which can then be modified and compiled back into a working Dex file. Now lets take a look at the interesting things contained in each APK file.
base.apk
This file contains some assets, resources and the Smali code. The most important part is
the file located at base/assets/bin/Data/Managed/Metadata/global-metadata.dat. This file contains strings and function names, which are necessary for reversing the game. For more details on how this file is loaded and used, check out Katy’s blogpost at https://katyscode.wordpress.com/2020/12/27/il2cpp-part-2/. We would also recommend reading the other il2cpp posts on her site if you are interested in understanding these type of games better.
split_UnityDataAssetPack.apk
This APK pretty much just contains some assets. These assets will be useful for later.
split_config.arm64_v8a.apk
This APK contains all of the shared libraries (.so files). In here the most interesting to us is the libil2cpp.so file. This shared library will be used with the global-metadata.dat file to help with analysis.
Unity and IL2CPP
Unity games for Android can be distributed in 2 different ways. The standard way is it
that is is built with various .dll’s which can be decompiled back into C# code. The other way
is by using il2cpp. This essentially compiles the game to native code, which should
improve performance of the game. There are various tools that can help with analysis, but we will be using cpp2il. The advantage of this tool over others is that it gives pseudo-code for each of the functions. However, take the output with caution (at least for ARM binaries), since the pseudo-code is not always accurate. You can also use il2cppdumper to modify the disassembly in Ghidra to help with analysis.
There is just one issue to solve before running cpp2il. The tool accepts 1 APK as input, yet we have 3 APKs, each with different parts of the full application. To handle this, we just created a new APK and copied in all of the necessary components. The main things that cpp2il needs to run are the libil2cpp.so, global-metadata.dat and the Unity assets that are referenced. So we just copied all of the assets from base.apk and split_UnityDataAssetPack.apk into split_config.arm64_v8a.apk. This does not produce a runnable application but it gets an APK that can be analyzed properly by cpp2il. The output is various text files that contain pseudo-code. Here is an example of what some of the output looks like.

Looking for Network Communication
In order to connect over the network, the application must be making use of sockets. So we will use this as an entry point. We used ag to search through the previously decompiled pseudo-code for uses of Socket. The tool ag is pretty similar to grep but it is quite a bit faster and has better default printing. Results from running ag 'Socket('.

It seems that 2 libraries are making use of Sockets, those are System and SmartFox2X. Since System is included in all Unity games, it makes sense to start looking into what SmartFox2X is.
From searching SmartFox2X, we can find the website https://www.smartfoxserver.com/. To quote the website “SmartFoxServer is a comprehensive SDK for rapidly developing multiplayer games and applications”. From navigating the website, we can find a section about the SmartFoxServer 2X protocol.

It shows on this page that it has a default port of 9933, which matches our observations of the network from earlier. There are also some details about the types of data that can be transmitted using this protocol. The website has some details on what the protocol is used for but to be able to fully understand it, we will need to reverse the code. Luckily, they share the client libraries on their website. This will be a lot easier for reversing since the tooling for decompiling a JAR file is much better than for decompiling il2cpp code. The client library is written in other languages but we are most comfortable with reversing Java, so that is where we will begin.
Starting Point to Reverse
The first thing to be done is decompile the SmartFox2X client library. To do this we just used jadx. Luckily for us, the library still has all of the symbols, which will be very helpful for reverse engineering. The goal is to understand the protocol being used on port 9933. From looking at the class names, DefaultSFSDataSerializer seems like a good place to start since the protocol likely does some serialization that it sends out over the wire. This class contains a lot of interesting methods but decodeObject() seems to be a promising starting point since it takes a byte array as input. We’ll come back to describing this function later, but for now just know that it is used to parse objects such as integers, arrays, etc. from the byte array. We will first traverse up the call chain to reach a spot that reads the header of the data being transmitted then reverse engineer back toward the decodeObject() function and a few more relevant functions that it calls.
Finding the PacketHeader
From traversing up the call chain, we get to a function called onDataRead() in the class SFSIOHandler. This appears to be the code that handles the data for each packet sent over the network.
public void onDataRead(ByteArray data) throws SFSException {
    if (data.getLength() == 0) {
        throw new SFSException("Unexpected empty packet data: no readable bytes available!");
    }
    if (this.bitSwarm != null    this.isDebugMode) {
        if (data.getLength() > 1024) {
            this.log.info("Data Read: Size > 1024, dump omitted");
        } else {
            this.log.info("Data Read: " + ByteUtils.fullHexDump(data.getBytes()));
        }
    }
    data.setPosition(0);
    while (data.getLength() > 0) {
        if (getReadState() == 0) {
            data = handleNewPacket(data);
        } else if (getReadState() == 1) {
            data = handleDataSize(data);
        } else if (getReadState() == 2) {
            data = handleDataSizeFragment(data);
        } else if (getReadState() == 3) {
            data = handlePacketData(data);
        } else if (getReadState() == 4) {
            data = handleInvalidData(data);
        }
    }
}
To understand the flow, we must understand what getReadState() does. The getReadState() function returns the variable currentState from the FiniteStateMachine class. The SFSIOHandler class actually has an initialize function which initializes the state and transitions of the FiniteStateMachine.
private void InitStates() {
    this.fsm = new FiniteStateMachine();
    this.fsm.addState(4);
    this.fsm.addState(3);
    this.fsm.addState(1);
    this.fsm.addState(2);
    this.fsm.addState(0);
    this.fsm.addStateTransition(0, 1, 0);
    this.fsm.addStateTransition(1, 3, 1);
    this.fsm.addStateTransition(1, 2, 2);
    this.fsm.addStateTransition(2, 3, 3);
    this.fsm.addStateTransition(3, 0, 4);
    this.fsm.addStateTransition(3, 4, 5);
    this.fsm.addStateTransition(4, 0, 6);
    this.fsm.setCurrentState(0);
}
So there are 5 states (0,1,2,3 and 4) and 7 transitions between those states. So for example, applying transition 4 will cause the state to change from 3 to 0. The function getReadState() will get one of the 5 states and during the parsing of the data from the TCP packets, the state transitions will be applied to move through the states. The diagram below makes visualizing this flow a bit easier.

The parser is initialized with state 0. So when a new packet is received by the onDataRead() function, it will first call the handleNewPacket() function.
private ByteArray handleNewPacket(ByteArray data) throws SFSException {
    if (this.isDebugMode) {
        this.log.info("Handling New Packet of size " + data.getLength());
    }
    byte headerByte = data.readByte();
    if (((headerByte   128) ^ (-1)) > 0) {
        throw new SFSException("Unexpected header byte: " + ((int) headerByte) + "n" + DefaultObjectDumpFormatter.prettyPrintByteArray(data.getBytes()));
    }
    PacketHeader header = createPacketHeader(headerByte);
    this.pendingPacket = new PendingPacket(header);
    this.fsm.applyTransition(0);    // Applies transition 0 which changes state from 0 to 1
    return resizeByteArray(data, 1, data.getLength() - 1);
}
It first does an error check on the header then calls createPacketHeader(), which creates a PacketHeader object.
private PacketHeader createPacketHeader(byte headerByte) {
    return new PacketHeader(true, (headerByte   64) > 0, (headerByte   32) > 0, (headerByte   16) > 0, (headerByte   8) > 0);
}
This is essentially just checking if various bits are set in the header and passing them as a boolean values into the PacketHeader constructor. From there we can easily tell what each bit represents.
public PacketHeader(boolean binary, boolean encrypted, boolean compressed, boolean blueBoxed, boolean bigSized) {
    this.binary = binary;
    this.compressed = compressed;
    this.encrypted = encrypted;
    this.blueBoxed = blueBoxed;
    this.bigSized = bigSized;
}
From earlier, we had sniffed traffic for this protocol and saw both 0x80 and 0xA0 headers. These breakdown as follows:
0x80 = 1000 0000 – Binary flag is set which seems to always be the case
0xA0 = 1010 0000 – Binary and compression flags are set
At this point the PacketHeader object is incomplete since it does not contain the length of the data that will be received. Looking at the end of handleNewPacket(), we see that transition 0 is applied which causes a state change from 0 to 1. So on the next iteration of the while loop, handleDataSize() is called.
private ByteArray handleDataSize(ByteArray data) throws SFSException {
    ByteArray data2;
    if (this.isDebugMode    this.log.isDebugEnabled()) {
        this.log.debug("Handling Header Size. Length: " + data.getLength() + " (" + (this.pendingPacket.getHeader().isBigSized() ? "big" : "small") + ")");
    }
    int dataSize = -1;
    int sizeBytes = 2;
    if (this.pendingPacket.getHeader().isBigSized()) {
        if (data.getLength() >= 4) {
            dataSize = data.readInt();
        }
        sizeBytes = 4;
    } else if (data.getLength() >= 2) {
        dataSize = data.readUShort();
    }
    if (this.isDebugMode    this.log.isDebugEnabled()) {
        this.log.debug("Data size is " + dataSize);
    }
    if (dataSize != -1) {
        this.pendingPacket.getHeader().setExpectedLen(dataSize);
        data2 = resizeByteArray(data, sizeBytes, data.getLength() - sizeBytes);
        this.fsm.applyTransition(1);    // Move from state 1 to 3
    } else {
    // Handle fragmented packet
        this.fsm.applyTransition(2);    // Move from state 1 to 2
        writeBytes(this.pendingPacket, data);
        data2 = this.EMPTY_BUFFER;
    }
    return data2;
}
Based on the flag for bigSized, the code will read the length in as either an integer or a short and set the length for the PacketHeader object. If the dataSize of the packet is not -1, then the packet contains all of the data needed for the deserialization and will apply transition 1 to move to the handlePacketData() function. Otherwise, we are dealing with a fragmented packet and transition 2 will be applied to move to the function handleDataSizeFragment().
private ByteArray handleDataSizeFragment(ByteArray data) throws SFSException {
    ByteArray data2;
    if (this.isDebugMode    this.log.isDebugEnabled()) {
        this.log.debug("Handling Size fragment. Data: " + data.getLength());
    }
    int remaining = this.pendingPacket.getHeader().isBigSized() ? 4 - this.pendingPacket.getBuffer().getLength() : 2 - this.pendingPacket.getBuffer().getLength();
    if (data.getLength() >= remaining) {
        writeBytes(this.pendingPacket, data, remaining);
        int neededLength = this.pendingPacket.getHeader().isBigSized() ? 4 : 2;
        ByteArray size = new ByteArray();
        size.writeBytes(this.pendingPacket.getBuffer().getBytes(), neededLength);
        size.setPosition(0);
        int dataSize = this.pendingPacket.getHeader().isBigSized() ? size.readInt() : size.readShort();
        if (this.isDebugMode    this.log.isDebugEnabled()) {
            this.log.debug("DataSize is ready: " + dataSize + " bytes");
        }
        this.pendingPacket.getHeader().setExpectedLen(dataSize);
        this.pendingPacket.setBuffer(new ByteArray());
        this.fsm.applyTransition(3);    // Moves from state 2 to 3
        if (data.getLength() > remaining) {
            data2 = resizeByteArray(data, remaining, data.getLength() - remaining);
        } else {
            data2 = this.EMPTY_BUFFER;
        }
    } else {
        // Append data to pendingPacket buffer
        writeBytes(this.pendingPacket, data);
        data2 = this.EMPTY_BUFFER;
    }
    return data2;
}
As more packets are received, this function will append those bytes to the buffer of the pendingPacket. This is done until a packet is received with a length greater than or equal to the remaining bytes. After, transition 3 will be applied, which will cause the code to jump to handlePacketData(). At this point, all of the data has been received and it can now be deserialized into an object.
Decoding the Messages
At this point, the payload header has been parsed which gives details about the length and format of the data to be received. Using that information the entire payload can be placed into a buffer decompressed/decrypted so that it can be converted into an object that can be used by the application. The starting point for this is handlePacketData().
private ByteArray handlePacketData(ByteArray data) throws SFSException {
    ByteArray data2;
    int remaining = this.pendingPacket.getHeader().getExpectedLen() - this.pendingPacket.getBuffer().getLength();
    boolean isThereMore = data.getLength() > remaining;
    ByteArray currentData = new ByteArray(data.getBytes());
    try {
        if (this.isDebugMode) {
            this.log.info("Handling Data: " + data.getLength() + ", previous state: " + this.pendingPacket.getBuffer().getLength() + "/" + this.pendingPacket.getHeader().getExpectedLen());
        }
        if (data.getLength() >= remaining) {
            writeBytes(this.pendingPacket, data, remaining);
            if (this.isDebugMode) {
                this.log.info("<<< Packet Complete >>>");
            }
            if (this.pendingPacket.getHeader().isEncrypted()) {
                try {
                    byte[] decrypted = this.packetEncrypter.decrypt(this.pendingPacket.getBuffer().getBytes());
                    this.pendingPacket.getBuffer().setBuffer(decrypted);
                } catch (Exception e) {
                    throw new SFSException(e);
                }
            }
            if (this.pendingPacket.getHeader().isCompressed()) {
                uncompress(this.pendingPacket);
            }
            this.protocolCodec.onPacketRead(this.pendingPacket.getBuffer());
            this.fsm.applyTransition(4);
        } else {
            writeBytes(this.pendingPacket, data);
        }
        if (isThereMore) {
            data2 = resizeByteArray(data, remaining, data.getLength() - remaining);
        } else {
            data2 = this.EMPTY_BUFFER;
        }
        return data2;
    } catch (RuntimeException ex) {
        this.log.error("Error handling data: " + ex.getMessage(), (Throwable) ex);
        this.skipBytes = remaining;
        this.fsm.applyTransition(5);
        return currentData;
    }
}
This function will first decrypt the payload (Not used in this app), decompresses the payload if necessary and then it passes it into onPacketRead().
public void onPacketRead(ByteArray packet) throws SFSException {
    ISFSObject sfsObj = SFSObject.newFromBinaryData(packet.getBytes());
    dispatchRequest(sfsObj);
}
From here we can see the start of where the payload gets deserialized into an SFSObject through the call to newFromBinaryData(). An SFSObject is an object that contains other objects or types such as integers or strings. When deserializing a data stream, it will always begin with an SFSObject and may contain several more nested SFSObjects. There are few function calls but the next area that gets interesting is the function decodeSFSObject().
private ISFSObject decodeSFSObject(ByteBuffer buffer) {
    ISFSObject sfsObject = SFSObject.newInstance();
    byte headerBuffer = buffer.get();
    if (headerBuffer != SFSDataType.SFS_OBJECT.getTypeID()) {
        throw new IllegalStateException("Invalid SFSDataType. Expected: " + SFSDataType.SFS_OBJECT.getTypeID() + ", found: " + ((int) headerBuffer));
    }
    int size = buffer.getShort();
    if (size < 0) {
        throw new IllegalStateException("Can't decode SFSObject. Size is negative = " + size);
    }
    for (int i = 0; i < size; i++) {
        try {
            int i2 = buffer.getShort();
            if (i2 < 0 || i2 > 255) {
                throw new IllegalStateException("Invalid SFSObject key length. Found = " + i2);
            }
            byte[] keyData = new byte[i2];
            buffer.get(keyData, 0, keyData.length);
            String key = new String(keyData);
            SFSDataWrapper decodedObject = decodeObject(buffer);
            if (decodedObject != null) {
                sfsObject.put(key, decodedObject);
            } else {
                throw new IllegalStateException("Could not decode value for key: " + keyData);
            }
        } catch (SFSCodecException codecError) {
            throw new IllegalArgumentException(codecError.getMessage());
        }
    }
    return sfsObject;
}
The first byte is for the headerBuffer, which is checked to ensure that it is of type SFSObject. So only payloads starting with an SFSObject are accepted. A size is read from the next 2 bytes (short) and then used in a for loop. On each iteration another size is read from the buffer, which is used to read a key. The value for this key is decoded from the buffer from the call to decodeObject(). So this essentially goes through each key in the data stream and decodes the data that follows it. At this point we are back at the function we initially started to reverse engineer from.
private SFSDataWrapper decodeObject(ByteBuffer buffer) throws SFSCodecException {
    SFSDataWrapper decodedObject;
    byte headerByte = buffer.get();
    if (headerByte == SFSDataType.NULL.getTypeID()) {
        decodedObject = binDecode_NULL(buffer);
    } else if (headerByte == SFSDataType.BOOL.getTypeID()) {
        decodedObject = binDecode_BOOL(buffer);
    } else if (headerByte == SFSDataType.BOOL_ARRAY.getTypeID()) {
        decodedObject = binDecode_BOOL_ARRAY(buffer);
    } else if (headerByte == SFSDataType.BYTE.getTypeID()) {
        decodedObject = binDecode_BYTE(buffer);
    } else if (headerByte == SFSDataType.BYTE_ARRAY.getTypeID()) {
        decodedObject = binDecode_BYTE_ARRAY(buffer);
    } else if (headerByte == SFSDataType.SHORT.getTypeID()) {
        decodedObject = binDecode_SHORT(buffer);
    } else if (headerByte == SFSDataType.SHORT_ARRAY.getTypeID()) {
        decodedObject = binDecode_SHORT_ARRAY(buffer);
    } else if (headerByte == SFSDataType.INT.getTypeID()) {
        decodedObject = binDecode_INT(buffer);
    } else if (headerByte == SFSDataType.INT_ARRAY.getTypeID()) {
        decodedObject = binDecode_INT_ARRAY(buffer);
    } else if (headerByte == SFSDataType.LONG.getTypeID()) {
        decodedObject = binDecode_LONG(buffer);
    } else if (headerByte == SFSDataType.LONG_ARRAY.getTypeID()) {
        decodedObject = binDecode_LONG_ARRAY(buffer);
    } else if (headerByte == SFSDataType.FLOAT.getTypeID()) {
        decodedObject = binDecode_FLOAT(buffer);
    } else if (headerByte == SFSDataType.FLOAT_ARRAY.getTypeID()) {
        decodedObject = binDecode_FLOAT_ARRAY(buffer);
    } else if (headerByte == SFSDataType.DOUBLE.getTypeID()) {
        decodedObject = binDecode_DOUBLE(buffer);
    } else if (headerByte == SFSDataType.DOUBLE_ARRAY.getTypeID()) {
        decodedObject = binDecode_DOUBLE_ARRAY(buffer);
    } else if (headerByte == SFSDataType.UTF_STRING.getTypeID()) {
        decodedObject = binDecode_UTF_STRING(buffer);
    } else if (headerByte == SFSDataType.TEXT.getTypeID()) {
        decodedObject = binDecode_TEXT(buffer);
    } else if (headerByte == SFSDataType.UTF_STRING_ARRAY.getTypeID()) {
        decodedObject = binDecode_UTF_STRING_ARRAY(buffer);
    } else if (headerByte == SFSDataType.SFS_ARRAY.getTypeID()) {
        buffer.position(buffer.position() - 1);
        decodedObject = new SFSDataWrapper(SFSDataType.SFS_ARRAY, decodeSFSArray(buffer));
    } else if (headerByte == SFSDataType.SFS_OBJECT.getTypeID()) {
        buffer.position(buffer.position() - 1);
        ISFSObject sfsObj = decodeSFSObject(buffer);
        SFSDataType type = SFSDataType.SFS_OBJECT;
        ISFSObject iSFSObject = sfsObj;
        if (sfsObj.containsKey(CLASS_MARKER_KEY)    sfsObj.containsKey(CLASS_FIELDS_KEY)) {
            type = SFSDataType.CLASS;
            iSFSObject = sfs2pojo(sfsObj);
        }
        decodedObject = new SFSDataWrapper(type, iSFSObject);
    } else {
        throw new SFSCodecException("Unknow SFSDataType ID: " + ((int) headerByte));
    }
    return decodedObject;
}
This is another important function and coordinates a lot of the deserializing. There is a huge if-else clause which essentially acts as a switch statement. A header byte is obtained from the buffer which is used in this switch statement to determine how to deserialize the next data element. The function getTypeID() returns an integer that corresponds with the given type. This seems to be used to decode all the primitive types (int, String, double, etc.) but also an SFSObject and SFSArray (an array that can contain different types of data) type. Most of the specific decoding functions are in the form binDecode_TYPE(buffer). Each type then corresponds to a value between 0 and 20 and the following values are defined in the SFSDataType enum.
NULL(0),
BOOL(1),
BYTE(2),
SHORT(3),
INT(4),
LONG(5),
FLOAT(6),
DOUBLE(7),
UTF_STRING(8),
BOOL_ARRAY(9),
BYTE_ARRAY(10),
SHORT_ARRAY(11),
INT_ARRAY(12),
LONG_ARRAY(13),
FLOAT_ARRAY(14),
DOUBLE_ARRAY(15),
UTF_STRING_ARRAY(16),
SFS_ARRAY(17),
SFS_OBJECT(18),
CLASS(19),
TEXT(20);
So if the headerByte is equal to 4, then the code in decodeObject() will call binDecode_INT() to decode an integer.
private SFSDataWrapper binDecode_INT(ByteBuffer buffer) {
    int intValue = buffer.getInt();
    return new SFSDataWrapper(SFSDataType.INT, Integer.valueOf(intValue));
}
This is a very simple function that just reads an integer (4 bytes) from the buffer and wraps it in the SFSDataWrapper to be returned. This returns back to the decodeSFSObject() function where it is set as the value for the key that was previously read.
sfsObject.put(key, decodedObject);
So an integer with the value of 147 would look like the following in the TCP packet.
04 00 00 00 93 – x04 is the integer type ID and x93 is 147 in hexadecimal
This call chain is recursive for SFSObjects which allows for nesting SFSObjects within each other. Similarly, SFSArrays make calls to decodeObject() allowing for nesting. With these details in mind, we now have all the necessary info for converting the binary payload sent over TCP back into an object used in the game.
Example Object Decoding
To summarize what we have learned so far, lets manually walk through decoding a message. The following is the hexadecimal representation of a message:
8000421200030001701200020001701200010007737563636573730101000163080017757365722E75706461746555736572416374697669747900016103000D0001630201
This message can be broken down like the following:

First up is the header byte which is 0x80. So we are just dealing with binary data with no compression or encryption used. We also know from the header that the next thing to do is read a short from the buffer, 0x0042, which represents the size of the payload. At this point is when the buffer is passed into decodeSFSObject(). The first step was grabbing the object header byte, 0x12 and making sure that it represents the SFSObject data type, which it does. Then for each of the 3 elements in the SFSObject, a key is read then the buffer is passed into decodeObject to read the object (i.e. SFSObject, int, byte, etc.). For the SFSObjects in the data stream, decodeSFSObject() will be called recursively to parse nested SFSObjects. The final result is an object that looks like this:
(sfs_object) p:
  (sfs_object) p:
    (bool) success: true
  (utf_string) c: user.updateUserActivity
(short) a: 13
(byte) c: 1
Hooking Functions to Decode Traffic
Now that we understand how the protocol works, lets look at how we can utilize the
JAR file to facilitate decoding the traffic. To do this we will import the JAR into a Java project and make calls to the necessary functions that we reversed earlier. The first step is reading in a pcap file and iterating over each TCP message on port 9933 and extracting the data section of the packet.
// Processing of packets was done using org.pcap4j
handle = Pcaps.openOffline(filename); //open pcap file
String filter = "tcp port 9933";    // filter for TCP port 9933
handle.setFilter(filter, BpfCompileMode.OPTIMIZE);

// Loop through each packet and grab the TCP data section
Packet packet = null;
while(true) {
    packet = handle.getNextPacketEx();
    if (p == null) {
        break;
    }
    TcpPacket tcpPacket = packet.get(TcpPacket.class);


    if (tcpPacket.getPayload() != null) {
      byte[] data = tcpPacket.getPayload().getRawData();
    }
}
Previously, we saw that the SFSIOHandler was the starting point for processing packets. So we need to instantiate the class. The constructor takes a BitSwarmClient object as its only argument.
public SFSIOHandler(BitSwarmClient bitSwarm) {
    this.isDebugMode = false;
    this.bitSwarm = bitSwarm;
    this.protocolCodec = new SFSProtocolCodec(this, bitSwarm);
    this.packetEncrypter = new DefaultPacketEncrypter(bitSwarm);
    InitStates();
    this.isDebugMode = bitSwarm.getSfs().isDebug();
}
Initially, we tried to instantiate the BitSwarmClient with its empty constructor and pass that object into the SFSIOHandler‘s constructor but this gave an error. So we looked into how SFSIOHandler was being instantiated.
this.bitSwarm = new BitSwarmClient(this);
this.bitSwarm.setIoHandler(new SFSIOHandler(this.bitSwarm));
this.bitSwarm.init();
This is ran within the initialize() function of the SmartFox class. this is a Java keyword used to reference the current object, so in this case, the SmartFox object. So we should be able to get a reference to a correctly initialized BitSwarmClient by instantiating the SmartFox class first, then using that to grab a reference to the BitSwarmClient. First we need to check to see if the SmartFox constructor takes any non primitive data types that may cause further issues for us.
public SmartFox(boolean debug) {
    this.CLIENT_TYPE_SEPARATOR = ':';
    this.majVersion = 1;
    this.minVersion = 7;
    this.subVersion = 8;
    this.clientDetails = "Android";
    this.useBlueBox = true;
    this.isJoining = false;
    this.inited = false;
    this.debug = false;
    this.isConnecting = false;
    this.autoConnectOnConfig = false;
    this.bbConnectionAttempt = 0;
    this.nodeId = null;
    this.log = LoggerFactory.getLogger(getClass());
    this.debug = debug;
    initialize();
}
Great! This only takes a boolean value. This value looks to be used for debugging, so may even be helpful to set as true as we develop the code to get insight into any issues we run into. We also see that at the end of the constructor, the initialize() function is called which will initialize the BitSwarmClient. So after instantiating the SmartFox class, we can utilize the getSocketEngine() function from the SmartFox class to obtain a reference to the BitSwarmClient object.
public BitSwarmClient getSocketEngine() {
    return this.bitSwarm;
}
So now we have a reference to the BitSwamClient object. Now to get a SFSIOHandler object we could initialize a new instance but from earlier we saw that the BitSwarmClient sets the SFSIOHandler (this.bitSwarm.setIoHandler(new SFSIOHandler(this.bitSwarm));)). So we can actually just use the following function from the BitSwarmClient to obtain a reference to a correctly initialize SFSIOHandler object.
public IOHandler getIoHandler() {
    return this.ioHandler;
}
Putting this all together we can get a reference to an SFSIOHandler object which we can then utilize for decoding.
SmartFox sf = new SmartFox(true);
SFSIOHandler handler = (SFSIOHandler) sf.getSocketEngine().getIoHandler();
With the handler set up, we can start working on parsing the data from the TCP packets.
From reversing earlier, we discovered that the entry point for handling the data from the TCP packets was the onDataRead() function of the SFSIOHandler class. So we can now call that directly using our handler.
handler.onDataRead(data);
From earlier, recall that the handler used a Finite State Machine for handling each step in the parsing process. This is relevant when instrumenting this functionality since the game messages may span 2 or more TCP packets. So we need to be able to know when an entire message has been parsed so that we can extract the SFSObject to print its contents in a more human readable form. To begin, we need to obtain a reference to the FinitStateMachine (fsm) variable from the SFSIOHandler class. Unfortunately, the fsm variable is private and the SFSIOHandler class does not have any getters for accessing this variable. Luckily, Java has some convenient functionality where you can take private variables and make them accessible. This can be done with the following code.
Field field=SFSIOHandler.class.getDeclaredField("fsm");
field.setAccessible(true);
FiniteStateMachine fsm = (FiniteStateMachine)field.get(handler);
Now that we have a reference to the FiniteStateMachine, we can check the state after each packet has been processed to see if the entire message has been received. The FiniteStateMachine exposes the getCurrentState() function to do this. Recall from the finite state machine diagram from earlier that the once the data has been deserialized into a SFSObject the state is set back to 0. So we can use this to signal when all of the data has been received for a given message.
if (fsm.getCurrentState() == 0)
Lastly, we need to get the SFSObject. Unfortunately, we could not extract it directly from the handler, but we can get the buffer of the pending packet and use that to deserialize the SFSObject. This buffer is a private variable so the same technique used for the FiniteStateMachine was needed to access it.
// Make the private variable pendingPacket accessible
Field field=SFSIOHandler.class.getDeclaredField("pendingPacket");
field.setAccessible(true);
PendingPacket pendingPacket = (PendingPacket)field.get(handler);

// Grab the buffer and convert it into an SFSObject
ISFSObject sfsObj = SFSObject.newFromBinaryData(pendingPacket.getBuffer().getBytes());
Now we can make use of the SFSObjects function getDump() to print out a readable version of the SFSObject. Putting all of these pieces together (forgoing error catching for simplicity) looks like the following.
public static void decodePcap(String filename) {
    // Set up handler for handling TCP packet data
    SmartFox sf = new SmartFox(false);
    SFSIOHandler handler = (SFSIOHandler) sf.getSocketEngine().getIoHandler();

    // Open Pcap file
    final PcapHandle pcapFile = Pcaps.openOffline(filename);

    // Filter for TCP packets on port 9933
    String filter = "tcp port 9933";
    pcapFile.setFilter(filter, BpfCompileMode.OPTIMIZE);


    Packet packet = null;
    while(true) {
            packet = pcapFile.getNextPacketEx();
        if (packet == null) {
            break;
        }
        TcpPacket tcpPacket = packet.get(TcpPacket.class);

        if (tcpPacket.getPayload() != null) {
            byte[] buffer = tcpPacket.getPayload().getRawData();
            ByteArray data = new ByteArray(buffer);

            // Read packet data
            handler.onDataRead(data);

            // Make the private pendingPacket variable accessible
            Field ppField=SFSIOHandler.class.getDeclaredField("pendingPacket");
            ppField.setAccessible(true);
            PendingPacket pendingPacket = (PendingPacket)ppField.get(handler);

            // Make the private fsm variable accessible
            Field fsmField=SFSIOHandler.class.getDeclaredField("fsm");
            fsmField.setAccessible(true);
            FiniteStateMachine fsm = (FiniteStateMachine)fsmField.get(handler);

            // Check that the state of the finite state machine is 0
            if (fsm.getCurrentState() == 0) {

                // Grab the bytes from the complete payload and deserialize it into an SFSObject
                ISFSObject sfsObj = SFSObject.newFromBinaryData(pendingPacket.getBuffer().getBytes());
                logger.info(sfsObj.getDump());
            }

        }
    }
}
Now lets test it out and see what the output looks like.

With this program we can start analyzing the game traffic and begin thinking of ways to attack it.
Cheating
Putting all of that together, we created and published a tool on github which can be used to decode pcap files or used as a proxy to analyze and replay requests. Using the tool we analyzed the network traffic to better understand how the application worked. From that analysis it was discovered that the server sets the state of most of the interesting things to attack. So when going through the vault unlocking process, the server will send to the client how much cryptocurrency the user has acquired. Since there did not seem to be anyway to set this from the client, that attack did not seem possible. There are a couple of things that the server cannot set for the client. These are the GPS coordinates and the walking pattern used for acquiring more keys.
Spoofing the GPS coordinates is easy to do and allows you to open vaults without being physically close to them. This can done fairly easily on Android by enabling Developer mode and choosing a mock location app.

From within the mock location app, set your location to near a vault. Then when you start up Coin Hunt World, you will be right next to the vault. All of the vault locations nearby can be captured from a request from the server. A single entry of what this looks like is below.
(sfs_object)
    (double) lng: -79.57888
    (long) tier: 1
    (bool) action: true
    (long) id: 317744
    (int) state: 0
    (utf_string) type: reg_v
    (null) custom_data: null
    (double) lat: 43.581177
    (long) key: 1
This can be used with the GPS spoofing app to easily navigate to available vaults.
Spoofing walking is a bit more complicated. While walking, the application will make requests like the following.
(sfs_object) p:
  (sfs_object) p:
    (int) running: 10
        (long) start_time: 1659970831567
        (double) lng: -79.5733108520508
        (int) stationary: 10
        (int) walking: 10
        (int) in_vehicle: 10
        (int) cycling: 10
        (int) steps: 8
        (double) lat: 43.5827903747559
        (int) unknown: 10


  (int) r: -1
  (utf_string) c: user.updateUserActivity


(short) a: 13
(byte) c: 1
This request is used to tell the server that the user has been walking and give data associated with that. The client will also periodically make the following request to check in on how close they are to completing the next milestone.
(sfs_object) p:
  (sfs_object) p:


  (int) r: -1
  (utf_string) c: user.validateUserSteps


(short) a: 13
(byte) c: 1
and the server will respond with something like this.
(sfs_object) p:
  (sfs_object) p:
    (int) prev_milestone: 0
        (bool) milestone_reached: false
        (bool) success: true
        (int) steps: 79
        (int) next_milestone: 500


  (utf_string) c: user.validateUserSteps


(short) a: 13
(byte) c: 1
This is mostly used to update the UI so that the user knows how far until they reach the next milestone. From observing this behavior, we noticed that the user.updateUserActivity command would increase the number of steps taken by the value for the steps parameter in that command. So with this information we began doing some tests to try and increase our step count. Initially, we attempted to replay a single request, but unfortunately the step count stayed the same. So they are doing some validation on the parameters sent to try and prevent cheating. Next the GPS coordinates were modified slightly but still the result was the same. The last single replay test was done by including updated timestamps in the replay but this did not work either.
With no success from replaying individual requests, it was time to attempt replaying a sequence of captured packets to try and achieve the walking milestones. This was meant to mimic walking as to bypass the validation that is done on the server to see if a user is actually walking. To get the requests to repeat, we first walked around and captured the sequence of packets to be used. After, we modified the code for the proxy slightly so that we could replay those requests with a push of a button. For each request, the timestamp was modified to the current time and a delay was set for the difference in time between each packet to mimic how the requests were originally sent out. Finally, we were able to complete a walking milestone without walking!

So now we can play the game without moving physically. We can obtain new keys by replaying previous captures of walking and can open vaults by spoofing our GPS coordinates to the positions that the vaults are located.
Defensive Guidance
The methods for cheating discussed in this post are interesting since it is not possible to completely stop them. GPS coordinates are controlled by the user’s device so spoofing them is always a possibility. The best measures to protect against this type of attack is through anti-reversing protections and cheat detection.
Encryption should be used for all network communication. Not only does this make intercepting and modifying traffic easier, it also leaves the user’s data open to an attacker passively listening on the network. The application can also perform checks on the device to see if it is running in a safer environment. Some of these checks could be to see if the device is rooted, emulated or currently spoofing the location. If any of these checks are true, return a message to the user and do not execute the application. It may also be worth recording a unique device identifier to identify users that working toward bypassing these checks.
To detect spoofed locations, some heuristics can be employed. Calculating the distance a user has traveled in a given period of time can be used to determine if a user is moving around the world faster than possible. The variation of the GPS coordinates could also be used. The exact location should vary slightly due to the nature of the GPS technology. If a user is consistently reporting the same GPS coordinates, it could indicate that they are replaying previous requests. On top of the previous heuristics, machine learning models can be trained and used to identify anomalies in location data. These models should be trained on known good data. All of these should be targeting long term patterns for a user and not single suspicious instances. This should help distinguish between active cheaters and errors in reporting due to equipment.
Conclusion
Throughout this post we went through the process of reverse engineering the game Coin Hunt World and most importantly how the game tracks state. To do this, we identified all network communication then reverse engineered and developed tooling to properly decode a third party binary protocol. We then looked into methods of cheating by spoofing GPS coordinates and replaying packets to complete the walking milestones. Researching games in the play-to-earn space can be interesting, because cheating can turn virtual assets directly into real money. More work can be done looking into other play-to-earn games to identify weaknesses in their earning model. NCC Group regularly provides security testing against games and gaming ecosystems to help developers find flaws in their systems and patch them.
Disclosure Timeline
- February 14th, 2023 – Initial disclosure of the unencrypted communication and location spoofing.
- February 14th, 2023 – Responded that they will look into and fix the unencrypted communication and that there is a team that monitors movement and removes cheaters every day. These algorithms are constantly being refined.
- May 11th, 2023 – Received confirmation that the unencrypted communication was fixed as of the end of April.
About NCC Group
NCC Group is a global expert in cybersecurity and risk mitigation, working with businesses to protect their brand, value and reputation against the ever-evolving threat landscape. With our knowledge, experience and global footprint, we are best placed to help businesses identify, assess, mitigate respond to the risks they face. We are passionate about making the Internet safer and revolutionizing the way in which organizations think about cybersecurity.
Here are some related articles you may find interesting
Technical Advisory – Multiple Vulnerabilities in Faronics Insight (CVE-2023-28344, CVE-2023-28345, CVE-2023-28346, CVE-2023-28347, CVE-2023-28348, CVE-2023-28349, CVE-2023-28350, CVE-2023-28351, CVE-2023-28352, CVE-2023-28353)
Introduction Faronics Insight is a feature rich software platform which is deployed on premises in schools. The application enables teachers to administer, control and interact with student devices. The application contains numerous features, including allowing teachers to transfer files to/from students and remotely viewing the contents of student screens. Generally…
Tool Release: Code Query (cq)
Code Query is a new, open source universal code security scanning tool. CQ scans code for security vulnerabilities and other items of interest to security-focussed code reviewers. It outputs text files containing references to issues found, into an output directory. These output files can then be reviewed, filtered by unix…
CowCloud
A common challenge technical teams (e.g. penetration testers) face is centralized deployment and pipelining execution of security tools. It is possible that at some point you have thought about customising several tools, buying their commercial licenses, and allowing a number of people to run the tools from AWS. The problem…
View articles by category
如有侵权请联系:admin#unsafe.sh