1 Airtest 简介
Airtest 是一个跨平台的、基于图像识别的 UI 自动化测试框架,适用于游戏和 App,支持平台有 Windows、Android 和 iOS。Airtest 框架基于一种图形脚本语言 Sikuli,引用该框架后,不再需要一行行的写代码,通过截取按钮或输入框的图片,用图片组成测试场景,这种方式学习成本低,简单易上手。
2 Airtest 实践
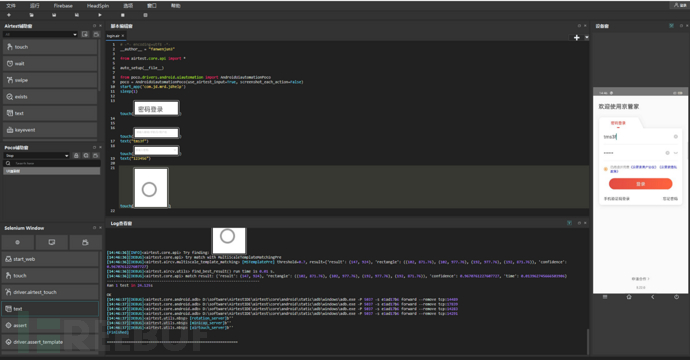
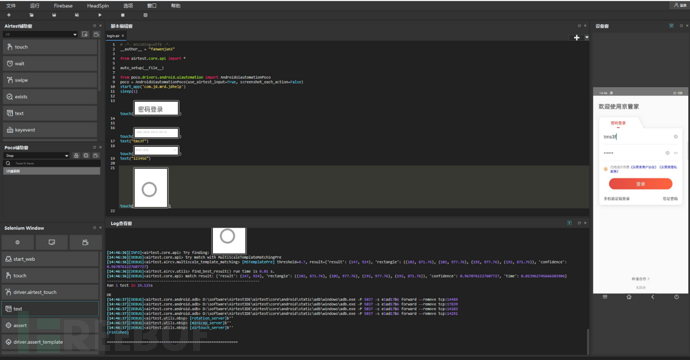
APP 接入流水线过程中,赛博平台只支持 air 脚本,因此需要对京管家 APP 的 UI 自动化脚本进行的改造。如截图可见,AirtestIDE 的主界面由菜单栏、快捷工具栏和多个窗口组成,初始布局中的 “设备窗口” 是工具的设备连接交互区域。
air 脚本生成步骤:
- 通过 adb 连接手机或模拟器
- 安装应用 APK
- 运行应用并截图
- 模拟用户输入(点击、滑动、按键)
- 卸载应用

通过以上步骤自动生成了 .air 脚本,调试过程中我们可以在 IDE 中运行代码,支持多行运行以及单行运行,调试通过后可在本地或服务器以命令行的方式运行脚本:
.air 脚本运行方式:airtest run “path to your .air dir” —device Android
.air 脚本生成报告的方式:airtest report “path to your .air dir”
3 Airtest 定位方式解析
IDE 的 log 查看窗口会时时打印脚本执行的日志,从中可以看出通过图片解析执行位置的过程。下面就以 touch 方法为例,解析 Airtest 如何通过图片获取到元素位置从而触发点击操作。
@logwrap
def touch(v, times=1, **kwargs):
    """
    Perform the touch action on the device screen
    :param v: target to touch, either a ``Template`` instance or absolute coordinates (x, y)
    :param times: how many touches to be performed
    :param kwargs: platform specific `kwargs`, please refer to corresponding docs
    :return: finial position to be clicked, e.g. (100, 100)
    :platforms: Android, Windows, iOS
    """
    if isinstance(v, Template):
        pos = loop_find(v, timeout=ST.FIND_TIMEOUT)
    else:
        try_log_screen()
        pos = v
    for _ in range(times):
        G.DEVICE.touch(pos, **kwargs)
        time.sleep(0.05)
    delay_after_operation()
    return pos

click = touch  # click is alias of t
该方法通过 loop_find 获取坐标,然后执行点击操作 G.DEVICE.touch (pos, kwargs),接下来看 loop_find 如何根据模板转换为坐标。
@logwrap
def loop_find(query, timeout=ST.FIND_TIMEOUT, threshold=None, interval=0.5, intervalfunc=None):
    """
    Search for image template in the screen until timeout
    Args:
        query: image template to be found in screenshot
        timeout: time interval how long to look for the image template
        threshold: default is None
        interval: sleep interval before next attempt to find the image template
        intervalfunc: function that is executed after unsuccessful attempt to find the image template
    Raises:
        TargetNotFoundError: when image template is not found in screenshot
    Returns:
        TargetNotFoundError if image template not found, otherwise returns the position where the image template has
        been found in screenshot
    """
    G.LOGGING.info("Try finding: %s", query)
    start_time = time.time()
    while True:
        screen = G.DEVICE.snapshot(filename=None, quality=ST.SNAPSHOT_QUALITY)
        if screen is None:
            G.LOGGING.warning("Screen is None, may be locked")
        else:
            if threshold:
                query.threshold = threshold
            match_pos = query.match_in(screen)
            if match_pos:
                try_log_screen(screen)
                return match_pos
        if intervalfunc is not None:
            intervalfunc()
        # 超时则raise,未超时则进行下次循环:
        if (time.time() - start_time) > timeout:
            try_log_screen(screen)
            raise TargetNotFoundError('Picture %s not found in screen' % query)
        else:
            t
首先截取手机屏幕 match_pos = query.match_in (screen),然后对比传参图片与截屏来获取图片所在位置 match_pos = query.match_in (screen)。接下来看 match_in 方法的逻辑:
def match_in(self, screen):
    match_result = self._cv_match(screen)
    G.LOGGING.debug("match result: %s", match_result)
    if not match_result:
        return None
    focus_pos = TargetPos().getXY(match_result, self.target_pos)
    return focus_pos
里面有个关键方法:match_result = self._cv_match (screen)
@logwrap
def _cv_match(self, screen):
    # in case image file not exist in current directory:
    ori_image = self._imread()
    image = self._resize_image(ori_image, screen, ST.RESIZE_METHOD)
    ret = None
    for method in ST.CVSTRATEGY:
        # get function definition and execute:
        func = MATCHING_METHODS.get(method, None)
        if func is None:
            raise InvalidMatchingMethodError("Undefined method in CVSTRATEGY: '%s', try 'kaze'/'brisk'/'akaze'/'orb'/'surf'/'sift'/'brief' instead." % method)
        else:
            if method in ["mstpl", "gmstpl"]:
                ret = self._try_match(func, ori_image, screen, threshold=self.threshold, rgb=self.rgb, record_pos=self.record_pos,
                                        resolution=self.resolution, scale_max=self.scale_max, scale_step=self.scale_step)
            else:
                ret = self._try_match(func, image, screen, threshold=self.threshold, rgb=self.rgb)
        if ret:
            break
    return ret
首先读取图片调整图片尺寸,从而提升匹配成功率:
image = self._resize_image(ori_image, screen, ST.RESIZE_METHOD)
接下来是循环遍历匹配方法 for method in ST.CVSTRATEGY。而 ST.CVSTRATEGY 的枚举值:
CVSTRATEGY = ["mstpl", "tpl", "surf", "brisk"]
if LooseVersion(cv2.__version__) > LooseVersion('3.4.2'):
    CVSTRATEGY = ["mstpl", "tpl", "sift", "brisk"]
func = MATCHING_METHODS.get (method, None),func 可能的取值有 mstpl、tpl、surf、shift、brisk,无论哪种模式都调到了共同的方法_try_math
if method in ["mstpl", "gmstpl"]:
    ret = self._try_match(func, ori_image, screen, threshold=self.threshold, rgb=self.rgb, record_pos=self.record_pos,
                            resolution=self.resolution, scale_max=self.scale_max, scale_step=self.scale_step)
else:
    ret = self._try_match(func, image, screen, threshold=self.threshold, rgb=self.rgb)
而_try_math 方法中都是调用的 func 的方法 find_best_result ()
@staticmethod
def _try_match(func, *args, **kwargs):
    G.LOGGING.debug("try match with %s" % func.__name__)
    try:
        ret = func(*args, **kwargs).find_best_result()
    except aircv.NoModuleError as err:
        G.LOGGING.warning("'surf'/'sift'/'brief' is in opencv-contrib module. You can use 'tpl'/'kaze'/'brisk'/'akaze'/'orb' in CVSTRATEGY, or reinstall opencv with the contrib module.")
        return None
    except aircv.BaseError as err:
        G.LOGGING.debug(repr(err))
        return None
    else:
        return ret
以 TemplateMatching 类的 find_best_result () 为例,看一下内部逻辑如何实现。
@print_run_time
def find_best_result(self):
    """基于kaze进行图像识别,只筛选出最优区域."""
    """函数功能:找到最优结果."""
    # 第一步:校验图像输入
    check_source_larger_than_search(self.im_source, self.im_search)
    # 第二步:计算模板匹配的结果矩阵res
    res = self._get_template_result_matrix()
    # 第三步:依次获取匹配结果
    min_val, max_val, min_loc, max_loc = cv2.minMaxLoc(res)
    h, w = self.im_search.shape[:2]
    # 求取可信度:
    confidence = self._get_confidence_from_matrix(max_loc, max_val, w, h)
    # 求取识别位置: 目标中心 + 目标区域:
    middle_point, rectangle = self._get_target_rectangle(max_loc, w, h)
    best_match = generate_result(middle_point, rectangle, confidence)
    LOGGING.debug("[%s] threshold=%s, result=%s" % (self.METHOD_NAME, self.threshold, best_match))
    return best_match if confidence >= self.threshold else Non
重点看第二步:计算模板匹配的结果矩阵 res,res = self._get_template_result_matrix ()
def _get_template_result_matrix(self):
    """求取模板匹配的结果矩阵."""
    # 灰度识别: cv2.matchTemplate( )只能处理灰度图片参数
    s_gray, i_gray = img_mat_rgb_2_gray(self.im_search), img_mat_rgb_2_gray(self.im_source)
    return cv2.matchTemplate(i_gray, s_gray, cv2.TM_CCOEFF_NORMED)
可以看到最终用的是 openCV 的方法,cv2.matchTemplate,那个优先匹配上就返回结果。
4 总结
使用过程中可以发现 Airtest 框架有两个缺点:一是对于背景透明的按钮或者控件,识别难度大;二是无法获取文本内容,但这一缺点可通过引入文字识别库解决,如:pytesseract。
对不能用 UI 控件定位的部件,使用图像识别定位还是非常方便的。UI 自动化脚本编写过程中可以将几个框架结合使用,uiautomator 定位速度较快,但对于 flutter 语言写的页面经常有一些部件无法定位,此时可以引入 airtest 框架用图片进行定位。每个框架都有优劣势,组合使用才能更好的实现目的。
如有侵权请联系:admin#unsafe.sh