
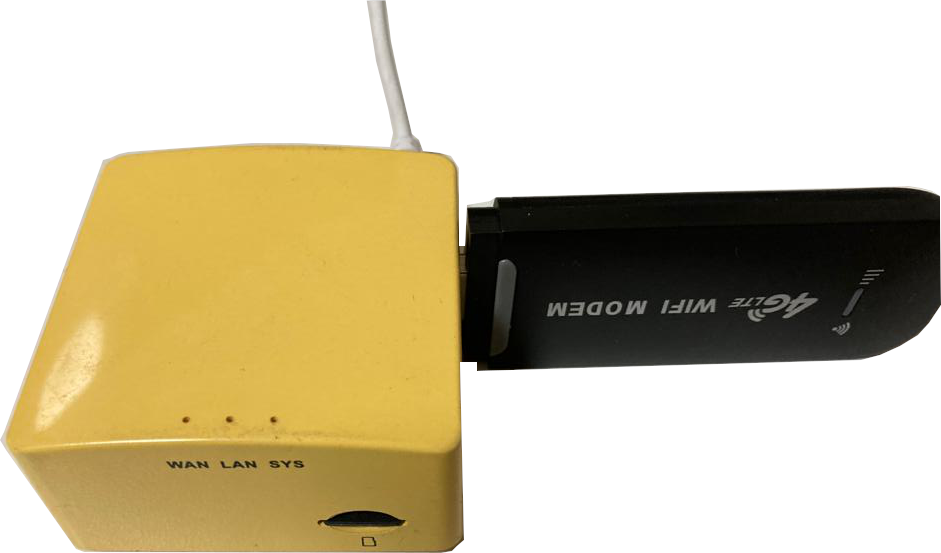
I’ve written a couple of blog posts in the past in which I explain how to use Marcus Mengs’ truly excellent P4wnP1. The most common deployment scenario involves a Raspberry Pi Zero W, or possibly a FriendlyArm NanoPi R1S. The downside of these platforms is that you need to be in fairly close physical proximity in order to access the WiFi interface, or even closer to access Bluetooth. The NanoPi R1S can support an LTE modem, to give you much bigger range, but the downside to that is that it looks pretty clunky.
In this post, I’m going to show you how to install and use P4wnP1 on the LTE modem itself, skipping the NanoPi R1S completely.
Wait, what!? Is this a trick? How on earth can you install software on an LTE modem? Good question!
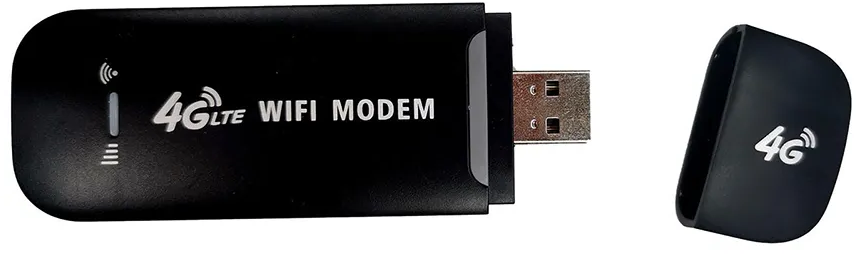
About six years ago, the Osmocom folks posted about how some Qualcomm modems are actually just running Linux under the hood. There are a bunch of modems that fall into this category, which you can find here. Having just created USaBUSe, I immediately saw the potential for running USaBUSE on such a platform – it had the USB gadget capability, and a long range network interface. Just PERFECT! I immediately purchased a DLink DWM222 modem, which is on that list. But it languished, as I was unable to get it to the ADB shell immediately, and then other projects came along pushing it down the stack.
Then last year, Hackaday posted this article, about how a hacker named HandsomeYingyan had figured out that a particular LTE modem was running Linux, and was able to build his own distribution for it. His github repo was in Chinese, and another hacker named extrowerk had gone to the trouble of running it through Google Translate, and making notes on how to actually use it for the rest of us. Seeing this, I immediately went searching for a suitable vendor on AliExpress, and added one to my shopping cart. But personal hacking budgets intervened (I’ve never been good at asking SensePost to pay for my toys, but I am getting better – I submitted this claim at least!), and it languished there until about two months ago when I finally pulled the trigger. Two months later, thanks to the vagaries of the South African Post Office, it finally arrived.
Having opened it up, I found it labeled as “FY_UZ801_V3.2”, which appeared to be a newer revision of one of the “known-working” variants. Good news! It’s actually quite a capable little device. Quad core, 512MB RAM, 4GB flash, WiFi and Bluetooth (Bluetooth not yet working), and of course, USB gadget enabled with an LTE interface. Just check that the GSM frequency bands on the modem you choose match up to what is available in your area.
I lost no time in following extrowerk’s instructions, and soon had Debian installed and running successfully on my modem! Whoop! Note: When flashing the “base” files, you want to be in the base/ directory, and run ./flash.sh, rather than base/flash.sh, as many of the required files are not found otherwise. Note2: Be smarter than me, and take a backup of the modem’s firmware using this comment’s advice, before gaily wiping everything out!
I was soon logged on using adb shell, and exploring the new playground I found myself in. First things first, let’s get it online using the WiFi interface. After setting your TERM variable to something suitable like TERM=xterm, you can run nmtui and select your AP.
It is a very limited installation of Debian, many necessities you would expect are not installed, such as vi. (OK, or nano!) But the /etc/apt/sources.list contains references to some Chinese mirrors that were not responding when I tried to run apt update. Without an editor, how are you supposed to fix this? My approach was the following:
cat > /etc/apt/sources.list <<EOF
deb http://deb.debian.org/debian bullseye main contrib non-free
deb-src http://deb.debian.org/debian bullseye main contrib non-free

deb http://deb.debian.org/debian bullseye-updates main contrib non-free
deb-src http://deb.debian.org/debian bullseye-updates main contrib non-free

deb http://deb.debian.org/debian bullseye-backports main contrib non-free
deb-src http://deb.debian.org/debian bullseye-backports main contrib non-free

deb http://security.debian.org/debian-security/ bullseye-security main contrib non-free
deb-src http://security.debian.org/debian-security/ bullseye-security main contrib non-free
EOF
Now you can run apt update and install your preferred editor and other niceties.
One of my first priorities was to get the LTE interface working, as this was the whole point of the device. And this is where my struggles began …
After way too much frustration wondering why the modem was reporting “NotReady”, I realised that I probably had the wrong firmware loaded for the LTE peripheral. And in my haste to get Debian installed, I had merrily blown away the entire firmware for the entire modem, including that for the LTE peripheral!
Note: There are two things that could quite reasonably be called an “LTE modem”. One is the entire device, with a USB connector sticking out of it. The other is the actual LTE peripheral. Both of these have firmware which is required to make them functional. One is a Linux operating system, and the other is a program for the Hexagon Digital Signal Processor chip. The LTE peripheral’s firmware just happens to be a file in the “entire device” firmware. So I’ll call it the LTE peripheral firmware, clumsy as it is.
Fortunately, I then found another person ddscentral who had built their own version of the kernel, but had also made the LTE peripheral firmware available to download.
ddscentral even hacked the bootloader to enter fastboot mode when the reset button is pressed while applying power. This means that you can’t brick the device by making the Linux distribution unbootable, which would prevent you from successfully invoking adb bootloader. If it won’t boot, just hold the button while plugging it in to the host, and it will show up in fastboot devices. Magic! Just follow the instructions at the link above, and all should be good. With that done, I was able to get an LTE peripheral that recognised the modem, and my Vodacom SIM card, but I was still unable to get online.
After a lot of hair pulling, I finally figured out that there are some built-in profiles in the LTE peripheral firmware that do not have the correct APN set. Running qmicli -d /dev/wwan0qmi0 -p --wds-get-profile-list=3gpp showed 3 profiles, two with an empty APN, and one with "m2m". None of which will work for Vodacom in South Africa. I made sure that the APN setting in the NetworkManager interface definition was correctly set to "internet", but that still did not work. After much going around, I discovered that the following script run at startup would do the trick.
#!/bin/sh

# wait for the modem to enumerate to the host OS
while [ ! -e /dev/wwan0qmi0 ] ; do
	sleep 5
done

for i in 1 2 3 ; do
	/usr/bin/qmicli -d /dev/wwan0qmi0 -p --wds-modify-profile="3gpp,$i,apn=internet,pdp-type=ipv4v6"
done 2>&1 | tee /tmp/qmicli.log
This was run in the background from /etc/rc.local, after enabling the rc-local systemd unit, and creating /etc/rc.local as an executable shell script.
Finally! I could now disable the WiFi interface, and connect purely over the LTE interface. Except … many mobile service providers use Carrier Grade NAT, making it impossible to establish inbound connections to mobile devices on their network. And even for those that don’t, how do you find it in the first place? Well, the second can be addressed using Dynamic DNS, but the first? I decided to create a Wireguard VPN to a convenient jump box. I’ll skip the instructions for that, as I simply followed a tutorial that I found online anyway. Just remember to add the PersistentKeepalive parameter so that it will establish the connection immediately, and not just when some process on the device tries to connect to another VPN endpoint.
Now I can get to my device using something similar to the following SSH config entry:
Host openstick-jumpbox
        User root
        ProxyJump jumpbox
        Hostname 192.168.167.117
        LocalForward 18000 localhost:8000
The need for the LocalForward will become clear in due course.
Sweet! Finally, we can start getting P4wnP1 installed. The easiest way is to simply clone the P4wnP1_aloa repo, and then copy the files to the right place. There are also a few dependencies required by P4wnP1, that are not installed by default.
apt install hostapd iproute2 iw hostapd git
git clone https://github.com/RoganDawes/P4wnP1_aloa
cd P4wnP1_aloa
mkdir -p /usr/local/P4wnP1
cp build/P4wnP1_* /usr/local/bin/
cp -r dist/* /usr/local/P4wnP1/
cp build/webapp* /usr/local/P4wnP1/www
mv /usr/local/P4wnP1/P4wnP1.service /etc/systemd/system/
Now P4wnP1 should be ready to run, but there is another wrinkle to deal with first. Up until now, we have been able to get into the modem by using adb shell from the PC that the modem is plugged into. This is managed by the mobian-usb-gadget systemd unit. But that is also using the USB interface, so we first have to stop/disable that, before P4wnP1 can take it over. Just be aware that from this point, your emergency access path is going away, so if you manage to lock yourself out (e.g. the LTE interface doesn’t come up for whatever reason), you might have to re-install it from scratch! There are pads on the PCB for a serial console which may provide an alternative access route, but I have not investigated those yet. They ARE documented, at least. Also be aware that while the device might already have a WiFi network interface defined, P4wnP1 will try to reconfigure it according to its own configuration settings, and so far, I have not been able to get this working. So don’t count on the WiFi when P4wnP1 is running.
I have used the mac80211_hwsim in the past on the NanoPi R1S to add fake WLAN interfaces, so that P4wnP1 will leave the real interface alone, but the kernel module has not been compiled in the images provided. I’m looking into building my own images, and will definitely include it when I do.
All that said, you can stop the adb interface and start P4wnP1 as follows:
systemctl stop mobian-usb-gadget
systemctl start P4wnP1.service
Note that I didn’t enable the P4wnP1 service, or disable the mobian one just yet, allowing a simple reboot to re-activate the ADB daemon.
Check that P4wnP1 is running successfully using journalctl -xfu P4wnP1. If it complains, I might have missed some of its dependencies in my commands above.
Now, if you are connected to your device using the SSH config snippet suggested above, the LocalForward should allow you to open your browser to http://localhost:18000, and access the P4wnP1 control interface. NB! P4wnP1 will listen on all interfaces by default, and there is no authentication! This is ok when the interfaces are all connected to trusted networks, and the WiFi passphrase is changed to a strong unique value, etc, etc. It’s a slightly different story when one of the interfaces is an LTE one, possibly exposed to the broader internet. I’d suggest using an iptables/nftables rule to prevent access to port 50051 and port 8000, or else editing the source and changing “0.0.0.0” to “127.0.0.1” and rebuilding. Now you can do all the P4wnP1 things you could do on any other platform, just from much farther away.
One thing to be aware of is that the thermal design of this hardware is not fantastic, and it may overheat if pushed too hard. The devices ship with firmware that only uses two of the four available cores as a result, but the replacement kernels are not restricted in this way. If you experience your device overheating, or becoming unstable, you can disable cores with chcpu -d 2,3 to disable cores 2 and 3. In theory, Linux kernel thermal management should prevent overheating, but I have not tested this at all.
如有侵权请联系:admin#unsafe.sh