在今年三月份的时候,我参加了腾讯游戏安全技术竞赛,到现在差不多快过去半年了,当时做这道安卓初赛题目时,也是卡在开头就毫无头绪了,而后看到看雪上的三位大佬|_|sher师傅,juice4fun师傅和fallw1nd师傅都分享了他们做这道题目时的解题过程,也是让我重拾了做出这道安卓初赛题的信心,因为需要分心在学习和其他事情上,所以从三月份到七月份也是陆陆续续复现了五个月,一路上走走停停。
终于在八月份,我难能可贵的获得了整整一个月的充裕时间,这也让我可以好好去钻研这道对我来说难度极大的安卓题目了,解题的过程中基本上把我能想到的安卓逆向工具用了个遍,每当我在解题的过程中遇到瓶颈时,我总会把这三位大佬的writeup打开来反复观摩研究思考为什么要这样做,怎么做效果会更好。
直到注册机写完之后纵观整个解题过程,真的是学到了很多。il2CppDumper是分析unity游戏的基础,能有好的开头全靠站在巨人的肩膀上
运行时解密so文件,让我首次尝试去手工修复dump下来的so。libsec2023.so中的反调试让我学会使用在安卓手机中断下硬件断点的工具rwProcMem33,也开始第一次编译安卓内核,经历了两三个不眠之夜。
第一眼见到CSEL-BR和CSET-BR结构的花指令让我毫无头绪,也让我开始思考frida-stalker与unicorn的区别所在,最终我选择使用frida-stalker辅助分析,IDApython批量去花的方法,效果很好。
BlackObfuscator混淆让我想起了被ollvm的控制流平坦化支配的恐惧,一筹莫展之际,这个月最新的工具Jeb5.1竟然能完美去除BlackObfuscator混淆,着实让我惊喜不已。
在探索vm的过程,我也慢慢的摸索出了vm题型的解题方法,或许未来遇到vm我也能游刃有余了。
前言写的有点长了,也算是我在这半年对于这道安卓题的感悟吧哈哈,虽然是安卓方向初赛题,但是对我整个安卓逆向的学习过程意义非凡,这篇文章我也写的尽可能的详细,前后的思维也尽量避免跳跃,每一步的操作基本上都是有据可依的,为之后也同样想要复现这道题目的朋友尽一点绵薄之力。
题目可以在腾讯游戏安全竞赛官网下载。(https://gslab.qq.com/html/competition/2023/doc/%E5%AE%89%E5%8D%93%E5%AE%A2%E6%88%B7%E7%AB%AF%E5%AE%89%E5%85%A8-%E5%88%9D%E8%B5%9B%E9%A2%98%E7%9B%AE.zip)
看雪这里也上传了一份到附件里了。
我在github里面也存了一份上去。(https://oacia.github.io/sec-2023/%E5%AE%89%E5%8D%93%E5%AE%A2%E6%88%B7%E7%AB%AF%E5%AE%89%E5%85%A8-%E5%88%9D%E8%B5%9B%E9%A2%98%E7%9B%AE.zip)
首先我们通过jadx反编译mouse_pre.aligned.signed.apk,通过查看AndroidManifest.xml可以知道下列关键信息:
◆包名:com.com.sec2023.rocketmouse.mouse
◆入口:com.unity3d.player.UnityPlayerActivity
解压该apk,通过查看lib文件夹内的内容,我们发现了libil2cpp.so。
我们使用Il2CppDumper(https://github.com/Perfare/Il2CppDumper)尝试解密global-metadata.dat,但是却失败了。
看了一下global-metadata.dat是没有加密的。
接下来我们用ida反编译libil2cpp.so,发现被加密了。
接下来我准备用frida来把解密后的libil2cpp.so从内存中dump下来。
但是当我用frida将代码注入进去后,apk提示hack detect,然后就退出了。
之后我不用frida注入这个apk,但是后台依旧运行着frida-server,apk依然弹出hack detect后退出。
通过这一点我大致可以判断它的检测方式有这两种可能:
◆检测运行的程序名称有没有frida-server
◆检测frida-server的端口
我们一个一个去验证一下。
首先我们把后台运行的frida-server名称改成fs试试。
blueline:/data/local/tmp # ./fs
修改完后依旧弹出hack detect。
那我们再去试一试修改frida-server的端口。
blueline:/data/local/tmp # ./fs -l 0.0.0.0:1234
端口修改之后用frida注入也不弹窗了。
现在我们可以用frida把解密后的libil2cpp.sodump下来,脚本如下:
function dump_so(so_name) {
Java.perform(function () {
var currentApplication = Java.use("android.app.ActivityThread").currentApplication();
var dir = currentApplication.getApplicationContext().getFilesDir().getPath();
var libso = Process.getModuleByName(so_name);
console.log("[name]:", libso.name);
console.log("[base]:", libso.base);
console.log("[size]:", ptr(libso.size));
console.log("[path]:", libso.path);
var file_path = dir + "/" + libso.name + "_" + libso.base + "_" + ptr(libso.size) + ".so";
var file_handle = new File(file_path, "wb");if (file_handle && file_handle != null) {
Memory.protect(ptr(libso.base), libso.size, 'rwx');
//如果报错为Error: access violation accessing,那么可以尝试添加下面的这一行代码,libso.base加上的值是通过address(access violation accessing)-address(base)计算出来的
//Memory.protect(ptr(libso.base.add(0x13b7000)), libso.size-0x13b7000, 'rwx');
var libso_buffer = ptr(libso.base).readByteArray(libso.size);
file_handle.write(libso_buffer);
file_handle.flush();
file_handle.close();
console.log("[dump]:", file_path);
}
});
}rpc.exports = {
dump_so: dump_so
};
在使用frida运行脚本之前需要注意去做一下端口转发。
adb forward tcp:1234 tcp:1234
随后进行frida注入。
frida -H 127.0.0.1:1234 -l "D:\frida\sec2023\global-metadata_dump.js" -f "com.com.sec2023.rocketmouse.mouse"
直接把dump下来的libil2cpp.so放到Il2CppDumper中,成功获取符号。
对于dump下来的so文件,所有的段(segment)和节(section)的偏移都是在虚拟空间中的偏移(即映射到进程空间的虚拟地址偏移),但静态分析工具分析so时所使用的偏移仍然为在实际文件中的偏移(即相对于文件开头的字节偏移量),错误的偏移导致静态分析工具如IDA等无法分析dump下来的so。
所以我们需要将segment和section在实际文件中的偏移替换为在虚拟空间中的偏移,这些偏移由program header table和secion header table内的成员指出。
我们将libil2cpp.so和libil2cpp.so_0x712a997000_0x13cc000.so一并拖入010 editor中,两个文件相互对比进行修复。
在010editor中复制一个成员的值到另一个成员中,只需要在软件界面的Template Results中单击想要复制的值按下Ctrl+Shift+C,然后单击需要替换的值,按下Ctrl+Shift+V即可完成替换。
修正 段(segment) 的偏移
段(segment) 的位置和大小由程序头表(Program Header Table)中的这四个成员决定。
在libil2cpp.so_0x712a997000_0x13cc000.so中我们将program_header_table中每一个element的p_vaddr_VIRTUAL_ADDRESS的值复制到p_offset_FROM_FILE_BEGIN,p_memsz_SEGMENT_RAM_LENGTH的值复制到p_filesz_SEGMENT_FILE_LENGTH。
修正 节头表(secion header table) 的偏移
节头表(secion header table)的位置在最后一个段(segment)之后,我们可以从ELF文件的Execution View直观看出。
由下图所示,libil2cpp.so_0x712a997000_0x13cc000.so中section_header_table在实际文件中的偏移为0x11AB778,我们需要将其修改为在虚拟空间中的偏移,这个值为0x13CB778,计算过程如下,此处所涉及计算的成员的值是在program_header_table的最后一个element,即program_table_entry64_program_table_element[10]。
◆section_header_table在虚拟空间中的偏移: 0x13CB778 = 0x00000000013BC000 + 0xF778 =p_vaddr_VIRTUAL_ADDRESS+p_memsz_SEGMENT_RAM_LENGTH
Section Header Table和Program Header Table并不是一定要位于文件开头和结尾的,其位置由
ELF Header指出
决定section_header_table起始地址的成员为elf_header->e_shoff_SECTION_HEADER_OFFSET_IN_FILE,位置如下图所示,在修改完成后,按下F5重新运行模板ELF.bt。
修补section的内容
在我们修正 节头表(secion header table) 的偏移后,节头表所在的区域是没有内容的,如下图所示,所以需要从
libil2cpp.so中复制节(section)的内容到dump下来的so中。
我们在libil2cpp.so点击struct section_header_table并按下Ctrl+Shift+C,然后回到libil2cpp.so_0x712a997000_0x13cc000.so中,选中section_header_table然后按下Ctrl+Shift+V,按下F5重新运行模板ELF.bt。
恢复节(section)的名称
可以发现修补了节(section)的内容之后,section的名称依旧是乱码
这是什么原因呢?
ELF文件中的每个section都是有名字的,比如.data、.text、.rodata,每个名字都是一个字符串,既然是字符串就需要一个字符串池来保存,而这个字符串池也是一个section,或者说准备一个section用来维护一个字符串池,这个字符串池保存了其他section以及它自己的名字。这个特殊的section叫做.shstrtab,所有section的头部是连续存放在一起的,类似一个数组,e_shstrndx变量是.shstrtab在这个数组中的下标。
首先我们要明白section的名称是如何通过索引找到的,在libil2cpp.so_0x712a997000_0x13cc000.so中,找到elf_header->e_shtrndx_STRING_TABLE_INDEX,这个的值为26(0x1A),说明了section_header_table->section_table_element[26]存储了所有section的名称。
section_header_table->section_table_element[26]中s_offset的值决定了section的名称将从1199370h去索引。
我们可以在dump前后的libil2cpp.so都跳转到这个地址去看看,在010editor中进行地址跳转只需右键该值选择Goto Address即可。
section的所有名称都在这个地方。
之后我们要将section的符号名称从原来的so复制到dump下来的so里面,位置就是我们之前分析出来的section_table_element[26]中s_offset所指向的物理内存地址,即选中libil2cpp.so从0x1199370h到0x1199470h按下Ctrl+Shift+C,然后将光标移动到libil2cpp.so_0x712a997000_0x13cc000.so的119A370h处,按下Ctrl+Shift+V。
修正 节(section) 的偏移
节(section) 的位置和大小由节头表(secion_header_table)中这两个成员决定。
修正 节(section) 的偏移有两条规则:
◆如果s_addr为0,无需修改s_offset
◆如果s_addr不为0,则将s_addr的值复制给s_offset
修正完成后,按下F5重新运行模板ELF.bt,可以发现section的名称已经恢复,同时也有了dynamic_symbol_table。
然后,我们将libil2cpp.so_0x712a997000_0x13cc000.so拖入IDA中进行分析,待分析完成后,点击如图所示的选项重新定位基址为0x712a997000,这样可以分析出更多的符号。
之后,我们点击File->Script file...运行il2cppdumper中的ida_with_struct_py3.py,需要注意的这个脚本需要运行两次,第一次选择script.json,第二次选择il2cpp.h。
处理之后的效果如下:
接下来需要知道这个OK按钮调用的函数。
我们可以使用这个工具frida-il2cppDumper,用法就直接用frida注入_agent.js就可以了。
frida -H 127.0.0.1:1234 -l "D:\frida\frida-il2cppDumper-main\_agent.js" -f "com.com.sec2023.rocketmouse.mouse"
当我们进入该apk之后,下列函数被调用。
method call
nameSpaze: class:SmallKeyboard
methodPointer offset in IDA:466300
public Void .ctor(){ }method end
-----------------------------------------------------------------------------------------------
-----------------------------------------------------------------------------------------------
method call
nameSpaze: class:iII1i
methodPointer offset in IDA:4663A8
public Void .ctor(){ }method end
-----------------------------------------------------------------------------------------------
-----------------------------------------------------------------------------------------------
method call
nameSpaze: class:iII1i
methodPointer offset in IDA:4663A8
public Void .ctor(){ }method end
-----------------------------------------------------------------------------------------------
-----------------------------------------------------------------------------------------------
method call
nameSpaze: class:iII1i
methodPointer offset in IDA:4663A8
public Void .ctor(){ }method end
-----------------------------------------------------------------------------------------------
-----------------------------------------------------------------------------------------------
method call
nameSpaze: class:iII1i
methodPointer offset in IDA:4663A8
public Void .ctor(){ }method end
-----------------------------------------------------------------------------------------------
-----------------------------------------------------------------------------------------------
method call
nameSpaze: class:iII1i
methodPointer offset in IDA:4663A8
public Void .ctor(){ }method end
-----------------------------------------------------------------------------------------------
-----------------------------------------------------------------------------------------------
method call
nameSpaze: class:iII1i
methodPointer offset in IDA:4663A8
public Void .ctor(){ }method end
-----------------------------------------------------------------------------------------------
-----------------------------------------------------------------------------------------------
method call
nameSpaze: class:iII1i
methodPointer offset in IDA:4663A8
public Void .ctor(){ }method end
-----------------------------------------------------------------------------------------------
-----------------------------------------------------------------------------------------------
method call
nameSpaze: class:iII1i
methodPointer offset in IDA:4663A8
public Void .ctor(){ }method end
-----------------------------------------------------------------------------------------------
-----------------------------------------------------------------------------------------------
method call
nameSpaze: class:iII1i
methodPointer offset in IDA:4663A8
public Void .ctor(){ }method end
-----------------------------------------------------------------------------------------------
-----------------------------------------------------------------------------------------------
method call
nameSpaze: class:iII1i
methodPointer offset in IDA:4663A8
public Void .ctor(){ }method end
-----------------------------------------------------------------------------------------------
-----------------------------------------------------------------------------------------------
method call
nameSpaze: class:iII1i
methodPointer offset in IDA:4663A8
public Void .ctor(){ }method end
-----------------------------------------------------------------------------------------------
-----------------------------------------------------------------------------------------------
method call
nameSpaze: class:iII1i
methodPointer offset in IDA:4663A8
public Void .ctor(){ }method end
-----------------------------------------------------------------------------------------------
-----------------------------------------------------------------------------------------------
method call
nameSpaze: class:SmallKeyboard
methodPointer offset in IDA:46618C
private Void Start(){ }method end
-----------------------------------------------------------------------------------------------
-----------------------------------------------------------------------------------------------
method call
nameSpaze: class:SmallKeyboard
methodPointer offset in IDA:465E90
private Void oO0oOo0(){ }method end
我们去看一下最后调用的这个函数oO0oOo0,进入IDA去进行分析,很明显是生成TOKEN的地方。
当我们点击小键盘上的OK按钮后,下列函数被调用,由于调用的函数太多,我这里仅仅从首次调用的函数开始,截取了部分输出作为示例。
method call
nameSpaze: class:<>c__DisplayClass14_0
methodPointer offset in IDA:4663B0
internal Void <Start>b__0(){ }method end
-----------------------------------------------------------------------------------------------
-----------------------------------------------------------------------------------------------
method call
nameSpaze: class:SmallKeyboard
methodPointer offset in IDA:465FDC
private Void iI1Ii(GameObject go) { }method end
-----------------------------------------------------------------------------------------------
-----------------------------------------------------------------------------------------------
method call
nameSpaze: class:SmallKeyboard
methodPointer offset in IDA:465880
private Void iI1Ii(iII1i _info) { }method end
-----------------------------------------------------------------------------------------------
-----------------------------------------------------------------------------------------------
method call
nameSpaze: class:SmallKeyboard
methodPointer offset in IDA:465AB0
private Void iI1Ii(UInt64 i1I) { }method end
-----------------------------------------------------------------------------------------------
-----------------------------------------------------------------------------------------------
method call
nameSpaze:OO0OoOOo class:Oo0
methodPointer offset in IDA:4660E8
public Void .ctor(UInt16[] OoOOO00, Int32 oOOO0O0O, UInt32[] OOoOO0) { }method end
-----------------------------------------------------------------------------------------------
-----------------------------------------------------------------------------------------------
method call
nameSpaze:OO0OoOOo class:Oo0
methodPointer offset in IDA:46A55C
private Void O000O000000o(){ }method end
-----------------------------------------------------------------------------------------------
-----------------------------------------------------------------------------------------------
method call
nameSpaze:OO0OoOOo class:oO0OoOOo
methodPointer offset in IDA:46A4D8
private Void .cctor(){ }method end
-----------------------------------------------------------------------------------------------
-----------------------------------------------------------------------------------------------
method call
nameSpaze:OO0OoOOo class:Oo0
methodPointer offset in IDA:46AD44
private Void oOOoO0o0(){ }method end
-----------------------------------------------------------------------------------------------
-----------------------------------------------------------------------------------------------
method call
nameSpaze:OO0OoOOo class:Oo0
methodPointer offset in IDA:46B578
private Void O00O00000o(){ }method end
SmallKeyboard类被调用了很多次,我们可以去dump.cs里面搜索一下,此处定义了KeyType不同的值对应的含义,那么这个EnterKey就是OK按钮了。
回到IDA,我们再去搜索一下SmallKeyboard,找到SmallKeyboard__iI1Ii(SmallKeyboard_o *this, SmallKeyboard_iII1i_o *info, const MethodInfo *method)这个函数,这是与KeyType有关的函数,显而易见的是KeyType == 2的情况。
对于这行代码,我的猜测是v13存储了我输入的值,我们可以使用frida去hookSystem_Convert__ToUInt64_486054767044的返回值来验证我们的猜想。
function hook_native(){
// 程序入口
Java.perform(function()
{// 获取模块
var module = Process.getModuleByName("libil2cpp.so")
// 转为函数地址
var addr=module.base.add("0x85b9c4");
// 获取函数入口
var func = new NativePointer(addr.toString());console.log('[+] hook '+func.toString())
// 函数hook钩子附加
Interceptor.attach(func, {onEnter: function (args) {
console.log('hook success');
console.log(args[0]);
console.log(args[1]);
},
onLeave: function (retval) {
console.log("retvalue is :", retval.toInt32());
console.log('method onleave');
}
});
});
}
setImmediate(function(){
setTimeout(hook_native, 1000);
},0);
当我输入123456,并点击OK按钮后,frida的回显如下,可以印证我们的猜测是正确的,v13是我们输入的数字。
v13作为参数传入了SmallKeyboard__iI1Ii_486050613936内,那么这应该就是我们要寻找的加密逻辑。
经过两个B跳转后,我们来到了这里。
这段汇编很有意思,我们去分析一下,off_712BD51FF0存储的是导入函数g_sec2023_p_array的地址,而g_sec2023_p_array的函数定义在libsec2023.so中,BR指令是无条件寄存器跳转,那么这四行arm汇编的意义就是调用g_sec2023_p_array偏移0x48处的函数。
来到libsec2023.so我们即可找到相对应的导出函数sub_31164。
那么显而易见,关键的逻辑就在libsec2023.so中的sub_31164了。
对libsec2023.so的sub_31164hook一下。
function hook_sub_31164(){
// 程序入口
Java.perform(function()
{// 获取模块
var module = Process.getModuleByName("libsec2023.so")
// 转为函数地址
var addr=module.base.add("0x31164");
// 获取函数入口
var func = new NativePointer(addr.toString());console.log('[+] hook '+func.toString())
// 函数hook钩子附加
Interceptor.attach(func, {onEnter: function (args) {
console.log('hook success');
console.log(args[0]);
console.log(args[1]);
console.log(args[2]);
},
onLeave: function (retval) {
console.log("retvalue is :", retval.toInt32());
console.log('method onleave');
}
});
});
}rpc.exports = {
hook_sub_35404: hook_sub_35404
}
但是当我注入将这段frida代码注入到libsec2023.so后,程序在短暂的延迟后显示hack detect后退出了。
我们可以使用frida Stalker来查看这个so调用函数的过程。
首先使用如下idaPython脚本打印出libsec2023.so的所有函数的地址和名称。
import idautils
import idcfunc_addr = []
func_name = []
for i in idautils.Functions():
    func_addr.append(i)
    func_name.append(idc.get_func_name(i))
for i in func_addr:
    print(f"{hex(i)}, ",end='')
print('')
for i in func_name:
    print(f"\"{i}\", ",end='')
将上面IDApython所打印出的内容填入下面frida代码的变量func_addr和func_name中。
var func_addr = [...]
var func_name = [...]function hook_dlopen(soName = '') {
Interceptor.attach(Module.findExportByName(null, "android_dlopen_ext"),
{
onEnter: function (args) {
var pathptr = args[0];
if (pathptr !== undefined && pathptr != null) {
var path = ptr(pathptr).readCString();
if (path.indexOf(soName) >= 0) {
this.is_can_hook = true;
}
}
},
onLeave: function (retval) {
if (this.is_can_hook) {
//hook_sub_3530C();
var times = 1;
var module = Process.getModuleByName("libsec2023.so");
this.pid = Process.getCurrentThreadId();
console.log("start Stalker!");
Stalker.follow(this.pid,{
events:{
call:false,
ret:false,
exec:false,
block:false,
compile:false
},
onReceive:function(events){
},
transform: function (iterator) {
var instruction = iterator.next();
do{
if (func_addr.indexOf(instruction.address - module.base) != -1){
console.log("call" + times+ ":" + func_name[func_addr.indexOf(instruction.address - module.base)])
times=times+1
}
iterator.keep();
} while ((instruction = iterator.next()) !== null);
},onCallSummary:function(summary){
}
});
console.log("Stalker end!");
}
}
}
);
}
setImmediate(hook_dlopen, "libsec2023.so")
打开apk后frida输出如下:
call1:JNI_OnLoad
call2:sub_FF14
call3:.memset
call4:.vsnprintf
call5:.time
call6:.localtime
call7:.__android_log_print
call8:sub_10070
call9:.fopen
call10:sub_21000
call11:.pthread_once
call12:sub_21054
call13:sub_412CC
call14:.malloc
call15:sub_21098
call16:sub_FABC
call17:sub_1010C
call18:sub_10194
call19:sub_11C4C
call20:.pthread_mutex_init
call21:sub_103D0
call22:sub_2BCA8
call23:sub_125E4
call24:sub_12660
call25:sub_1CE70
call26:sub_1CE34
call27:sub_1C664
call28:.pthread_mutex_lock
call29:.pthread_mutex_unlock
call30:.strlen
call31:sub_125F0
call32:sub_1D998
call33:sub_2C67C
call34:sub_2C40C
call35:.__strlcpy_chk
call36:.__strlen_chk
call37:sub_11BC4
call38:sub_2CCC0
call39:sub_355F0
call40:sub_35630
call41:sub_356C4
call42:sub_35700
call43:sub_11DF0
call44:sub_35870
call45:sub_36940
call46:sub_36B34
call47:sub_36B9C
call48:sub_36BC8
call49:sub_36BF0
call50:sub_36E00
call51:sub_36E70
call52:sub_36ED0
call53:sub_36F00
call54:sub_36F3C
call55:nullsub_17
call56:sub_36C8C
call57:sub_36CB8
call58:sub_2E318
call59:sub_2E288
call60:sub_2D590
call61:sub_1F450
call62:sub_20FD0
call63:.fstat
call64:sub_2DB5C
call65:sub_1FE3C
call66:sub_1FB70
call67:.sscanf
call68:sub_200C0
call69:.memcpy
call70:sub_1F6C0
call71:sub_1F8A4
call72:.free
call73:sub_36D38
call74:sub_36D70
call75:sub_36DA4
call76:sub_37060
call77:sub_41368
call78:sub_36A20
call79:sub_36D10
call80:sub_3C6A4
call81:sub_369B0
call82:sub_3DF74
call83:sub_3A054
call84:sub_3A090
call85:sub_3A0FC
call86:sub_3A138
call87:sub_24364
call88:sub_3852C
call89:sub_38D9C
call90:sub_36A90
call91:sub_3F2B0
call92:sub_36120
call93:sub_36144
call94:sub_370AC
call95:sub_36558
call96:sub_21BAC
call97:sub_21C20
call98:sub_21F50
call99:sub_21DB4
call100:j_.pthread_mutex_lock
call101:j_.pthread_mutex_unlock
call102:sub_11E30
call103:sub_11C60
call104:.pthread_attr_init
call105:.pthread_attr_setstacksize
call106:.pthread_attr_setdetachstate
call107:.pthread_create
call108:.pthread_attr_destroy
call109:sub_11C6C
call110:j_j_.free_2
call111:j_.free
call112:sub_37254
call113:sub_37740
call114:sub_377A8
call115:sub_377D8
call116:sub_37804
call117:sub_37A64
call118:sub_37AD4
call119:sub_37B34
call120:sub_37B64
call121:sub_37BA0
call122:nullsub_18
call123:sub_3789C
call124:sub_378C4
call125:sub_20DD0
call126:sub_20580
call127:sub_20CB0
call128:sub_20EBC
call129:j_.stat
call130:.stat
call131:sub_373B4
call132:sub_1240C
call133:sub_1F74C
call134:.lseek
call135:sub_1F9EC
call136:sub_1FA34
call137:sub_37940
call138:sub_37974
call139:sub_379A8
call140:sub_1235C
call141:sub_37134
call142:sub_37184
call143:sub_371AC
call144:sub_376CC
call145:sub_37704
call146:sub_37738
call147:sub_3715C
call148:sub_36580
call149:sub_36538
call150:sub_36178
...
这里需要用到的工具是rwprocmem33,具体的编译和使用可以在我写的另一篇文章(https://bbs.kanxue.com/thread-278647.htm)进行阅读,这里不在过多赘述。
运行下面的frida代码获取libsec2023.so的基址。
function dump_so(so_name) {
    Java.perform(function () {
        var currentApplication = Java.use("android.app.ActivityThread").currentApplication();
        var dir = currentApplication.getApplicationContext().getFilesDir().getPath();
        var libso = Process.getModuleByName(so_name);
        console.log("[name]:", libso.name);
        console.log("[base]:", libso.base);
        console.log("[size]:", ptr(libso.size));
        console.log("[path]:", libso.path);
    });
}rpc.exports = {
    dump_so: dump_so
};
frida -H 127.0.0.1:1234 -l "D:\frida\sec2023\get_so_base.js" -f "com.com.sec2023.rocketmouse.mouse"
利用下面的命令获取进程的PID。
ps -A | grep mouse
将得到的参数填入rwprocmem33中。
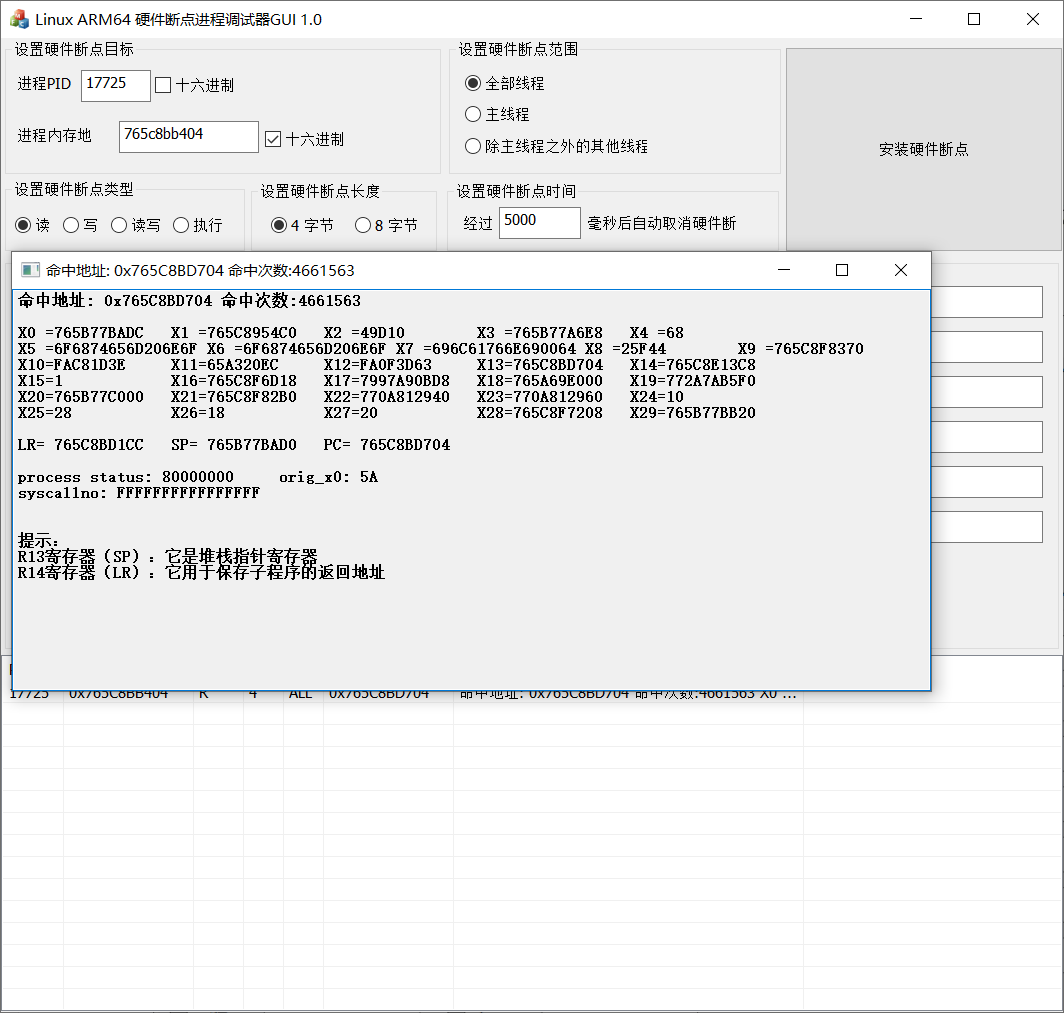
首先对我们最感兴趣的libil2cpp.so调用的libsec2023.so的导出函数sub_35404下硬件断点看看,毕竟之前我们用frida去hook这个函数失败了嘛,硬件断点下的位置可以通过基址(base)+偏移(func offset)得到。
结果如下:
仅仅下了五秒的硬件断点,相同地址的命中次数进入达到了百万次。
我们再对不同的地址打下硬件断点看看,发现均只有一个命中地址,并且命中次数都达到百万次。
与基址相减得到偏移为0x37704。
进入ida查看sub_37704函数,代码很短,按下交叉引用也没有输出。
这该怎么办呢?
还记得上面我们曾用frida-stalker打印出了libsec2023.so函数的调用链嘛,我们从sub_37704向上回溯看看。
call135:sub_1F9EC
call136:sub_1FA34
call137:sub_37940
call138:sub_37974
call139:sub_379A8
call140:sub_1235C
call141:sub_37134
call142:sub_37184
call143:sub_371AC
call144:sub_376CC
call145:sub_37704
sub_37704是被sub_376CC调用的,sub_376CC中的这个BR跳转应该是调用了sub_37704。
再看调用sub_376CC的函数sub_371AC,在这个函数中,我们发现了一条有趣的指令,CSEL。
熟悉arm指令集的朋友肯定知道,CSEL是arm中的分支结构指令,而BR跳转的位置由X8决定,所以这段汇编便可以改变便程序控制流。
CSEL X8, X8, X9, EQ中,EQ表示Equal,即相等条件,其值由最近的CMP的比较后得出的值决定,例如此处判断的条件就是CMP W0, W8。
用c语言来表示就是:
if(W0 == W8){
    X8 = X8
}
else{
    X8 = X9
}
而X8和X9相差0x10,X8的修改便导致了控制流的改变。
为了不让控制流转向错误的分支导致frida注入后强制退出,我们可以对此处的汇编进行patch,将CSEL X8, X8, X9, EQ改为CSEL X8, X8, X8, EQ,即将汇编08 01 89 9A修改为08 01 88 9A。
但是要怎么让apk运行我们patch过后的libsec2023.so呢?
有以下的三种思路可以参考:
◆反编译apk然后替换其中的lib/arm64-v8a/libsec2023.so并回编译后安装apk。
◆在手机安装apk后,在/data/app/子目录中找到libsec2023.so的位置并予以替换。
◆在apk加载libsec2023.so之后进行patch。
前两种方法经过尝试均以失败告终,那么现在只剩下最后一种方法了,就是在libsec2023.so加载之后动态patch,而这利用frida可以说简直就是轻而易举,利用Memory.writeByteArray就可以做到。
运行rpc.exports.anti_sec2023()的时机是在打开apk之后。
function anti_sec2023() {
    Java.perform(function () {
        var currentApplication = Java.use("android.app.ActivityThread").currentApplication();
        var libso = Process.getModuleByName("libsec2023.so");
        console.log("[name]:", libso.name);
        console.log("[base]:", libso.base);
        console.log("[size]:", ptr(libso.size));
        console.log("[path]:", libso.path);
        Memory.protect(ptr(libso.base), libso.size, 'rwx');
        Memory.writeByteArray(ptr(libso.base).add(0x371DC),[0x08,0x01,0x88,0x9A]);
    });
}
rpc.exports = {
    anti_sec2023: anti_sec2023
};
之后再次尝试对sub_31164附加钩子。
function hook_31164(){
// 程序入口
Java.perform(function()
{// 获取模块
var module = Process.getModuleByName("libsec2023.so")
// 转为函数地址
var addr=module.base.add("0x31164");
// 获取函数入口
var func = new NativePointer(addr.toString());console.log('[+] hook '+func.toString())
// 函数hook钩子附加
Interceptor.attach(func, {onEnter: function (args) {
console.log('hook success');
console.log(args[0]);
console.log(args[1]);
console.log(args[2]);
},
onLeave: function (retval) {
console.log("retvalue is :", retval.toInt32());
console.log('method onleave');
}
});
});
}
这一次,钩子成功附加上去了!
sub_31164首先调用了sub_3B8CC,那我们就就去分析一下sub_3B8CC。
往下看最后一行汇编是是BR X8,我们看看BR表示的意思是什么。
BR: 跳转到某寄存器(的值)指向的地址(无返回), 不会改变lr (x30)寄存器的值。
寄存器跳转的存在严重的阻碍了我们的逆向分析,那我们试试能不能稍稍修改一下。
我们可以使用frida-stalker来追踪寄存器的值(绝对不是因为我用不来unicorn才用frida的(真的)。
起初我是直接准备patch内存中的指令的,代码也写的差不多了(现在被注释了),没想到这寄存器跳转会有两种情况,没办法改成B跳转,不然进程会崩溃掉,所以就打印出跳转的地址手工分析咯。
function addr_locate_so(addr){//定位某个内存地址在哪个so里面,虽然可以直接Process.getModuleByAddress,但是会抛出异常所以就用函数实现了
var process_Obj_Module_Arr = Process.enumerateModules();
for(var i = 0; i < process_Obj_Module_Arr.length; i++) {
if(addr>process_Obj_Module_Arr[i].base && addr<process_Obj_Module_Arr[i].base.add(process_Obj_Module_Arr[i].size)){
return process_Obj_Module_Arr[i].name+":0x"+(addr-process_Obj_Module_Arr[i].base).toString(16)
}
}
}
function anti_BR(){
var libso = Process.getModuleByName("libsec2023.so")
var hook_addr = new NativePointer(libso.base.add(0x31164).toString());
this.tid = Process.getCurrentThreadId();
console.log('[+] hook '+hook_addr.toString())
var reg_name;//br之后的寄存器的名称
var inst_addr;
Interceptor.attach(hook_addr, {onEnter: function (args) {
console.log("start Stalker!");
//不追踪libc.so,不然frida会报错退出..看堆栈回溯应该是动态编译执行了libc.so里面的ptrace才导致的异常
Stalker.exclude({
"base": Process.getModuleByName("libc.so").base,
"size": Process.getModuleByName("libc.so").size
})
Stalker.follow(this.tid, {
events: {
call: true, // CALL instructions: yes please
ret: false, // RET instructions
exec: false, // all instructions: not recommended as it's
block: false, // block executed: coarse execution trace
compile: false // block compiled: useful for coverage
},
transform: (iterator) => {
let instruction = iterator.next();
const startAddress = instruction.address;
const isAppCode = startAddress.compare(libso.base) >= 0 &&startAddress.compare(libso.base.add(libso.size)) === -1;
do {
if (isAppCode) {
if (instruction.mnemonic === "br") {
reg_name = instruction.opStr;
inst_addr = new NativePointer(instruction.address);iterator.putCallout((context) => {
var addr_before = addr_locate_so(inst_addr);
var addr_after = addr_locate_so(parseInt(context[reg_name],16));
if(addr_after==undefined){
addr_after = "unknown:"+context[reg_name];
}
console.log(addr_before,"jump to",addr_after," ",reg_name);
//Memory.patchCode(inst_addr,4,code =>{
//var cw = new Arm64Writer(code,{pc: inst_addr});
//cw.putBImm(new NativePointer(context[reg_name]));
//cw.flush();
//})
});
}
}
iterator.keep();
} while ((instruction = iterator.next()) !== null);
}
})
console.log("stalker end!");
},
onLeave: function (retval) {
Stalker.unfollow(this.tid);
Stalker.garbageCollect();
}
});
}
运行代码后,程序输出如下:
[Remote::com.com.sec2023.rocketmouse.mouse ]-> rpc.exports.anti_BR()
[+] hook 0x76cd136164
[Remote::com.com.sec2023.rocketmouse.mouse ]-> start Stalker!
stalker end!
libsec2023.so:0x3ba00 jump to libsec2023.so:0x3ba04   x10
libsec2023.so:0x3ba30 jump to libsec2023.so:0x3ba34   x12
libsec2023.so:0x3ba70 jump to libsec2023.so:0x3ba34   x12
libsec2023.so:0x3ba70 jump to libsec2023.so:0x3ba34   x12
libsec2023.so:0x3ba70 jump to libsec2023.so:0x3ba34   x12
libsec2023.so:0x3ba70 jump to libsec2023.so:0x3ba74   x12
libsec2023.so:0x3badc jump to libsec2023.so:0x3bae0   x13
libsec2023.so:0x3bb28 jump to libsec2023.so:0x3bae0   x13
libsec2023.so:0x3bb28 jump to libsec2023.so:0x3bae0   x13
libsec2023.so:0x3bb28 jump to libsec2023.so:0x3bae0   x13
libsec2023.so:0x3bb28 jump to libsec2023.so:0x3bb2c   x13
libsec2023.so:0x3bb4c jump to libsec2023.so:0x3ba04   x10
libsec2023.so:0x3bb4c jump to unknown:0x3   x10
libsec2023.so:0x3bb4c jump to unknown:0x2   x10
libsec2023.so:0x3bb4c jump to unknown:0x1   x10
libsec2023.so:0x3bb4c jump to unknown:0x0   x10
libsec2023.so:0x3bb4c jump to unknown:0xffffffffffffffff   x10
libsec2023.so:0x3bb4c jump to unknown:0x0   x10
libsec2023.so:0x3bb4c jump to unknown:0x6d000000   x10
libsec2023.so:0x3bb4c jump to unknown:0x6d940000   x10
libsec2023.so:0x3bb4c jump to unknown:0x6d94ca00   x10
libsec2023.so:0x3bb4c jump to unknown:0x6d94cae5   x10
libsec2023.so:0x3bb4c jump to libsec2023.so:0x3bb50   x10
libsec2023.so:0x3a08c jump to libsec2023.so:0x3a0f0   x8
libsec2023.so:0x3b508 jump to libsec2023.so:0x3b50c   x11
libsec2023.so:0x3b54c jump to libsec2023.so:0x3b50c   x11
libsec2023.so:0x3b54c jump to libsec2023.so:0x3b50c   x11
libsec2023.so:0x3b54c jump to libsec2023.so:0x3b50c   x11
libsec2023.so:0x3b54c jump to libsec2023.so:0x3b50c   x11
libsec2023.so:0x3b54c jump to libsec2023.so:0x3b50c   x11
libsec2023.so:0x3b54c jump to libsec2023.so:0x3b50c   x11
libsec2023.so:0x3b54c jump to libsec2023.so:0x3b50c   x11
libsec2023.so:0x3b54c jump to libsec2023.so:0x3b50c   x11
libsec2023.so:0x3b54c jump to libsec2023.so:0x3b50c   x11
libsec2023.so:0x3b54c jump to libsec2023.so:0x3b50c   x11
libsec2023.so:0x3b54c jump to libsec2023.so:0x3b50c   x11
libsec2023.so:0x3b54c jump to libsec2023.so:0x3b50c   x11
libsec2023.so:0x3b54c jump to libsec2023.so:0x3b50c   x11
libsec2023.so:0x3b54c jump to libsec2023.so:0x3b50c   x11
libsec2023.so:0x3b54c jump to libsec2023.so:0x3b50c   x11
libsec2023.so:0x3b54c jump to libsec2023.so:0x3b50c   x11
libsec2023.so:0x3b54c jump to libsec2023.so:0x3b50c   x11
libsec2023.so:0x3b54c jump to libsec2023.so:0x3b550   x11
libsec2023.so:0x3b5c0 jump to libsec2023.so:0x3b5c4   x11
libsec2023.so:0x3b604 jump to libsec2023.so:0x3b5c4   x11
libsec2023.so:0x3b604 jump to libsec2023.so:0x3b5c4   x11
libsec2023.so:0x3b604 jump to libsec2023.so:0x3b5c4   x11
libsec2023.so:0x3b604 jump to libsec2023.so:0x3b5c4   x11
libsec2023.so:0x3b604 jump to libsec2023.so:0x3b5c4   x11
libsec2023.so:0x3b604 jump to libsec2023.so:0x3b5c4   x11
libsec2023.so:0x3b604 jump to libsec2023.so:0x3b5c4   x11
libsec2023.so:0x3b604 jump to libsec2023.so:0x3b5c4   x11
libsec2023.so:0x3b604 jump to libsec2023.so:0x3b5c4   x11
libsec2023.so:0x3b604 jump to libsec2023.so:0x3b5c4   x11
libsec2023.so:0x3b604 jump to libsec2023.so:0x3b5c4   x11
libsec2023.so:0x3b604 jump to libsec2023.so:0x3b5c4   x11
libsec2023.so:0x3b604 jump to libsec2023.so:0x3b5c4   x11
libsec2023.so:0x3b604 jump to libsec2023.so:0x3b5c4   x11
libsec2023.so:0x3b604 jump to libsec2023.so:0x3b5c4   x11
libsec2023.so:0x3b604 jump to libsec2023.so:0x3b5c4   x11
libsec2023.so:0x3b604 jump to libsec2023.so:0x3b5c4   x11
libsec2023.so:0x3b604 jump to libsec2023.so:0x3b608   x11
libsec2023.so:0x3aa70 jump to libsec2023.so:0x3aa74   x8
libsec2023.so:0x3aaa0 jump to libsec2023.so:0x3aaa4   x8
libsec2023.so:0x3aad4 jump to libsec2023.so:0x3aad8   x8
libsec2023.so:0x3ab04 jump to libsec2023.so:0x3ab70   x8
libsec2023.so:0xf28c jump to libc.so:0xb2688   x17
libsec2023.so:0xf4ac jump to libc.so:0xb2bd8   x17
libsec2023.so:0x3ac90 jump to libsec2023.so:0x3acc0   x11
libsec2023.so:0xf40c jump to libc.so:0x4bc20   x17
libsec2023.so:0xf40c jump to libc.so:0xb2688   x17
libsec2023.so:0xf40c jump to libc.so:0xb2bd8   x17
libsec2023.so:0x3b950 jump to libsec2023.so:0x3b95c   x8
libsec2023.so:0x3b950 jump to libsec2023.so:0x3a0f0   x8
libsec2023.so:0x3b950 jump to unknown:0x76ccc36000   x8
libsec2023.so:0x3b950 jump to unknown:0x76ccc36000   x8
libsec2023.so:0x3b950 jump to unknown:0x76ccc36000   x8
libsec2023.so:0x3b950 jump to unknown:0x76ccc36000   x8
libsec2023.so:0x3b950 jump to unknown:0x76ccc36000   x8
libsec2023.so:0x3b950 jump to unknown:0x76ccc36000   x8
libsec2023.so:0x3b950 jump to unknown:0x76ccc36000   x8
libsec2023.so:0x3b950 jump to unknown:0x76ccc36000   x8
libsec2023.so:0x3b950 jump to unknown:0x76ccc36000   x8
libsec2023.so:0x3b950 jump to unknown:0x76ccc36000   x8
libsec2023.so:0x3b950 jump to unknown:0x76ccc36000   x8
libsec2023.so:0x3b950 jump to unknown:0x76ccc36000   x8
libsec2023.so:0x3b950 jump to unknown:0x76ccc36000   x8
libsec2023.so:0x3b950 jump to unknown:0x76ccc36000   x8
libsec2023.so:0x3b950 jump to unknown:0x76ccc36000   x8
libsec2023.so:0x3b950 jump to unknown:0x76ccc36000   x8
libsec2023.so:0x3b950 jump to unknown:0x76ccc36000   x8
libsec2023.so:0x3b950 jump to unknown:0x76ccc36000   x8
libsec2023.so:0x3b950 jump to unknown:0x76ccc36000   x8
libsec2023.so:0x3b950 jump to unknown:0x76ccc36000   x8
libsec2023.so:0x3b950 jump to unknown:0x76ccc36000   x8
libsec2023.so:0x3b950 jump to unknown:0x76ccc36000   x8
libsec2023.so:0x3b950 jump to unknown:0x76ccc36000   x8
libsec2023.so:0x3b950 jump to unknown:0x76ccc36000   x8
libsec2023.so:0x3b950 jump to unknown:0x76ccc36000   x8
libsec2023.so:0x3b950 jump to unknown:0x76ccc36000   x8
libsec2023.so:0x3b950 jump to unknown:0x76ccc36000   x8
libsec2023.so:0x3b950 jump to unknown:0x76ccc36000   x8
libsec2023.so:0x3b950 jump to unknown:0x76ccc36000   x8
libsec2023.so:0x3b950 jump to unknown:0x76ccc36000   x8
libsec2023.so:0x3b950 jump to unknown:0x76ccc36000   x8
libsec2023.so:0x3b950 jump to unknown:0x76ccc36000   x8
libsec2023.so:0x3b950 jump to unknown:0x76ccc36000   x8
libsec2023.so:0x3b950 jump to unknown:0x76ccc36000   x8
libsec2023.so:0x3b950 jump to unknown:0x76ccc36000   x8
libsec2023.so:0x3b950 jump to unknown:0x76ccc36000   x8
libsec2023.so:0x3b950 jump to unknown:0x76ccc36000   x8
libsec2023.so:0x3b950 jump to unknown:0x76ccc36000   x8
libsec2023.so:0x3b950 jump to libsec2023.so:0x3aa74   x8
libsec2023.so:0x3b950 jump to libsec2023.so:0x3aaa4   x8
libsec2023.so:0x3b950 jump to libsec2023.so:0x3aad8   x8
libsec2023.so:0x3b950 jump to libsec2023.so:0x3ab70   x8
libsec2023.so:0x3b950 jump to libsec2023.so:0x3ab70   x8
libsec2023.so:0x3b950 jump to unknown:0x77ea7ac3a0   x8
libsec2023.so:0x3b950 jump to unknown:0x1c01f8026ad23c58   x8
libsec2023.so:0x3b950 jump to unknown:0x1c01f8026ad23c58   x8
libsec2023.so:0x3b950 jump to unknown:0x1c01f8026ad23c58   x8
libsec2023.so:0x3b950 jump to unknown:0xe   x8
libsec2023.so:0x3b990 jump to libsec2023.so:0x3b99c   x8
libsec2023.so:0x311a0 jump to libil2cpp.so:0x13b8d64   x2
我们不妨以地址0x3ba70作为分析的示例,这里我们发现0x3ba70会跳转的地址有两种情况,分别是0x3ba34和0x3ba74。
等等,0x3ba74??这不就是0x3ba70之后要执行的指令吗?
那结果显而易见了,这BR寄存器跳转的前身肯定就是条件跳转,BGE,BLE这类的指令。
libsec2023.so:0x3ba70 jump to libsec2023.so:0x3ba34   x12
libsec2023.so:0x3ba70 jump to libsec2023.so:0x3ba34   x12
libsec2023.so:0x3ba70 jump to libsec2023.so:0x3ba34   x12
libsec2023.so:0x3ba70 jump to libsec2023.so:0x3ba74   x12
接下来就是在IDA里面修复控制流咯,我们修复一下0x3ba00这个第一个BR跳转的地方,别的地方的思想都是一样的。
libsec2023.so:0x3ba00 jump to libsec2023.so:0x3ba04 x10
进入到off_72C40,加上W11得到正确的跳转,写了个简单的python脚本输出hex方便直接复制进去。
red_num = 0xFFFFFFFF8C034254
add_num = 0x740078FC
num = (red_num+add_num)&0xffffffff
my_byte = list(num.to_bytes(8,'little'))
my_byte = [hex(x)[2::].zfill(2) for x in my_byte]
print(' '.join(list(my_byte)))
这个地方修复完是这样的,可以看到*(off_72C40+0)和*(off_72C40+0x28)的地方值已经被我加上去了。
接下来就是改是汇编了,ADD指令我们肯定是不需要了,因为已经被我们加上去了,所以接下来继续往下走看的是这条CSEL X10, XZR, X9, CC指令。
各个条件码的含义如下:
那么这里BR分支跳转的意思就可以表示为:
if(X8 < 2){//由CC指令的含义知道是小于比较
    B 0x3BA04//即继续向下执行
}
else if(X8 >= 2){
    B 0x3BB50//跳转到其他地方
}
所以这里改成BGE,然后把不需要的指令NOP掉,一处地方就修复好啦。
还要注意的是,除了CSEL-BR结构之外,还有CSET-BR结构。
CSET:比较指令,满足条件,则并置 1,否则置 0 ,如:
cmp w8, #2        ; 将寄存器 w8 的值和常量 2 进行比较
cset w8, gt       ; 如果是大于(grater than),则将寄存器 w8 的值设置为 1,否则设置为 0
和CSEL-BR结构的修复思路是相似的,对于上图(0x3B95C处)的CSET-BR结构,我们仅需关注这几行指令。
CSET W23, NE
LDR  X8, [X21,W23,UXTW#3]
ADD  X8, X8, X22
BR   X8
其中的LDR X8, [X21,W23,UXTW#3]的含义可以用C语言这样表示X8 = *(X21 + (W23 << 3)),UXTW#3即将操作数左移三位的意思。
这样一个一个修复过去,未免也太麻烦了,那索性就写个idapython脚本一键去除CSEL-BR和CSET-BR结构来解放双手吧哈哈。
import ida_segment
import idautils
import idc
import ida_bytes
from keystone import *def patch_nop(begin, end): # arm64中的NOP指令是b'\x1F\x20\x03\xD5'
while end > begin:
ida_bytes.patch_bytes(begin, b'\x1F\x20\x03\xD5')
begin = begin + 4# 获取text段的起始地址
text_seg = ida_segment.get_segm_by_name(".text")
start, end = text_seg.start_ea, text_seg.end_ea
# start, end = 0x3BA34, 0x3BA80
# start, end = 0x37390,0x373B4#测试ADRP指令
# start, end = 0x3FCE0, 0x3FD00 # 测试EQ情况
#start, end = 0x3AA90, 0x3AAA4
# start, end = 0x3A078, 0x3A090#测试CSET-BR去除情况
current_addr = start
# print(text_seg.start_ea,text_seg.end_ea)
nop_addr_array_after_finish = [] # 在CSEL/CSET-BR结构修复完成后需要NOP的指令
while current_addr < end:
# 处理CSEL-BR结构
if idc.print_insn_mnem(current_addr) == "CSEL":
CSEL_addr = current_addr
nop_addr_array_temp = []
nop_addr_array_temp.append(CSEL_addr)
BR_addr = 0
BR_reg = ""
temp_addr = idc.next_head(current_addr)
for _ in range(9): # 向下搜寻9条指令,寻找是否有BR指令
if idc.print_insn_mnem(temp_addr) == "BR":
BR_addr = temp_addr
BR_reg = idc.print_operand(temp_addr, 0)
break
if idc.print_insn_mnem(temp_addr) == "CSEL":
break
temp_addr = idc.next_head(temp_addr)
if BR_addr != 0: # 匹配到了CSEL-BR结构的汇编,需要去除
# 形如CSEL X11, X12, X11, GE,获取CSEL后的操作数op1~3,以及条件码cond
CSEL_op1 = idc.print_operand(CSEL_addr, 0)
CSEL_op2 = idc.print_operand(CSEL_addr, 1)
CSEL_op2_val = -1
CSEL_op3 = idc.print_operand(CSEL_addr, 2)
CSEL_op3_val = -1
CSEL_cond = idc.print_operand(CSEL_addr, 3)# 读取条件分支语句CSEL中要赋值给目标寄存器的两个源寄存器中存储的值
temp_addr = idc.prev_head(CSEL_addr)
while (CSEL_op2_val == -1 or CSEL_op3_val == -1) and temp_addr > text_seg.start_ea:
if CSEL_op2 == "XZR": # 如果寄存器的值是XZR,说明该值为0
CSEL_op2_val = 0
if CSEL_op3 == "XZR":
CSEL_op3_val = 0
if idc.print_insn_mnem(temp_addr) == "MOV":
if idc.print_operand(temp_addr, 0)[1::] == CSEL_op2[
1::] and CSEL_op2_val == -1: # 寄存器X11和W11是同一个寄存器
CSEL_op2_val = idc.get_operand_value(temp_addr, 1)
nop_addr_array_temp.append(temp_addr)
elif idc.print_operand(temp_addr, 0)[1::] == CSEL_op3[1::] and CSEL_op3_val == -1:
CSEL_op3_val = idc.get_operand_value(temp_addr, 1)
nop_addr_array_temp.append(temp_addr)
temp_addr = idc.prev_head(temp_addr)
# print(CSEL_op2_val, CSEL_op3_val, hex(current_addr))
assert CSEL_op2_val != -1 and CSEL_op3_val != -1temp_addr = BR_addr
jump_array_reg = "" # 存贮跳转表的寄存器名称
jump_array_addr = -1 # 跳转表所在的位置
add_reg = [] # 加到跳转表的值所在的寄存器
add_val = -1 # 加到跳转表的值
while temp_addr > CSEL_addr: # 从后往前找,以BR所在的地址开始,CSEL所在的地址结束,匹配必要的寄存器名称和值
# print(hex(temp_addr),idc.print_insn_mnem(temp_addr))
if idc.print_insn_mnem(temp_addr) == "ADD" and idc.print_operand(temp_addr, 0) == BR_reg:
add_reg.append(idc.print_operand(temp_addr, 1)[1::])
add_reg.append(idc.print_operand(temp_addr, 2)[1::])
nop_addr_array_temp.append(temp_addr)
elif idc.print_insn_mnem(temp_addr) == "MOV":
if idc.print_operand(temp_addr, 0)[1::] in add_reg:
add_val = idc.get_operand_value(temp_addr, 1)
nop_addr_array_temp.append(temp_addr)
elif idc.print_insn_mnem(temp_addr) == "LDR":
jump_array_reg = idc.print_operand(temp_addr, 1)[1:-1].split(',')[0] # 获取存储跳转表的寄存器名称
nop_addr_array_temp.append(temp_addr)
elif idc.print_insn_mnem(temp_addr) == "ADRL":
jump_array_reg = idc.print_operand(temp_addr, 0)
jump_array_addr = idc.get_operand_value(temp_addr, 1)
nop_addr_array_temp.append(temp_addr)
temp_addr = idc.prev_head(temp_addr)# 如果在CSEL-BR间的指令中没找到跳转表所在的位置,则向上寻找
if jump_array_addr == -1:
temp_addr = CSEL_addr
while temp_addr > text_seg.start_ea:
# print(hex(temp_addr), idc.print_insn_mnem(temp_addr))
if idc.print_insn_mnem(temp_addr) == "ADRL":
if idc.print_operand(temp_addr, 0) == jump_array_reg:
jump_array_addr = idc.get_operand_value(temp_addr, 1)
nop_addr_array_temp.append(temp_addr)
break
elif idc.print_insn_mnem(temp_addr) == "ADRP": # ADRP指令,还需要加上另一部分
if idc.print_operand(temp_addr, 0) == jump_array_reg:
jump_array_addr = idc.get_operand_value(temp_addr, 1)
nop_addr_array_temp.append(temp_addr)
while temp_addr < text_seg.end_ea:
if idc.print_insn_mnem(temp_addr) == "ADD":
if idc.print_operand(temp_addr, 0) == jump_array_reg:
jump_array_addr += idc.get_operand_value(temp_addr, 2)
nop_addr_array_temp.append(temp_addr)
break
temp_addr = idc.next_head(temp_addr)
break
temp_addr = idc.prev_head(temp_addr)
# print(hex(jump_array_addr),hex(add_val))if add_val == -1:
temp_addr = CSEL_addr
while temp_addr > text_seg.start_ea:
# print(hex(temp_addr), idc.print_insn_mnem(temp_addr))
if idc.print_insn_mnem(temp_addr) == "MOV":
if idc.print_operand(temp_addr, 0)[1::] in add_reg and idc.print_operand(temp_addr, 0)[0] == 'X':
add_val = idc.get_operand_value(temp_addr, 1)
nop_addr_array_temp.append(temp_addr)
break
temp_addr = idc.prev_head(temp_addr)# 计算出分支跳转的两个位置
branch_a = (ida_bytes.get_qword(jump_array_addr + CSEL_op2_val) + add_val) & 0xffffffffffffffff
branch_b = (ida_bytes.get_qword(jump_array_addr + CSEL_op3_val) + add_val) & 0xffffffffffffffff
# print(hex(branch_a), hex(branch_b))# print(CSEL_cond,hex(current_addr))
# GE<->LT 有符号大于等于 vs 有符号小于
# EQ<->NE 结果相等 vs 结果不相等
# CC<->CS 无符号小于 vs 无符号大于等于
# HI<->LS 无符号大于 vs 无符号小于等于
# if CSEL_cond == "GE":#构造B.LT跳转
logic_rev = {"GE": "LT", "LT": "GE", "EQ": "NE", "NE": "EQ", "CC": "CS", "CS": "CC", "HI": "LS", "LS": "HI"}
ks = Ks(KS_ARCH_ARM64, KS_MODE_LITTLE_ENDIAN)
code = ""
if branch_b == idc.next_head(BR_addr): # 判断逻辑不取反
code = f"B.{CSEL_cond} #{hex(branch_a)}"
elif branch_a == idc.next_head(BR_addr): # 判断逻辑取反
code = f"B.{logic_rev[CSEL_cond]} #{hex(branch_b)}"#print(hex(current_addr), hex(add_val), CSEL_op2_val, CSEL_op3_val, hex(jump_array_addr), code)
# 修复BR跳转
if code != "":patch_br_byte, count = ks.asm(code, addr=BR_addr)
ida_bytes.patch_bytes(BR_addr, bytes(patch_br_byte))
print(f"fix CSEL-BR at {hex(BR_addr)}")
nop_addr_array_after_finish.extend(nop_addr_array_temp)
current_addr = idc.next_head(BR_addr)
continue
else:
print(f"error! unable to fix CSEL-BR at {hex(current_addr)},branch:{hex(branch_a)}, {hex(branch_b)}")# 处理CSET-BR结构
elif idc.print_insn_mnem(current_addr) == "CSET":
CSET_addr = current_addr
nop_addr_array_temp = []
nop_addr_array_temp.append(CSET_addr)
BR_addr = 0
BR_reg = ""
temp_addr = idc.next_head(current_addr)
for _ in range(15): # 向下搜寻15条指令,寻找是否有BR指令
if idc.print_insn_mnem(temp_addr) == "BR":
BR_addr = temp_addr
BR_reg = idc.print_operand(temp_addr, 0)
break
elif idc.print_insn_mnem(temp_addr) == "CSEL":
break
elif idc.print_insn_mnem(temp_addr) == "RET":
break
temp_addr = idc.next_head(temp_addr)
if BR_addr != 0: # 匹配到了CSET-BR结构的汇编,需要去除
# 形如CSET W23, NE,获取CSET后的操作数op1,以及条件码cond
CSET_op1 = idc.print_operand(CSET_addr, 0)
CSET_op1_val = -1
CSET_cond = idc.print_operand(CSET_addr, 1)temp_addr = BR_addr
jump_array_reg = "" # 存贮跳转表的寄存器名称
jump_array_addr = 0 # 跳转表所在的位置
add_reg = [] # 加到跳转表的值所在的寄存器
add_val = 0 # 加到跳转表的值
Lshift_val = -1
while temp_addr > CSET_addr: # 从后往前找,以BR所在的地址开始,CSET所在的地址结束,匹配必要的寄存器名称和值
# print(hex(temp_addr),idc.print_insn_mnem(temp_addr))
if idc.print_insn_mnem(temp_addr) == "ADD" and idc.print_operand(temp_addr, 0) == BR_reg:
add_reg.append(idc.print_operand(temp_addr, 1)[1::])
add_reg.append(idc.print_operand(temp_addr, 2)[1::])
nop_addr_array_temp.append(temp_addr)
elif idc.print_insn_mnem(temp_addr) == "MOVK":
if idc.print_operand(temp_addr, 0)[1::] in add_reg:
add_val += (idc.get_operand_value(temp_addr, 1) << 16)
elif idc.print_insn_mnem(temp_addr) == "MOV":
if idc.print_operand(temp_addr, 0)[1::] in add_reg:
add_val += idc.get_operand_value(temp_addr, 1)
nop_addr_array_temp.append(temp_addr)
elif idc.print_insn_mnem(temp_addr) == "LDR":
LDR_temp = idc.print_operand(temp_addr, 1)[1:-1].split(',')
jump_array_reg = LDR_temp[0] # 获取存储跳转表的寄存器名称
if len(LDR_temp) == 3:
Lshift_val = int(LDR_temp[2][-1:])
nop_addr_array_temp.append(temp_addr)
elif idc.print_insn_mnem(temp_addr) == "ADRL":
jump_array_reg = idc.print_operand(temp_addr, 0)
jump_array_addr = idc.get_operand_value(temp_addr, 1)
nop_addr_array_temp.append(temp_addr)
elif idc.print_insn_mnem(temp_addr) == "LSL":
if idc.print_operand(temp_addr, 0)[1::] == CSET_op1[1::]:
Lshift_val = idc.get_operand_value(temp_addr, 2)temp_addr = idc.prev_head(temp_addr)
# 如果在CSET-BR间的指令中没找到跳转表所在的位置,则向上寻找
if jump_array_addr == 0:
temp_addr = CSET_addr
while temp_addr > text_seg.start_ea:
# print(hex(temp_addr), idc.print_insn_mnem(temp_addr))
if idc.print_insn_mnem(temp_addr) == "ADRL":
if idc.print_operand(temp_addr, 0) == jump_array_reg:
jump_array_addr = idc.get_operand_value(temp_addr, 1)
nop_addr_array_temp.append(temp_addr)
break
elif idc.print_insn_mnem(temp_addr) == "ADRP": # ADRP指令,还需要加上另一部分
if idc.print_operand(temp_addr, 0) == jump_array_reg:
jump_array_addr = idc.get_operand_value(temp_addr, 1)
nop_addr_array_temp.append(temp_addr)
while temp_addr < text_seg.end_ea:
if idc.print_insn_mnem(temp_addr) == "ADD":
if idc.print_operand(temp_addr, 0) == jump_array_reg:
jump_array_addr += idc.get_operand_value(temp_addr, 2)
nop_addr_array_temp.append(temp_addr)
break
temp_addr = idc.next_head(temp_addr)
break
temp_addr = idc.prev_head(temp_addr)
# print(hex(jump_array_addr),hex(add_val))# 向上寻找加到跳转表的值
if add_val == 0:
temp_addr = CSET_addr
while temp_addr > text_seg.start_ea:
# print(hex(temp_addr), idc.print_insn_mnem(temp_addr))
if idc.print_insn_mnem(temp_addr) == "MOV":
if idc.print_operand(temp_addr, 0)[1::] in add_reg:
add_val = idc.get_operand_value(temp_addr, 1)
nop_addr_array_temp.append(temp_addr)
break
elif idc.print_insn_mnem(temp_addr) == "MOVK": # 形如MOV W9, #0x76BC;MOVK W9, #0x4C48,LSL#16;的形式
if idc.print_operand(temp_addr, 0)[1::] in add_reg:
# print(hex(add_val))
add_val = (idc.get_operand_value(temp_addr, 1) << 16)
# print(hex(add_val))
while temp_addr > text_seg.start_ea:
if idc.print_insn_mnem(temp_addr) == "MOV":
if idc.print_operand(temp_addr, 0)[1::] in add_reg:
add_val += idc.get_operand_value(temp_addr, 1)
# print(hex(add_val))
break
temp_addr = idc.prev_head(temp_addr)break
temp_addr = idc.prev_head(temp_addr)
# print(hex(current_addr))
# 计算出分支跳转的两个位置
branch_a = (ida_bytes.get_qword(jump_array_addr + (1 << Lshift_val)) + add_val) & 0xffffffffffffffff
branch_b = (ida_bytes.get_qword(jump_array_addr + (0 << Lshift_val)) + add_val) & 0xffffffffffffffff
# print(hex(branch_a), hex(branch_b))# print(CSEL_cond,hex(current_addr))
# GE<->LT 有符号大于等于 vs 有符号小于
# EQ<->NE 结果相等 vs 结果不相等
# CC<->CS 无符号小于 vs 无符号大于等于
# HI<->LS 无符号大于 vs 无符号小于等于
# if CSEL_cond == "GE":#构造B.LT跳转
logic_rev = {"GE": "LT", "LT": "GE", "EQ": "NE", "NE": "EQ", "CC": "CS", "CS": "CC", "HI": "LS", "LS": "HI"}
ks = Ks(KS_ARCH_ARM64, KS_MODE_LITTLE_ENDIAN)
code = ""
if branch_b == idc.next_head(BR_addr): # 判断逻辑不取反
code = f"B.{CSET_cond} #{hex(branch_a)}"
elif branch_a == idc.next_head(BR_addr): # 判断逻辑取反
code = f"B.{logic_rev[CSET_cond]} #{hex(branch_b)}"# print(hex(current_addr),add_reg,hex(add_val),CSET_op1,CSET_op1_val,jump_array_reg,hex(jump_array_addr),Lshift_val,code)
# 修复BR跳转
if code != "":
patch_br_byte, count = ks.asm(code, addr=BR_addr)
ida_bytes.patch_bytes(BR_addr, bytes(patch_br_byte))
print(f"fix CSET-BR at {hex(BR_addr)}")
nop_addr_array_after_finish.extend(nop_addr_array_temp)
current_addr = idc.next_head(BR_addr)
continue
else:
print(f"error! unable to fix CSET-BR at {hex(current_addr)},branch:{hex(branch_a)}, {hex(branch_b)}")current_addr = idc.next_head(current_addr)
for addr in nop_addr_array_after_finish:
patch_nop(addr, addr + idc.get_item_size(addr))
__int64 __fastcall sub_3B9D4(__int64 result)
{
unsigned __int64 i; // x8
__int64 v2; // x10
int v3; // w11
__int64 v4; // x11
int v5; // w10
int v6; // w12
unsigned __int8 v7; // w14
int v8; // [xsp+Ch] [xbp-4h]for ( i = 0LL; i < 2; ++i )
{
v2 = 3LL;
v8 = 0;
v3 = 24;
do
{
*((_BYTE *)&v8 + v2) = (*(_DWORD *)(result + 4 * i) >> v3) ^ v2;
--v2;
v3 -= 8;
}
while ( v2 >= 0 );
HIBYTE(v8) ^= 0x86u;
BYTE2(v8) -= 94;
v4 = 3LL;
BYTE1(v8) ^= 0xD3u;
LOBYTE(v8) = v8 - 28;
*(_DWORD *)(result + 4 * i) = 0;
v5 = 0;
v6 = 24;
do
{
v7 = *((_BYTE *)&v8 + v4) - v6;
*((_BYTE *)&v8 + v4--) = v7;
v5 += v7 << v6;
*(_DWORD *)(result + 4 * i) = v5;
v6 -= 8;
}
while ( v4 >= 0 );
}
return result;
}
第一个加密函数sub_3B9D4取出数据的每一位进行加密,其中出现的HIBYTE,BYTE2,BYTE1,LOBYTE含义如下,假设有数据a1=0x12345678,则
我们可以使用frida去hooksub_3B9D4传入的值以及返回值,观察加密前后的变化,假设我此处在小键盘输入的数字是999999999999,hex(999999999999)=0xe8d4a50fff
//hook第一个加密函数,观察数值前后变化
function hook_1_enc(){
// 获取模块
var module = Process.getModuleByName("libsec2023.so")
// 转为函数地址
var addr=module.base.add("0x3B9D4");
// 获取函数入口
var func = new NativePointer(addr.toString());
console.log('[+] hook '+func.toString())
// 函数 hook 钩子附加
Interceptor.attach(func, {onEnter: function (args) {
console.log('before first enc');
console.log(hexdump(args[0],{
offset: 0,// 相对偏移
length: 64,//dump 的大小
header: true,
ansi: true
}));
},
onLeave: function (retval) {
console.log("after first enc")
console.log(hexdump(retval,{
offset: 0,// 相对偏移
length: 64,//dump 的大小
header: true,
ansi: true
}));
}
});
}
于是第一个算法如下:
algorithm_1 = {
(0, "enc"): lambda x: (x - 28) & 0xff,
(1, "enc"): lambda x: x ^ 0xd3,
(2, "enc"): lambda x: (x - 94) & 0xff,
(3, "enc"): lambda x: x ^ 0x86,(0, "dec"): lambda x: (x + 28) & 0xff,
(1, "dec"): lambda x: x ^ 0xd3,
(2, "dec"): lambda x: (x + 94) & 0xff,
(3, "dec"): lambda x: x ^ 0x86
}def enc_1(input):
input_byte = bytearray(input.to_bytes(8, 'little'))
for i in range(len(input_byte)):
index = i % 4
input_byte[i] = (algorithm_1[(index, "enc")](input_byte[i] ^ index) - 8 * index) & 0xff
return int.from_bytes(input_byte, 'little')def dec_1(input):
input_byte = bytearray(input.to_bytes(8, 'little'))
for i in range(len(input_byte)):
index = i % 4
input_byte[i] = (algorithm_1[(index, "dec")]((input_byte[i] + 8 * index) & 0xff)) ^ index
return int.from_bytes(input_byte, 'little')def mytest_1():
input = 999999999999 # 假设在小键盘输入999999999999# 验证加密算法
input = enc_1(input)
assert input.to_bytes(8, 'little') == b'\xe3\xd5\x39\x39\xcc\xca\x94\x6d'# 验证解密算法
input = dec_1(input)
assert input.to_bytes(8, 'little') == b'\xff\x0f\xa5\xd4\xe8\x00\x00\x00'mytest_1()
在对输入的值进行首轮加密之后,又再次对输入值经过bswap32函数加密。
这个函数对应的arm汇编为:
REV W8, W8
那我们去arm手册看看REV指令的定义好了。
REV
Byte-Reverse Word reverses the byte order in a 32-bit register.
Operation
if ConditionPassed() then
    EncodingSpecificOperations();
    bits(32) result;
    result<31:24> = R[m]<7:0>;
    result<23:16> = R[m]<15:8>;
    result<15:8>  = R[m]<23:16>;
    result<7:0>   = R[m]<31:24>;
    R[d] = result;
看Operation很清楚的知道这就是反转字节,比如:
w8 = 0x12345678;
REV W8, W8;
w8;//w8 = 0x78563412
所以此处bswap32(v6),是对v6进行字节翻转,而v6 = HIDWORD(a1),故在进行第一个加密函数sub_3B9D4之后,将首先对输入的高32位进行加密处理,这在我们后续hook第二个加密函数sub_3A924之后,也可以体现出来这一点。
我们首先hook一下sub_3A924让前后分析的逻辑连贯起来。
//hook第2个加密函数,观察数值前后变化
var enc2_count = 0;
var input_2 = [0,0]
function hook_2_enc(){
// 获取模块
var module = Process.getModuleByName("libsec2023.so")
// 转为函数地址
var addr=module.base.add("0x3A924");
// 获取函数入口
var func = new NativePointer(addr.toString());
console.log('[+] hook '+func.toString())
// 函数 hook 钩子附加
Interceptor.attach(func, {onEnter: function (args) {
console.log('before second enc, count:',enc2_count+1);
input_2[enc2_count] = args[3]
console.log(hexdump(args[1],{
offset: 0,// 相对偏移
length: 64,//dump 的大小
header: true,
ansi: true
}));},
onLeave: function (retval) {
console.log('after second enc, count:',enc2_count+1);
console.log(hexdump(input_2[enc2_count],{
offset: 0,// 相对偏移
length: 64,//dump 的大小
header: true,
ansi: true
}));
enc2_count+=1;
}
}
);
}
在经过第一轮加密后,我们得到了密文cc ca 94 6d e3 d5 39 39,而在此处,第一次调用sub_3A924的输入为6d 94 ca cc,第二次调用sub_3A924的输入为39 39 d5 e3,正好对应了上文提到的翻转字节处理。
我们进入该函数后,发现如v11+1408LL,v11 + 1664LL等等的fastcall函数调用,一般这种形式的函数调用在安卓逆向中遇到的话,那大概率就是JNIEnv *。
在此题中,我们只需要对v11按下Y切换类型,然后输入JNIEnv *,就会转换成JNIEnv *的结构体函数指针如图:
在这里出现了jni函数GetStaticMethodID,我们hook一下这个函数观察调用了什么方法。
//hook GetStaticMethodID
function hook_GetStaticMethodID() {
    var symbols = Module.enumerateSymbolsSync("libart.so");
    var addr_jni = null;
    for (var i = 0; i < symbols.length; i++) {
        var symbol = symbols[i];
        if (symbol.name.indexOf("GetStaticMethodID")!=-1) {
            addr_jni = symbol.address;
            console.log("find ",symbol.name);
            console.log("[+] hook ",addr_jni);
            Interceptor.attach(addr_jni, {
                onEnter: function (args) {
                    console.log("call GetStaticMethodID: ",symbol.name);
                    console.log("name: ",args[2].readCString());
                    console.log("sig: ",args[3].readCString());
                },
                onLeave: function (retval) {
                    //console.log("return val")
                    //console.log(retval);
                }
            });
        }
    }
}
在输出中,我们发现GetStaticMethodID调用了名为encrypt的方法。
但是我们在apk中却并未发现该方法。
那么由此就可以推断出这个方法是由dex动态加载的。
我们可以使用frida-dexdump来把内存中的dex给dump下来,要注意frida的端口已经被我们修改为了1234,所以这里也要加上-H参数。
将所有dex dump下来之后,接下来的步骤就是把这些dex一个一个拖进jadx里面反编译,去看看哪一个dex包含encrypt方法。
这个控制流一眼看上去就是加了混淆的,据FallW1nd师傅说是BlackObfuscator混淆,本来准备去手工分析的,但是想起前几天刚下载了Jeb5.1,就想看看新工具的效果怎样。
当我用Jeb5.1反编译这个dex之后,这BlackObfuscator混淆怎么就直接去除了?
好家伙这Jeb5.1竟然能自动去除控制流平坦化,crazy!
那么这第二个加密的逻辑相当的清晰,算法如下:
import struct
def enc_2(input):
input = int.from_bytes(input.to_bytes(4, 'little'), 'big') # 字节再次翻转
input = (input >> 7 | input << 25) & 0xffffffff
input_byte = bytearray(input.to_bytes(4, 'big'))
xor_arr = [50, -51, -1, -104, 25, -78, 0x7C, -102]
for i in range(4):
input_byte[i] = (input_byte[i] ^ xor_arr[i]) & 0xff
input_byte[i] = (input_byte[i] + i) & 0xff
return int.from_bytes(input_byte, 'big')def dec_2(input):
input_byte = bytearray(input.to_bytes(4, 'big'))
xor_arr = [50, -51, -1, -104, 25, -78, 0x7C, -102]
for i in range(4):
input_byte[i] = (input_byte[i] - i) & 0xff
input_byte[i] = (input_byte[i] ^ xor_arr[i]) & 0xffinput = int.from_bytes(input_byte, 'big')
input = (input << 7 | input >> 25) & 0xffffffff
input = int.from_bytes(input.to_bytes(4, 'little'), 'big') # 字节再次翻转return input
def mytest_2():
input = int.from_bytes(b'\xe3\xd5\x39\x39\xcc\xca\x94\x6d','little')
input_low, input_high = struct.unpack('>2I', input.to_bytes(8, 'little')) # 实现bswap32# 验证加密算法
input_high = enc_2(input_high)
assert input_high.to_bytes(4, 'big') == b'\xaa\x17\xd8\x10'
input_low = enc_2(input_low)
assert input_low.to_bytes(4, 'big') == b'\xf4\xc0\x8e\x36'# 验证解密算法
input_high = dec_2(input_high)
input_low = dec_2(input_low)
input = struct.pack('>2I', input_low, input_high)
assert input == b'\xe3\xd5\x39\x39\xcc\xca\x94\x6d'mytest_2()
我们可以hook一下第二次加密前后输入的变化。
//hook sub_3B8CC,观察传入的参数
function hook_3B8CC(){
// 获取模块
var module = Process.getModuleByName("libsec2023.so")
// 转为函数地址
var addr=module.base.add("0x3B8CC");
// 获取函数入口
var func = new NativePointer(addr.toString());
console.log('[+] hook '+func.toString())
// 函数 hook 钩子附加
Interceptor.attach(func, {
onEnter: function (args) {
console.log("\nbefore sub_3B8CC: ",args[0]);},
onLeave: function (retval) {
console.log("after sub_3B8CC: ",retval);
}
});
}
我们在sub_31164中去hook最后的br x2跳转来观察之后跳转到了哪一个函数中。
function addr_in_so(addr){
var process_Obj_Module_Arr = Process.enumerateModules();
console.log(addr);
for(var i = 0; i < process_Obj_Module_Arr.length; i++) {
//包含"lib"字符串的
if(process_Obj_Module_Arr[i].path.indexOf("lib")!=-1)
{
if(addr>process_Obj_Module_Arr[i].base && addr<process_Obj_Module_Arr[i].base.add(process_Obj_Module_Arr[i].size)){
console.log(addr.toString(16),"位于",process_Obj_Module_Arr[i].name,"中","offset: ",(addr-process_Obj_Module_Arr[i].base).toString(16));
}
}
}
}
//hook sub_311A0,查看BR X2跳转的地址
function hook_311A0(){
// 获取模块
var module = Process.getModuleByName("libsec2023.so")
// 转为函数地址
var addr=module.base.add("0x311A0");
// 获取函数入口
var func = new NativePointer(addr.toString());
console.log('[+] hook '+func.toString())
// 函数 hook 钩子附加
Interceptor.attach(func, {onEnter: function (args) {
addr_in_so(this.context.x2);
},
onLeave: function (retval) {
//console.log(hexdump(retval));
}
});
}
可见在libsec2023.so中经过两次加密之后,apk回到了libil2cpp.so中。
偏移0x138d64加上原来so的基址后,定位到了这个地方。
B跳转过去发现并不是一个函数,而是FUNCTION CHUNK。
那先修改一下.init_proc的End address。
然后回到之前chunk function的位置,按下P让IDA分析出函数,就可以看伪代码继续分析了。
这个类的名称被o,O,0给混淆了,导致难以分辨类和变量,所以需要为这些类和变量进行重命名。
在看看其他函数,这最后的v6 + v8 + (v6 | ~v8) + (v8 ^ v6) - (v6 & ~v8) + 1看起来是MBA表达式。
在github找个工具GAMBA简化一下,有些表达式要分开简化效果才好,这里4294967296=0x100000000已经溢出32位了,所以4294967296+v8=v8。
重命名函数之后,很明显发现这个加密算法应该和VM指令相关。
我们回到类的初始化函数ctor完成之后,下一个要调用的函数OO0OoOOo_Oo0__oOOoO0o0。
进入该函数,又是经典的while(1)循环,那么在这个循环里面,必定会出现eip和opcode,这两个分别对应着this->fields.oOOO0Oo0和U16_arr,我们重命名之。
之后,我们以add函数为例分析其他全局变量的含义,这里对应的vm指令应该为add uS_arr[bbb], uS_arr[bbb], uS_arr[bbb+1]。
到这里可能会有人纠结uS_arr究竟代表寄存器还是代表栈呢?我们回到初始化函数中,发现变量bbb所赋的初值为-1,那么由此可以确定,uS_arr代表的是栈,而bbb则表示esp。
至此为止,vm所需的关键变量我们均已经分析清楚了。
接下来就可以分析vm虚拟机了,对于vm类题型,我们只需要找到vm指令中的加减乘除位运算的位置和输入输出是多少就够了,别的指令比如push,pop,mov,opcode是多少,opcode是如何被vm读取等等这些问题都不需要考虑,因为在vm中,所有的vm指令的最终目的都是为了对输入的值进行操作,我们知道了这些加密运算,那么逆运算自然是信手拈来。
所以在这里,我们可以用frida去hook一下运算相关的指令。
//hook vm
function hook_vm(){
var module = Process.getModuleByName("libil2cpp.so")
var my_base = 0x712a997000;
var esp,ptr_esp,eip,ptr_eip,opcode,input,stack;var addr_run=module.base.add(0x712AE01D44-my_base);
Interceptor.attach(addr_run, {
onEnter: function (args) {
opcode = ptr(args[0].add(0x10).readS64()).add(0x20);
input = ptr(args[0].add(0x18).readS64()).add(0x1c);
stack = ptr(args[0].add(0x20).readS64()).add(0x1c);
ptr_esp = args[0].add(0x28);
ptr_eip = args[0].add(0x2c);
console.log("====start vm====");
for(var i=1;i<8;i++){
console.log("input["+i+"]=0x"+input.add(4*i).readS32().toString(16));
}
},
onLeave: function (retval) {
console.log("====end vm====")
}
});var addr_add=module.base.add(0x712AE01E50-my_base);
Interceptor.attach(addr_add, {
onEnter: function (args) {
esp=ptr_esp.readS32();
eip=ptr_eip.readS32();
console.log("stack["+esp+"]=0x"+stack.add(4*esp).readS32().toString(16)+"+"+stack.add(4*(esp+1)).readS32());
},
onLeave: function (retval) {
}
});var addr_sub=module.base.add(0x712AE01ECC-my_base);
Interceptor.attach(addr_sub, {
onEnter: function (args) {
esp=ptr_esp.readS32();
eip=ptr_eip.readS32();
console.log("stack["+esp+"]=0x"+stack.add(4*esp).readS32().toString(16)+"-"+stack.add(4*(esp+1)).readS32());
},
onLeave: function (retval) {
}
});var addr_mul=module.base.add(0x712AE01F44-my_base);
Interceptor.attach(addr_mul, {
onEnter: function (args) {
esp=ptr_esp.readS32();
eip=ptr_eip.readS32();
console.log("stack["+esp+"]=0x"+stack.add(4*esp).readS32().toString(16)+"*"+stack.add(4*(esp+1)).readS32());
},
onLeave: function (retval) {
}
});var addr_Lshift=module.base.add(0x712AE01FC4-my_base);
Interceptor.attach(addr_Lshift, {
onEnter: function (args) {
esp=ptr_esp.readS32();
eip=ptr_eip.readS32();
console.log("stack["+esp+"]=0x"+stack.add(4*esp).readS32().toString(16)+"<<"+stack.add(4*(esp+1)).readS32());
},
onLeave: function (retval) {
}
});var addr_Rshift=module.base.add(0x712AE02040-my_base);
Interceptor.attach(addr_Rshift, {
onEnter: function (args) {
esp=ptr_esp.readS32();
eip=ptr_eip.readS32();
console.log("stack["+esp+"]=0x"+stack.add(4*esp).readS32().toString(16)+">>"+stack.add(4*(esp+1)).readS32());
},
onLeave: function (retval) {
}
});var addr_and=module.base.add(0x712AE020BC-my_base);
Interceptor.attach(addr_and, {
onEnter: function (args) {
esp=ptr_esp.readS32();
eip=ptr_eip.readS32();
console.log("stack["+esp+"]=0x"+stack.add(4*esp).readS32().toString(16)+"&"+stack.add(4*(esp+1)).readS32());
},
onLeave: function (retval) {
}
});var addr_xor=module.base.add(0x712AE0213C-my_base);
Interceptor.attach(addr_xor, {
onEnter: function (args) {
esp=ptr_esp.readS32();
eip=ptr_eip.readS32();
console.log("stack["+esp+"]=0x"+stack.add(4*esp).readS32().toString(16)+"^"+stack.add(4*(esp+1)).readS32());
},
onLeave: function (retval) {
}
});
}
输出以及分析如下:
====start vm====
input[1]=0x10d817aa//输入的低32位
input[2]=0x368ec0f4//输入的高32位
//低32位进行vm加密
stack[1]=0x10d817aa>>24
stack[1]=0x10&255//取出第4个字节,即0x10,方便起见,记为byte4
stack[2]=0x18-8
stack[2]=0x10d817aa>>16
stack[2]=0x10d8&255//取出第3个字节,即0xd8,记为byte3
stack[3]=0x10-8
stack[3]=0x10d817aa>>8
stack[3]=0x10d817&255//取出第2个字节,即0x17,记为byte2
stack[4]=0x8-8
stack[4]=0x10d817aa>>0
stack[4]=0x10d817aa&255//取出第1个字节,即0xaa,记为byte1
stack[5]=0x0-8
stack[4]=0xaa-27//byte1=byte1-27=0x8f
stack[3]=0x17^194//byte2=byte2^194=0xd5
stack[2]=0xd8+168//byte3=byte3+168=0x180
stack[1]=0x10^54//byte4=byte4^54=0x26
stack[1]=0x8f^0//byte1^0
stack[1]=0x8f<<0//byte1<<0
stack[2]=0xff<<0
stack[1]=0x8f&255
stack[1]=0x8f+0
stack[1]=0x4+1
stack[1]=0x0+8
stack[1]=0xd5^8//byte2^8
stack[1]=0xdd<<8//byte2<<8
stack[2]=0xff<<8
stack[1]=0xdd00&65280
stack[1]=0xdd00+143
stack[1]=0x5+1
stack[1]=0x8+8
stack[1]=0x180^16//byte3^16
stack[1]=0x190<<16//byte3<<16
stack[2]=0xff<<16
stack[1]=0x1900000&16711680
stack[1]=0x900000+56719
stack[1]=0x6+1
stack[1]=0x10+8
stack[1]=0x26^24//byte4^24
stack[1]=0x3e<<24//byte4<<24
stack[2]=0xff<<24
stack[1]=0x3e000000&-16777216
stack[1]=0x3e000000+9493903//高32位进行vm加密
stack[1]=0x7+1
stack[1]=0x18+8
stack[1]=0x368ec0f4>>24//取出第4个字节,即0x36,记为byte4
stack[1]=0x36&255
stack[2]=0x18-8
stack[2]=0x368ec0f4>>16//取出第3个字节,即0x8e,记为byte3
stack[2]=0x368e&255
stack[3]=0x10-8
stack[3]=0x368ec0f4>>8//取出第2个字节,即0xc0,记为byte2
stack[3]=0x368ec0&255
stack[4]=0x8-8
stack[4]=0x368ec0f4>>0//取出第1个字节,即0xf4,记为byte1
stack[4]=0x368ec0f4&255
stack[5]=0x0-8
stack[4]=0xf4-47//byte1=byte1-47=0xc5
stack[3]=0xc0^182//byte2=byte2^182=0x76
stack[2]=0x8e+55//byte3=byte3+55=0xc5
stack[1]=0x36^152//byte4=byte4^152=0xae
stack[1]=0xc5+0//byte1+0
stack[1]=0xc5<<0//byte1<<0
stack[2]=0xff<<0
stack[1]=0xc5&255
stack[1]=0xc5+0
stack[1]=0x4+1
stack[1]=0x0+8
stack[1]=0x76+8//byte2+8
stack[1]=0x7e<<8//byte2<<8
stack[2]=0xff<<8
stack[1]=0x7e00&65280
stack[1]=0x7e00+197
stack[1]=0x5+1
stack[1]=0x8+8
stack[1]=0xc5+16//byte3+16
stack[1]=0xd5<<16//byte3<<16
stack[2]=0xff<<16
stack[1]=0xd50000&16711680
stack[1]=0xd50000+32453
stack[1]=0x6+1
stack[1]=0x10+8
stack[1]=0xae+24//byte4+24
stack[1]=0xc6<<24//byte<<24
stack[2]=0xff<<24
stack[1]=0x-3a000000&-16777216
stack[1]=0x-3a000000+13991621
stack[1]=0x7+1
stack[1]=0x18+8
====end vm====
input[1]=0x3e90dd8f
input[2]=0x-392a813b//无符号int对应的是0xc6d57ec5
由此可见,这个vm其实相当的简单。
import struct
def enc_vm_low(input):
byte4, byte3, byte2, byte1 = struct.unpack(">4B", input.to_bytes(4, 'big'))
byte1 = (byte1 - 27) ^ 0
byte2 = (byte2 ^ 194) ^ 8
byte3 = (byte3 + 168) ^ 16
byte4 = (byte4 ^ 54) ^ 24
input = struct.pack(">4B", byte1 & 0xff, byte2 & 0xff, byte3 & 0xff, byte4 & 0xff)
return int.from_bytes(input, 'little')def dec_vm_low(input):
byte4, byte3, byte2, byte1 = struct.unpack(">4B", input.to_bytes(4, 'big'))
byte1 = (byte1 ^ 0) + 27
byte2 = (byte2 ^ 8) ^ 194
byte3 = (byte3 ^ 16) - 168
byte4 = (byte4 ^ 24) ^ 54
input = struct.pack(">4B", byte1 & 0xff, byte2 & 0xff, byte3 & 0xff, byte4 & 0xff)
return int.from_bytes(input, 'little')def enc_vm_high(input):
byte4, byte3, byte2, byte1 = struct.unpack(">4B", input.to_bytes(4, 'big'))
byte1 = (byte1 - 47) + 0
byte2 = (byte2 ^ 182) + 8
byte3 = (byte3 + 55) + 16
byte4 = (byte4 ^ 152) + 24
input = struct.pack(">4B", byte1 & 0xff, byte2 & 0xff, byte3 & 0xff, byte4 & 0xff)
return int.from_bytes(input, 'little')def dec_vm_high(input):
byte4, byte3, byte2, byte1 = struct.unpack(">4B", input.to_bytes(4, 'big'))
byte1 = (byte1 - 0) + 47
byte2 = (byte2 - 8) ^ 182
byte3 = (byte3 - 16) - 55
byte4 = (byte4 - 24) ^ 152
input = struct.pack(">4B", byte1 & 0xff, byte2 & 0xff, byte3 & 0xff, byte4 & 0xff)
return int.from_bytes(input, 'little')def mytest_3():
input_high = int.from_bytes(b'\xaa\x17\xd8\x10','big')
input_low = int.from_bytes(b'\xf4\xc0\x8e\x36','big')input_high, input_low = input_low, input_high # 对应sub_3B8CC最后 输入的高/低32位交换
input = struct.pack('>2I', input_low, input_high)# 验证加密算法
input_low, input_high = struct.unpack('<2I', input)
input_low = enc_vm_low(input_low)
assert input_low == 0x3e90dd8f
input_high = enc_vm_high(input_high)
assert input_high == 0xc6d57ec5# 验证解密算法
input_low = dec_vm_low(input_low)
assert input_low == 0x10d817aa
input_high = dec_vm_high(input_high)
assert input_high == 0x368ec0f4mytest_3()
这个算法一看就知道是xtea,那么需要知道的就只有v24这个密钥了。
用frida把密钥hook下来。
//hook xtea加密的key
function hook_xtea_key(){
    // 获取模块
    var module = Process.getModuleByName("libil2cpp.so");
    var my_base = 0x712a997000;
    var addr_key=module.base.add(0x712ADFCC60-my_base);
    // 函数 hook 钩子附加
    Interceptor.attach(addr_key, {
        onEnter: function (args) {
            console.log(hexdump(this.context.x20,{
                offset: 0,// 相对偏移
                length: 64,//dump 的大小
                header: true,
                ansi: true
                }));
        },
        onLeave: function (retval) {
        }
    });
}
再把xtea加密之后的值也顺便hook下来。
//hook 所有加密完成之后的值,以及比较的值
function hook_final_check(){
    // 获取模块
    var module = Process.getModuleByName("libil2cpp.so");
    var my_base = 0x712a997000;
    var addr_final_check=module.base.add(0x712ADFCD14-my_base);
    // 函数 hook 钩子附加
    Interceptor.attach(addr_final_check, {
        onEnter: function (args) {
            console.log("result = ",this.context.x0);
            console.log("result_low = ",this.context.x21);
            console.log("result_high = ",this.context.x22);
        },
        onLeave: function (retval) {
        }
    });
}
那么这部分的算法如下:
import ctypes
def enc_xtea(input_low, input_high):
v0, v1 = ctypes.c_uint32(input_low), ctypes.c_uint32(input_high)
key = [0x7b777c63, 0xc56f6bf2, 0x2b670130, 0x76abd7fe]
delta = 0x21524111
total1 = ctypes.c_uint32(0xBEEFBEEF)
total2 = ctypes.c_uint32(0x9D9D7DDE)
for i in range(64):
v0.value += (((v1.value << 7) ^ (v1.value >> 8)) + v1.value) ^ (total1.value - key[total1.value & 3])
v1.value += (((v0.value << 8) ^ (v0.value >> 7)) - v0.value) ^ (total2.value + key[(total2.value >> 13) & 3])
total1.value -= delta
total2.value -= delta
return v0.value, v1.valuedef dec_xtea(input_low, input_high):
v0, v1 = ctypes.c_uint32(input_low), ctypes.c_uint32(input_high)
key = [0x7b777c63, 0xc56f6bf2, 0x2b670130, 0x76abd7fe]
delta = 0x21524111
total1 = ctypes.c_uint32(0xBEEFBEEF - 64 * delta)
total2 = ctypes.c_uint32(0x9D9D7DDE - 64 * delta)
for i in range(64):
total1.value += delta
total2.value += delta
v1.value -= (((v0.value << 8) ^ (v0.value >> 7)) - v0.value) ^ (total2.value + key[(total2.value >> 13) & 3])
v0.value -= (((v1.value << 7) ^ (v1.value >> 8)) + v1.value) ^ (total1.value - key[total1.value & 3])
return v0.value, v1.valuedef mytest_4():
input_low = 0x3e90dd8f
input_high = 0xc6d57ec5# 验证加密算法
input_low, input_high = enc_xtea(input_low, input_high)
assert (input_low, input_high) == (0xabba3c01, 0x7223607f)# 验证解密算法
input_low, input_high = dec_xtea(input_low, input_high)
assert (input_low, input_high) == (0x3e90dd8f, 0xc6d57ec5)mytest_4()
至此为止,所有加密算法分析完毕。
在所有的加密完成后,这里的result就是我们的token,加密的低32位和token比较,高32位和0比较。
import struct
import ctypes
algorithm_1 = {
(0, "dec"): lambda x: (x + 28) & 0xff,
(1, "dec"): lambda x: x ^ 0xd3,
(2, "dec"): lambda x: (x + 94) & 0xff,
(3, "dec"): lambda x: x ^ 0x86
}
def dec_xtea(input_low, input_high):
v0, v1 = ctypes.c_uint32(input_low), ctypes.c_uint32(input_high)
key = [0x7b777c63, 0xc56f6bf2, 0x2b670130, 0x76abd7fe]
delta = 0x21524111
total1 = ctypes.c_uint32(0xBEEFBEEF-64*delta)
total2 = ctypes.c_uint32(0x9D9D7DDE-64*delta)
for i in range(64):
total1.value += delta
total2.value += delta
v1.value -= (((v0.value << 8) ^ (v0.value >> 7)) - v0.value) ^ (total2.value + key[(total2.value >> 13) & 3])
v0.value -= (((v1.value << 7) ^ (v1.value >> 8)) + v1.value) ^ (total1.value - key[total1.value & 3])
return v0.value, v1.valuedef dec_vm_low(input):
byte4, byte3, byte2, byte1 = struct.unpack(">4B", input.to_bytes(4, 'big'))
byte1 = (byte1 ^ 0) + 27
byte2 = (byte2 ^ 8) ^ 194
byte3 = (byte3 ^ 16) - 168
byte4 = (byte4 ^ 24) ^ 54
input = struct.pack(">4B", byte1 & 0xff, byte2 & 0xff, byte3 & 0xff, byte4 & 0xff)
return int.from_bytes(input, 'little')def dec_vm_high(input):
byte4, byte3, byte2, byte1 = struct.unpack(">4B", input.to_bytes(4, 'big'))
byte1 = (byte1 - 0) + 47
byte2 = (byte2 - 8) ^ 182
byte3 = (byte3 - 16) - 55
byte4 = (byte4 - 24) ^ 152
input = struct.pack(">4B", byte1 & 0xff, byte2 & 0xff, byte3 & 0xff, byte4 & 0xff)
return int.from_bytes(input, 'little')def dec_2(input):
input_byte = bytearray(input.to_bytes(4, 'big'))
xor_arr = [50, -51, -1, -104, 25, -78, 0x7C, -102]
for i in range(4):
input_byte[i] = (input_byte[i] - i) & 0xff
input_byte[i] = (input_byte[i] ^ xor_arr[i]) & 0xffinput = int.from_bytes(input_byte, 'big')
input = (input << 7 | input >> 25) & 0xffffffff
input = int.from_bytes(input.to_bytes(4, 'little'), 'big') # 字节再次翻转return input
def dec_1(input):
input_byte = bytearray(input.to_bytes(8, 'little'))
for i in range(len(input_byte)):
index = i % 4
input_byte[i] = (algorithm_1[(index, "dec")]((input_byte[i] + 8 * index) & 0xff)) ^ index
return int.from_bytes(input_byte, 'little')token = int(input("enter the token plz~:"))
input_low,input_high = token,0#xtea
input_low,input_high=dec_xtea(input_low, input_high)#vm
input_low,input_high = dec_vm_low(input_low),dec_vm_high(input_high)#bswap32
input = struct.pack('<2I', input_low, input_high)
input_low, input_high = struct.unpack('>2I', input)#高/低32位对调
input_low, input_high=input_high, input_low#blackObfuscator
input_high = dec_2(input_high)
input_low = dec_2(input_low)#last decrypt
input = struct.pack('>2I', input_low, input_high)
input=int.from_bytes(input,'little')
input = dec_1(input)#output
print(input)
◆ELF文件格式的详解
(https://cloud.tencent.com/developer/article/1710868)
◆[原创]2023腾讯游戏安全竞赛初赛题解(安卓)
(https://bbs.kanxue.com/thread-276949.htm#msg_header_h2_0)
◆[原创]2023腾讯游戏安全大赛-安卓赛道初赛wp
(https://bbs.kanxue.com/thread-276896.htm#msg_header_h2_2)
◆[原创] 腾讯游戏安全技术竞赛2023 安卓客户端初赛WriteUp
(https://bbs.kanxue.com/thread-276893.htm)
◆ARMv8(aarch64)指令集特性
(https://blog.csdn.net/weixin_38669561/article/details/107279528)
看雪ID:oacia
https://bbs.kanxue.com/user-home-963320.htm
# 往期推荐
球分享
球点赞
球在看
如有侵权请联系:admin#unsafe.sh