大年三十,没有鞭炮声,举国同心,抗击疫情,2020,与时间赛跑!
前言
想远程家里电脑,又不想一直开着浪费电。试过WOL(局域网唤醒)的方案不太靠谱,一来唤醒可能会失败,二来电脑如果蓝屏/卡机没法强制关机。于是想到了单片机来控制,至于控制部分,考虑过机械臂,但成本太高,通过步进电机制作又略显麻烦。后面想到了个简单的方案,通过短接PWR-SW开机键两端,产生开机触发信号即可模拟开机动作。所以就有了本文这个简易东西,文章写得有些琐碎,留个纪念吧。
完整代码和相关资料已放Github:https://github.com/BlackINT3/iot-security/tree/master/minisw

硬件部分
硬件属于本文重点,虽然原理比较简单,但相对软件,需要准备的东西较多,都可以在X宝买,有些商家为了堆销量1块钱都包邮。
基本原理
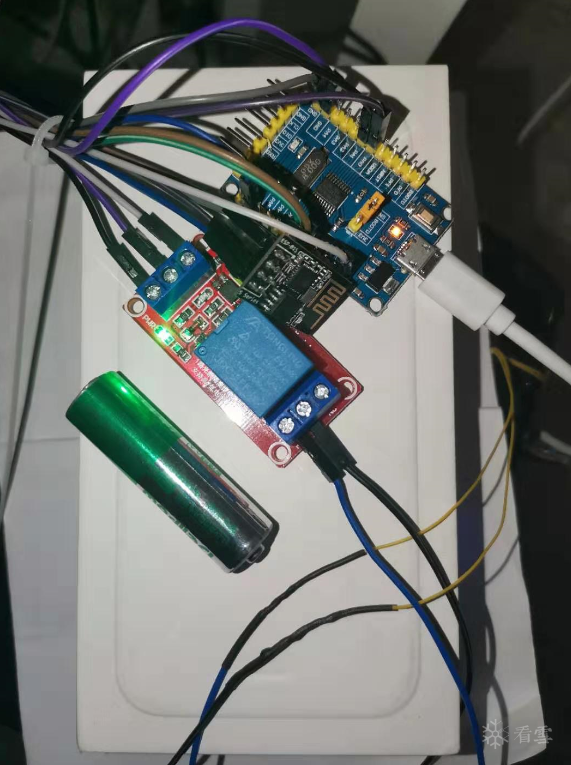
STM32板子利用ESP8266模块的WiFi功能连接路由(和Web服务端处于同一个内网),然后定时轮询Web服务器,获取指令(开机/关机、强制关机),得到指令后STM32板子操作GPIO,控制继电器开闭,从而控制PWR-SW开机键闭合。
硬件准备
- MCU:STM32F030F4 Cortex-M0入门级,¥6块多。之前用的F103开发板,后面觉得功耗较高、功能过剩,就买了一块F0最小系统。
- 继电器:1路5v光耦隔离的即可。
- WiFi模块:ESP8266-01s(出厂一般都是刷了固件的,我之前用Arduino把固件写坏了,后面重刷了一次,也顺带升级了版本)
- USB转UART下载器(可选):可用USART烧录程序。
- JLink仿真器(可选):支持SWD,可用SWD烧录程序。
- 杜邦线:公对公/公对母/母对母若干根。
- 烙铁、助焊剂(焊膏/松香)、焊锡备用。
- 热缩管:包扎飞线和杜邦线的接线处。
- 飞线:接电脑开机键两端。
电路接线
- 拆下电脑前端面板,用飞线连接开机键两端(无需焊接,捆住固定即可)。飞线出来的两端连接到继电器(可通过杜邦线间接连接)。
- 买到的STM32F030F4板子有两块引脚排针,需要自己焊上去,当然你也可以买焊好的。
- 板子需要5v Micro USB电源线,可用普通充电头(我是直接用的电脑USB口,关机状态下提供电源,需要在BIOS里设置)
- 板子PA1连接到继电器作为电平输入,同时连接5V引脚和共地。
- JLink接线( 查看JLink接线),UART接线按常规连接TX/RX/GND即可。
- ESP8266的TX和RX分别连接PA9和PA10,同时连接3.3V引脚和共地,PA0连接RST用于复位。模块启动时CH-EN引脚默认高电平,因此无需使能。
开发环境
- Keil5:例如安装5.29。KeyGen下载
- 安装STM32F0开发包:Keil.STM32F0xx_DFP.2.0.0.pack,建议用迅雷下载。
- 配置烧录和调试器:Flash--Configure Flash Tools--Debug--选择JLink,然后设置,没问题的话能SW Device里看到JLink的设备,最后选择Flash Download把STM32F0xx的烧录信息添加进去,例如STM32F0xx 16KB Flash,地址范围0x08000000~(+0x00004000)。然后勾选Reset and Run(下载后运行)。
- 配置编译,优化选择O1(O0生成的文件超出了Flash的容量)。
代码实现
因为工程比较简单,也写了注释,所以我将代码全部放入main.c中便于阅读。程序首先初始化定时器以及各外设,连接WiFi后开始轮询获取服务端数据,通过解析数据来设置PA1端口的高低电平,进而控制继电器闭合。
- 初始化定时器
//接收数据定时器
TIM1_Init(50);

//接收超时定时器
TIM3_Init(5000);

//轮询定时器
TIM14_Init(3000);
- 初始化ESP8266,控制WiFi
void WiFi_Init()
{
    GPIO_InitTypeDef GPIO_InitStruct;
    RCC_AHBPeriphClockCmd(RCC_AHBPeriph_GPIOA, ENABLE);
    GPIO_InitStruct.GPIO_Pin = GPIO_Pin_0;
    GPIO_InitStruct.GPIO_Speed = GPIO_Speed_10MHz;
    GPIO_InitStruct.GPIO_Mode = GPIO_Mode_OUT;
    GPIO_InitStruct.GPIO_OType = GPIO_OType_PP;
    GPIO_Init(GPIOA, &GPIO_InitStruct);
    RESET_IO(1);
}
char WiFi_Start()
{
    //复位
    if (WiFi_Reset(50)) {
        return 1;
    }
    //设置STA模式
    if (WiFi_SendCmd("AT+CWMODE=1",50)) {
        return 1;
    }
    //取消自动连接
    if (WiFi_SendCmd("AT+CWAUTOCONN=0",50)) {
        return 1;
    }
    //开始连接
    if (WiFi_Connect(30)){
        return 1;
    }
    //开启透传
    if(WiFi_SendCmd("AT+CIPMODE=1",50)){
        return 1;
    }
    //关闭多路连接
    if(WiFi_SendCmd("AT+CIPMUX=0",50)){
        return 1;
    }
    return 0;
}
- 初始化USART
void USART1_Init(unsigned int baud)
{
    GPIO_InitTypeDef GPIO_InitStruct;
    USART_InitTypeDef USART_InitStructure;
    NVIC_InitTypeDef NVIC_InitStruct;

    RCC_AHBPeriphClockCmd(RCC_AHBPeriph_GPIOA, ENABLE);
    RCC_APB2PeriphClockCmd(RCC_APB2Periph_USART1, ENABLE);

    //设置PA9/PA10作为TX/RX端口
    GPIO_PinAFConfig(GPIOA, GPIO_PinSource9, GPIO_AF_1);
    GPIO_PinAFConfig(GPIOA, GPIO_PinSource10, GPIO_AF_1);

    GPIO_InitStruct.GPIO_Pin = GPIO_Pin_9 | GPIO_Pin_10;
    GPIO_InitStruct.GPIO_Mode = GPIO_Mode_AF;
    GPIO_InitStruct.GPIO_Speed = GPIO_Speed_50MHz;
    GPIO_InitStruct.GPIO_OType = GPIO_OType_PP;
    GPIO_InitStruct.GPIO_PuPd = GPIO_PuPd_UP;
    GPIO_Init(GPIOA, &GPIO_InitStruct);

    USART_InitStructure.USART_BaudRate = baud;
    USART_InitStructure.USART_WordLength = USART_WordLength_8b;
    USART_InitStructure.USART_StopBits = USART_StopBits_1;
    USART_InitStructure.USART_Parity = USART_Parity_No;
    USART_InitStructure.USART_HardwareFlowControl = USART_HardwareFlowControl_None;
    USART_InitStructure.USART_Mode = USART_Mode_Rx | USART_Mode_Tx;

    USART_Init(USART1, &USART_InitStructure);
    USART_ITConfig(USART1,USART_IT_RXNE,ENABLE);
    USART_Cmd(USART1, ENABLE);

    NVIC_InitStruct.NVIC_IRQChannel = USART1_IRQn;
    NVIC_InitStruct.NVIC_IRQChannelPriority = 0x02;
    NVIC_InitStruct.NVIC_IRQChannelCmd = ENABLE;
    NVIC_Init(&NVIC_InitStruct);
}
- 初始化GPIO,控制继电器
void RelayIO_Init()
{
    GPIO_InitTypeDef GPIO_InitStruct;
    RCC_AHBPeriphClockCmd(RCC_AHBPeriph_GPIOA, ENABLE);
    GPIO_InitStruct.GPIO_Pin = GPIO_Pin_1;
    GPIO_InitStruct.GPIO_Speed = GPIO_Speed_10MHz;
    GPIO_InitStruct.GPIO_Mode = GPIO_Mode_OUT;
    GPIO_InitStruct.GPIO_OType = GPIO_OType_PP;
    GPIO_Init(GPIOA, &GPIO_InitStruct);
    //默认低电平,高电平闭合
    RESET_BUTTON(0);
}
- 轮询服务器
//根据实际情况配置
#define ACCESS_KEY "Basic aW90MTpwYXNzd2Qx" //base64(iot1:passwd1)
#define SSID          "****"
#define PASSWORD   "****"
#define SERVER_IP  ""
#define SERVER_PORT 0

//构造HTTP请求开关数据
void WiFi_MiniSW_Status()
{
    char temp[128];
    memset(TXbuff,0,sizeof(TXbuff));
  memset(temp,0,sizeof(temp));
    sprintf(TXbuff,"GET /minisw/ HTTP/1.1\r\n");
    sprintf(temp,"Authorization:%s\r\n",ACCESS_KEY);
    strcat(TXbuff,temp);
    strcat(TXbuff,"Host:33322.zicp.vip:30000\r\n\r\n");
}

//连接服务器
if (!WiFi_Connect_Server(50)) {
    //连接成功,Http请求数据
    WiFi_RxCounter = 0;
    memset(WiFi_RxBuff,0,WiFi_RxBuff_Size);
    Conn_Status = 1;
    WiFi_MiniSW_Status();
    WiFi_Input(TXbuff);
    TIM_Cmd(TIM3, ENABLE);
} else {
    //失败重置
    TIM_Cmd(TIM3, DISABLE);
    TIM_Cmd(TIM14, DISABLE);
    Conn_Status = 0;
    Reset_Status = 1;
    Poll_Status = 0;
}
- 解析返回数据,控制继电器闭合
//时间戳改变,说明控制命令有更新
if (memcmp(ts, sw_ts, sizeof(ts))) {
    if (sw_ts[0] != '\0') {
        presult = strstr(json,"\"act\": ");
        if(presult!=NULL){
            if(*(presult+7) == '1') {
                //闭合1s,实现关机或开机
                PRESS_BUTTON();
                Delay_Ms(1000);
                RELEASE_BUTTON();
            } else {
                //闭合5s,实现强制关机(重复5次,这样写是防止用5000导致溢出结果不准确)
                PRESS_BUTTON();
                Delay_Ms(1000);
                Delay_Ms(1000);
                Delay_Ms(1000);
                Delay_Ms(1000);
                Delay_Ms(1000);
                RELEASE_BUTTON();
            }
        }
    }
}
服务端
服务端使用Python 3.7开发,个人比较喜欢小巧的webpy框架。
环境准备
- 安装virtualenv:pip install virtualenv
- 创建:virtualenv --no-site-packages minisw_web
- 激活:call minisw_xxx/Scripts/activate.bat (Windows) source minisw_web/bin/activate (Linux)
- 安装webpy:pip install web.py
- 程序运行:python minisw_web.py [监听端口]
交互接口
- 登录接口:HTTP Basic认证,只需验证密码正确与否。
- 查询接口:读取数据,返回当前状态
- 更新接口:写入数据,返回操作结果
代码实现
需求简单无需考虑性能和并发,因此省了很多东西,干脆连数据库都不用了,直接上一个pickle序列化作为存储即可,协议字段如下:
{
    'pc':1,         //机器id(保留)
    'act':1,        //0:强制关机 1:开机/关机
    'ts':15212121   //时间戳
}
下面是完整代码实现:
#!/usr/bin/env python3
# -*- coding: utf-8 -*-

import web
import re
import base64
import json
import pickle
import time

URLS = (
    '/minisw/?', 'minisw'
)

allowed = (
    ('iot1','passwd1'),
    ('iot2','passwd2')
)

web.config.debug = False

DB_FILE = 'minisw.db'

class minisw:
    def update(self, args):
        try:
            f = open(DB_FILE, 'wb')
            print(args)
            act = int(args.act)
            pc = int(args.pc)
            ts = str(int(time.time()))
            if pc == 1:
                kv = {'pc':pc, 'act':act, 'ts':ts}
                pickle.dump(kv, f)
                return 'succ'
        except Exception as e:
            print(e)
        finally:
            if f:
                f.close()
        return 'err'

    def pick(self):
        try:
            f = open(DB_FILE, 'rb')
            kv = pickle.load(f)
            print(kv)
            act = kv['act']
            pc = kv['pc']
            ts = kv['ts']
            rsp = {'pc':pc, 'act':act, 'ts':ts}
            return str(json.dumps(rsp))
        except Exception as e:
            print(e)
        finally:
            if f:
                f.close()
        return 'err'

    def accept(self, args):
        print(args)
        if len(args.keys()) == 0:
            return self.pick()
        return self.update(args)

    def GET(self):
        auth = web.ctx.env.get('HTTP_AUTHORIZATION')
        authreq = False
        if auth is None:
            authreq = True
        else:
            auth = re.sub('^Basic ','',auth)
            username,password = str(base64.b64decode(auth), 'utf-8').split(':')
            if (username,password) in allowed:
                return self.accept(web.input())
            else:
                authreq = True
        if authreq:
            web.header('WWW-Authenticate','Basic realm="Auth example"')
            web.ctx.status = '401 Unauthorized'
            return

    def POST(self):
        return '0'

def main():
    app = web.application(URLS, globals())
    app.run()

if __name__ == '__main__':
    main()
手机端
同样为了简化,没考虑跨平台,直接用Java写了个Android程序,总共两个Activity,一个登录,一个控制台,截图如下:


接下来说下开发过程:
环境搭建
- 从官网下载Android Studio最新版,例如3.5.3 (截止2020年1月)。
- 准备梯子,设置好代理(File--Settings--Http Proxy)。
- 下载安装SDK,推荐安装4.4到10.0,一劳永逸。
代码实现
- 使用OkHttp3访问服务端接口,实现对应的功能,Android 9使用HTTP需要配置network_security_config.xml。
- 代码也比较简单,主要是一些按钮对应功能的实现。
部分代码片段
public class GlobalData {
    //服务端地址
    public static String authUrl = "http://www.aaabbbccc.com:30000/minisw/";

    public static OkHttpClient buildBasicAuthClient(final String name, final String password) {
        return new OkHttpClient.Builder().authenticator(new Authenticator() {
            private int responseCount(Response response) {
                int result = 0;
                while ((response = response.priorResponse()) != null) {
                    result++;
                }
                return result;
            }
            @Override
            public Request authenticate(Route route, Response response) throws IOException {
                if (responseCount(response) >= 1) {
                    System.out.println("认证失败,返回null");
                    return null;
                }
                String credential = Credentials.basic(name, password);
                return response.request().newBuilder().header("Authorization", credential).build();
            }
        }).connectTimeout(2, TimeUnit.SECONDS).readTimeout(2, TimeUnit.SECONDS).build();
    }

    public static class AuthRequest implements Callable<String>{
        private String username;
        private String password;
        private String url;

        public AuthRequest(String user, String passwd, String url) {
            this.username = user;
            this.password = passwd;
            this.url = url;
        }

        public String call() throws Exception {
            OkHttpClient client = GlobalData.buildBasicAuthClient(username, password);
            Request request = new Request.Builder()
                    .url(url)
                    .build();
            Response response = client.newCall(request).execute();
            if (!response.isSuccessful()) throw new IOException("Unexpected code " + response);
            return response.body().string();
        }
    };

    public static String AuthGet(String url, String username, String password) {
        try {
            FutureTask<String> ftask = new FutureTask<String>(new GlobalData.AuthRequest(username, password, url));
            Thread t = new Thread(ftask);
            t.start();
            t.join();
            String res = ftask.get();
            return res;
        } catch (Exception e) {
            return "err";
        }
    }
}
如有侵权请联系:admin#unsafe.sh