
In a recent engagement I had to deal with some custom encrypted strings inside an Android ARM64 2024-1-15 16:0:0 Author: blog.nviso.eu(查看原文) 阅读量:56 收藏
In a recent engagement I had to deal with some custom encrypted strings inside an Android ARM64 app. I had a lot of fun reversing the app and in the process I learned a few cool new techniques which are discussed in this writeup.
This is mostly a beginner guide which explains step-by-step how you can tackle a problem like this. Feel free to try it out yourself, or just jump to the parts that interest you.
In this tutorial-like blogpost, we will:
- Create a small test app that decrypts some strings in-memory
- Use the Ghidra Emulator to figure out the decrypted value. This will require some manual intervention
- Automate the decryption using Python
While I learned these techniques analyzing an Android app, they can of course be used on any ARM64 binary, and the general techniques work for any architecture.
Creating a test app
Let’s start with creating a small test app that decrypts some strings using a basic XOR algorithm. It’s always good to isolate the problem so that you can focus on solving it without other potential issues getting in the way. The code snippet below contains three encrypted strings, and a xorString function that takes a string and a key and performs the XOR operation to obtain the actual string. Additionally, there is a status integer for each string to indicate if the string has already been decrypted. The status integer is atomic, so that if multiple threads are using the same string, they won’t interfere with each other while decrypting the string. Using atomic status flags isn’t actually necessary in this small example, since we only have one thread, but it is what the original app was using, and it is very common to see this kind of approach.
#include <stdio.h>
#include <stdatomic.h>
#include <string.h>
#include <stdlib.h>

void xorString(char *str, char *key, int size, _Atomic int *status) {
    // Check and update status atomically
    int expected = 1;
    if (atomic_compare_exchange_strong(status, &expected, 0)) {
        // Perform XOR operation if the string is encrypted
        for (int i = 0; i < size; i++) {
            str[i] ^= key[i % 4];
        }
    }
}

char string1[] = {0x70,0xea,0xc7,0xd4,0x57,0xaf,0xfc,0xd7,0x4a,0xe3,0xcf,0x00};
_Atomic int status1 = 1; // 1 for encrypted
char string2[] = {0xce,0xc6,0x40,0x93,0xaf,0xf7,0x51,0x9f,0xfd,0xca,0x44,0x88,0xe6,0xdc,0x5a,0x00};
_Atomic int status2 = 1; // 1 for encrypted
char string3[] = {0x45,0xf6,0x8d,0x57,0x32,0xcf,0x80,0x4b,0x7a,0xf0,0x97,0x00};
_Atomic int status3 = 1; // 1 for encrypted

char key1[4] = {0x38, 0x8f, 0xab, 0xb8};
char key2[4] = {0x8f, 0xb3, 0x34, 0xfc};
char key3[4] = {0x12, 0x9f, 0xf9, 0x3f};

int main() {

    xorString(string1, key1, strlen(string1), &status1);
    xorString(string2, key2, strlen(string2), &status2);
    xorString(string3, key3, strlen(string3), &status3);

    printf("String 1: %sn", string1);
    printf("String 2: %sn", string2);
    printf("String 3: %sn", string3);

    return 0;
}
Note: The code above definitely still has race conditions, as one thread could be reading out the string before it is completely decrypted. However, I didn’t want to make the example more complex and this example has all the necessary ingredients to examine some interesting Ghidra functionality.
In order to compile it, let’s use the dockcross project, which allows us to very easily crosscompile via a docker instance:
docker run --rm dockcross/android-arm64 > ./dockcross-android-arm64
chmod +x dockcross-android-arm64
./dockcross-anroid-arm64 bash -c '$CC main.c -o main'
file main
# main: ELF 64-bit LSB pie executable, ARM aarch64, version 1 (SYSV), dynamically linked, interpreter /system/bin/linker64, not stripped
This will result in a non-stripped ARM aarch64 binary. In a real scenario, the binary would most likely be stripped, but for this exercise, that’s not needed. The binary can be pushed to our Android device and it will print the decrypted strings when running it:
adb push main /data/local/tmp/
adb shell /data/local/tmp/main

String 1: Hello World
String 2: Auto Decryption
String 3: With Python
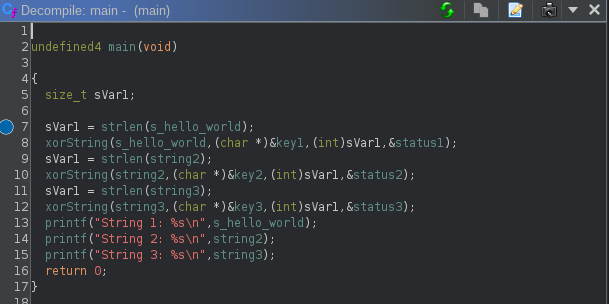
Great! Let’s open this in Ghidra and get started. Create a new project, import the main binary and perform a quick auto analysis. This will give you the main Ghidra listing, and the decompiled main function is decompiled very cleanly:

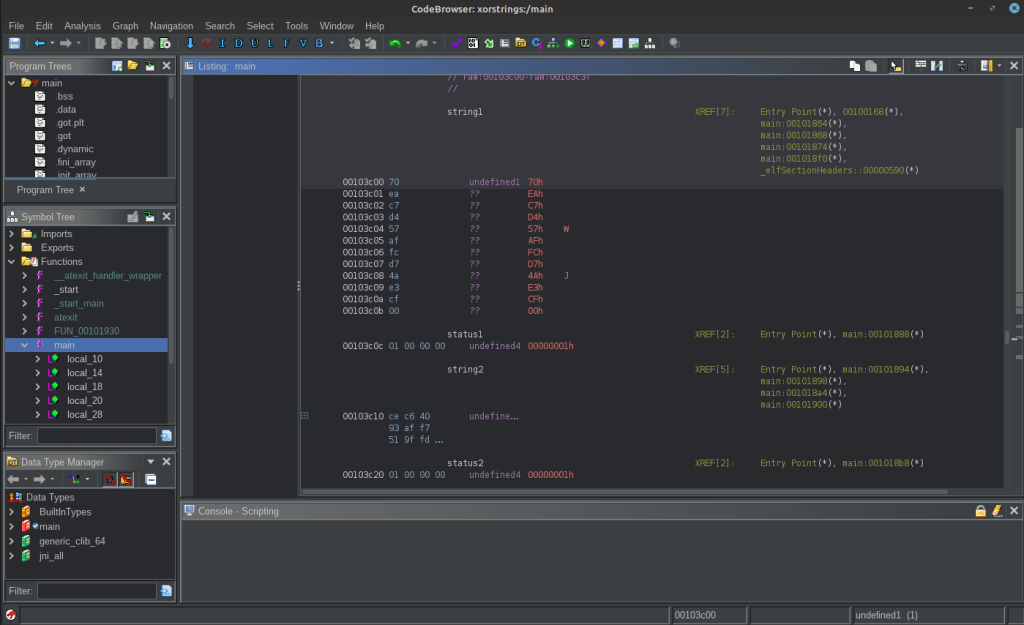
Looking at string1, string2 and string3, Ghidra doesn’t identify any interesting strings, which makes sense due to the fact that they are obfuscated:
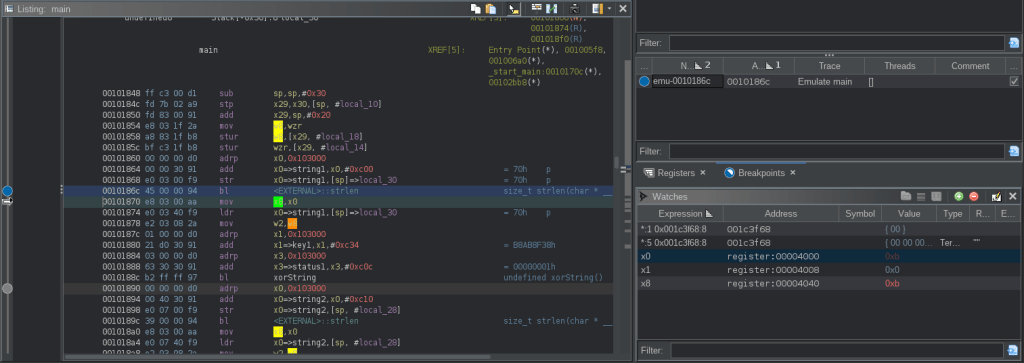
In the main listing, we can see three invocations to the xorString function:
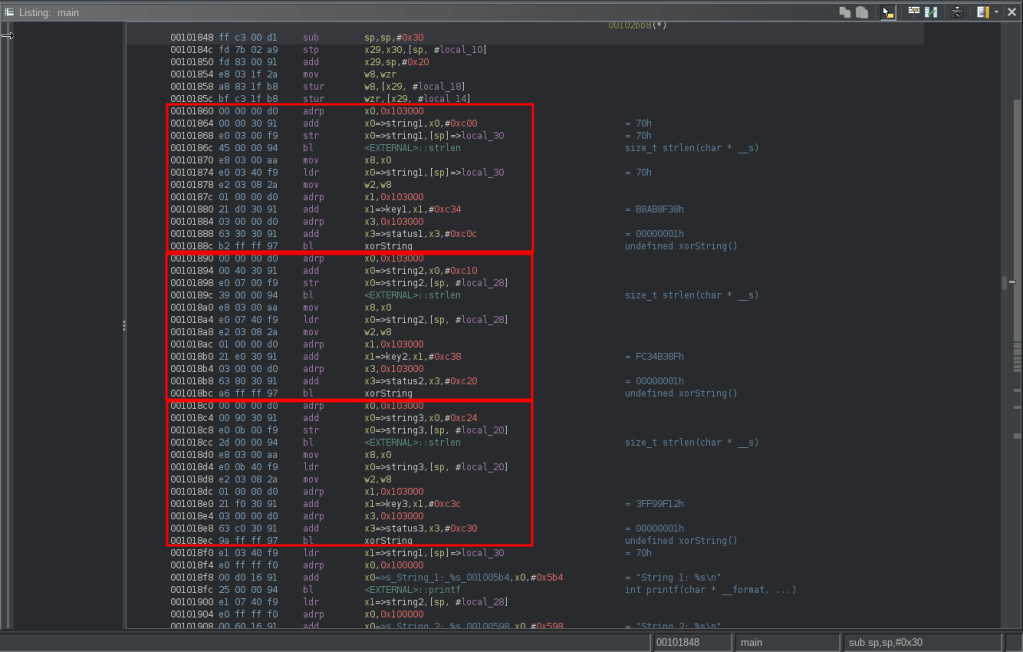
The arguments are kept in x0, x1, x2 and x3. This is of course pretty standard for aarch64, though it’s not uncommon to see other calling conventions due to optimizations or obfuscation.
In this example, the xorString function is quite straightforward, but let’s just imagine it’s a bit more complex and we can’t immediately figure out how it works based on the listing or decompiled code. One way to figure out the decrypted string is to attach a debugger and put a breakpoint right after the function call. However, any Android app that has custom string encryption most likely has some kind of Runtime Application Self-Protection (RASP), which means a debugger (or Frida) will immediately be detected. So rather than trying to get that up and running, let’s use Ghidra’s emulator.
Tracing in Ghidra
Go to the main Ghidra project window and drag the main binary onto the emulator:

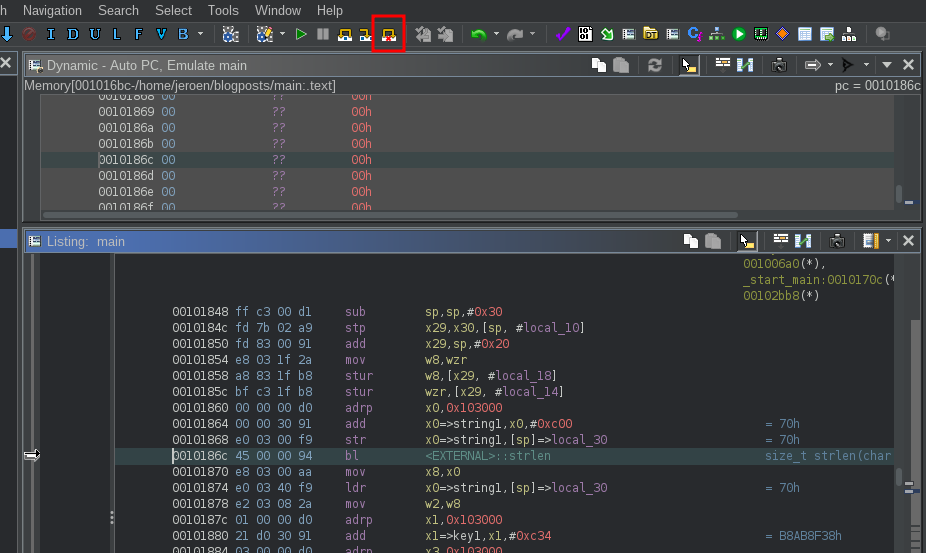
This will open the Ghidra emulator. We want to emulate the xorString function, which means we have to properly initialize all the registers. The first function call starts at 0x101860, so make sure that line is selected, and click the button to start a new trace:

Before letting the trace continue, add a breakpoint to line 0x101890 which is right after the first call to xorString. You can add a breakpoint by selecting the line and pressing k or by right-mouse clicking all the way on the left (where the trace arrow is) and choosing ‘Toggle Breakpoint’. Leave the default options and click OK.

Finally, click the green Resume button at the top or tap F5 to start the actual trace. After starting the trace, not much will actually happen. The emulator will continue executing until the PC (as indicated in the Registers window) is trying to execute 0x104018 which is not a valid instruction address. So what happened? We can restart the trace by selecting line 0x101860 and clicking the Emulator button. Apparently, the emulator goes into the strlen function to determine the length of the obfuscated string. This strlen function is imported from an external library, and so the Emulator doesn’t have access to it.
There are at least two ways to get around this: Manual intervention, or creating custom sleigh code. Let’s take a look at both and we’ll start with manual intervention.
Manually skipping the strlen function
Start a new trace and continue until you’ve reached the call to strlen (0x10186c). Next, click the ‘Skip instruction’ button to jump to the next line without actually executing the instruction:
Of course, since we skipped the strlen function, the correct value is not in x0. We can patch this manually by opening the Registers window and filtering on x. The current value of x0 is 0x103c00 (the location of the string) and we need to replace this with the length. The string1 variable is a null-terminated string (otherwise strlen wouldn’t work) so we can take a look at the memory location (0x103c00) and count the number of characters. We can also label it as a c-style string by right-mouse clicking > Data > TerminatedCString

You can now hover over the ds to see that the length of the string is 12 (0xc), but we have to subtract one for the null byte so the length is 11. Back in our Registers window, we can now change the value of x0 to 11. Before you modify the register, click the button at the top of the registers window to enable editing and then double click the value of the x0 register and update it to 11:

Emulating strlen
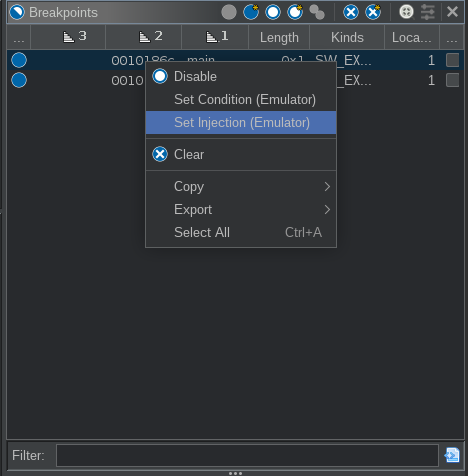
As an alternative, we can create some custom SLEIGH code that is run instead of the strlen function. First, close all the current traces via the Threads window. Next, start a new trace at 0x101860 and then add a breakpoint on the strlen call at 0x10186c. In the breakpoints window, right-mouse click on the breakpoint and choose ‘Set Injection (Emulator)’:
As the injection, we’ll use the following code:
# Initialize counter variable
x8=0;
# Top of our for-loop
<loop>
# If we read a null-byte, we know the length
if (*:1 (x0+x8) == 0) goto <exit>;
# Increase the counter
x8 = x8+1;
# Jump back to the top
goto <loop>;
<exit>
# Assign counter to x0
x0=x8;
# Don't execute the current line in the listing
emu_skip_decoded();
Normally we would have to allocate some space on the stack to store the old value of x8, but since we know that x8 will be overwritten in the line after our strlen call, we know it’s free to use. This code is very similar to the code from the official Ghidra documentation, just adapted for AARCH64. You can also continue reading the official documentation to figure out how to make this SLEIGH injection work for any call to strlen rather than just this single occurrence.
Before stepping through the trace, choose Debugger > Configure Emulator > Invalidate Emulator Cache, just to make sure the Emulator will pick up on our custom SLEIGH code. Finally, we can step through the trace and this time it will skip over the strlen call and store the length of the string in x0:
Continuing with the trace
Continue with single steps until you get to line 0x10178c. When stepping over this stlxr instruction, Ghidra throws an error:
Sleigh userop 'ExclusiveMonitorPass' is not in the library ghidra.pcode.exec.ComposedPcodeUseropLibrary@73117252
ghidra.pcode.exec.PcodeExecutionException: Sleigh userop 'ExclusiveMonitorPass' is not in the library ghidra.pcode.exec.ComposedPcodeUseropLibrary@73117252
    at ghidra.pcode.exec.PcodeExecutor.step(PcodeExecutor.java:275)
    at ghidra.pcode.exec.PcodeExecutor.finish(PcodeExecutor.java:178)
    at ghidra.pcode.exec.PcodeExecutor.execute(PcodeExecutor.java:160)
    at ghidra.pcode.exec.PcodeExecutor.execute(PcodeExecutor.java:135)
    at ghidra.pcode.emu.DefaultPcodeThread.executeInstruction(DefaultPcodeThread.java:586)
    at ghidra.pcode.emu.DefaultPcodeThread.stepInstruction(DefaultPcodeThread.java:417)
    at ghidra.trace.model.time.schedule.Stepper$Enum$1.tick(Stepper.java:25)
    at ghidra.trace.model.time.schedule.TickStep.execute(TickStep.java:74)
    at ghidra.trace.model.time.schedule.Step.execute(Step.java:182)
    at ghidra.trace.model.time.schedule.Sequence.execute(Sequence.java:392)
    at ghidra.trace.model.time.schedule.TraceSchedule.finish(TraceSchedule.java:400)
    at ghidra.app.plugin.core.debug.service.emulation.DebuggerEmulationServicePlugin.doEmulateFromCached(DebuggerEmulationServicePlugin.java:722)
    at ghidra.app.plugin.core.debug.service.emulation.DebuggerEmulationServicePlugin.doEmulate(DebuggerEmulationServicePlugin.java:770)
    at ghidra.app.plugin.core.debug.service.emulation.DebuggerEmulationServicePlugin$EmulateTask.compute(DebuggerEmulationServicePlugin.java:261)
    at ghidra.app.plugin.core.debug.service.emulation.DebuggerEmulationServicePlugin$EmulateTask.compute(DebuggerEmulationServicePlugin.java:251)
    at ghidra.app.plugin.core.debug.service.emulation.DebuggerEmulationServicePlugin$AbstractEmulateTask.run(DebuggerEmulationServicePlugin.java:238)
    at ghidra.util.task.Task.monitoredRun(Task.java:134)
    at ghidra.util.task.TaskRunner.lambda$startTaskThread$0(TaskRunner.java:106)
    at java.base/java.util.concurrent.ThreadPoolExecutor.runWorker(ThreadPoolExecutor.java:1144)
    at java.base/java.util.concurrent.ThreadPoolExecutor$Worker.run(ThreadPoolExecutor.java:642)
    at java.base/java.lang.Thread.run(Thread.java:1589)
Caused by: ghidra.pcode.exec.SleighLinkException: Sleigh userop 'ExclusiveMonitorPass' is not in the library ghidra.pcode.exec.ComposedPcodeUseropLibrary@73117252
    at ghidra.pcode.exec.PcodeExecutor.onMissingUseropDef(PcodeExecutor.java:578)
    at ghidra.pcode.emu.DefaultPcodeThread$PcodeThreadExecutor.onMissingUseropDef(DefaultPcodeThread.java:205)
    at ghidra.pcode.exec.PcodeExecutor.executeCallother(PcodeExecutor.java:562)
    at ghidra.pcode.exec.PcodeExecutor.stepOp(PcodeExecutor.java:249)
    at ghidra.pcode.emu.DefaultPcodeThread$PcodeThreadExecutor.stepOp(DefaultPcodeThread.java:182)
    at ghidra.pcode.exec.PcodeExecutor.step(PcodeExecutor.java:268)
    ... 20 more

---------------------------------------------------
Build Date: 2023-Sep-28 1301 EDT
Ghidra Version: 10.4
Java Home: /usr/lib/jvm/java-19-openjdk-amd64
JVM Version: Private Build 19.0.2
OS: Linux 5.15.0-76-generic amd64
Apparently the call to ExclusiveMonitorPass isn’t implemented for this Emulator so it doesn’t know what to do. The ExclusiveMonitorPass is there because of the atomic status flag which makes sure that different threads don’t interfere with each other while decrypting the string. We could simulate the call again with some custom SLEIGH code, but since our emulation is single-threaded anyway, let’s patch the code to remove the call altogether.
Patching the decryption function
Currently, the decompiled code looks like this:
void xorString(long param_1,long param_2,int param_3,int *param_4)
{
  int iVar1;
  char cVar2;
  bool bVar3;
  int local_30;

  do {
    iVar1 = *param_4;
    if (iVar1 != 1) break;
    cVar2 = 'x01';
    bVar3 = (bool)ExclusiveMonitorPass(param_4,0x10);
    if (bVar3) {
      *param_4 = 0;
      cVar2 = ExclusiveMonitorsStatus();
    }
  } while (cVar2 != '');
  if (iVar1 == 1) {
    for (local_30 = 0; local_30 < param_3; local_30 = local_30 + 1) {
      *(byte *)(param_1 + local_30) =
           *(byte *)(param_1 + local_30) ^ *(byte *)(param_2 + local_30 % 4);
    }
  }
  return;
}
The general flow is described in this ARMv8-A Synchronization primitives document which explains how ExclusiveMonitors work. While the decompiler understands the special exclusive stlxr and ldaxr commands, the emulator does not. In the snippet below, I’ve renamed (L) and retyped (CTRL+L) the variables, and added some constants and comments to make it a bit clearer:
void xorString(char *p_string,char *p_key,int p_length,int *p_status)
{
  int counter;
  bool wasAbleToStore;
  bool monitorIsReady;
  int status;
  int ENCRYPTED = 1;
  int DECRYPTED = 0;

  do {
    status = *p_status;
    // If the string isn't encrypted, no need to do more work
    if (status != ENCRYPTED) break;
    wasAbleToStore = true;

    // Check whether the given address is part of the Exclusive Monitor of the current PE
    monitorIsReady = (bool)ExclusiveMonitorPass(p_status,0x10);
    if (monitorIsReady) {
      // Try to store the value. This will also lift the exclusion in case the write was successful
      *p_status = DECRYPTED;
      // If the store was unsuccessful, wasAbleToStore will become false
      wasAbleToStore = (bool)ExclusiveMonitorsStatus();
    }
  } while (wasAbleToStore != false);

  // Only encrypt if status == ENCRYPTED
  if (status == ENCRYPTED) {
    for (counter = 0; counter < p_length; counter = counter + 1) {
      p_string[counter] = p_string[counter] ^ p_key[counter % 4];
    }
  }
  return;
}
The code will figure out if the string still needs to be decrypted and if so, try to update the status. If this status update succeeds, the thread will continue on to the decryption algorithm and start XORing the different characters. Since we are only using a single thread in the emulator, let’s just patch out the thread-specific logic while making as few modifications as possible.
If we look at the listing, the instruction that triggered the error is stlxr:

The stlxr instruction is the exclusive version of the non-exclusive str instruction which simply stores a value at a certain position. Let’s modify this instruction to str w12, [x11] by right-mouse clicking, choosing ‘Patch Instruction’ and entering the new instruction:

In the next line (0x101790) the w10 register, which is no longer there, is checked and we jump to the top of the block if it’s not equal to zero (cbnz). This means that if we nop-out the cbnz instruction, the flow would just continue as if the store was successful. So right-mouse click > Patch Instruction and choose the nop command:

If we now look at the decompilation view, the code is much more straightforward:
void xorString(char *p_string,char *p_key,int p_length,int *p_status)
{
  int counter;
  bool wasAbleToStore;

  if (*p_status == ENCRYPTED) {
    *p_status = 0;
    for (counter = 0; counter < p_length; counter = counter + 1) {
      p_string[counter] = p_string[counter] ^ p_key[counter % 4];
    }
  }
  return;
}
Let’s trace through the first invocation again. Start a new trace, add the custom SLEIGH injection breakpoint and put a breakpoint at line 0x101890. Once the second breakpoint hits, examine address 0x103c0c in the Dynamic listing window. The string has successfully been decrypted and we can convert it into a normal C string using right-mouse click > Data > TerminatedCString. Note that the normal listing still has the obfuscated string, since it is not automatically updated based on the emulator result.

Now that we know that the string ‘Hello world’ is located at address 0x103c00, we can label it appropriately in the normal listing. Select the symbol name string1 and press L:
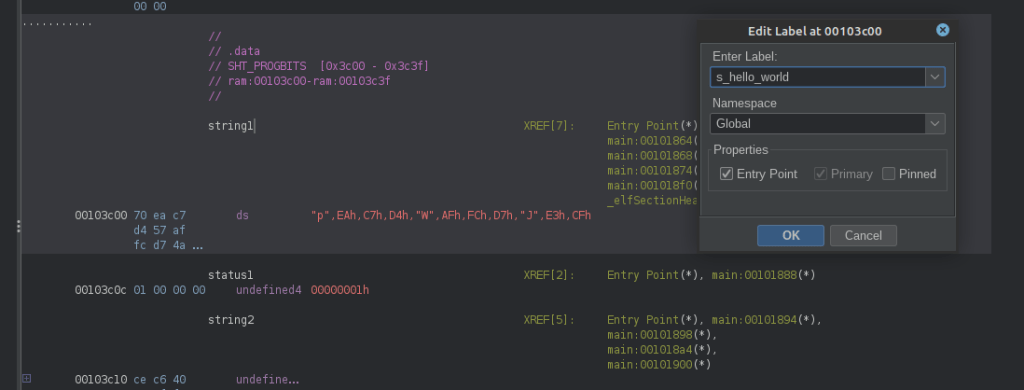
The new label will automatically be used throughout the listing and the decompilation view:
The same technique can be used to decode the other two strings, but let’s just automate everything with some python to speed things up.
Automating with python
Automating Ghidra can be a bit tricky due to a few reasons:
- We can choose between Python2 or Java, but no Python3
- Not too many code examples
- Documentation is limited
To solve the first problem, we could install Ghidraton or Ghidra bridge, but for simplicity, let’s just stick to importing a normal print function and using python2.
As for the actual code, the easiest solution by far (at least currently) is to use ChatGPT to generate it. It does a pretty good job and can quickly give you the necessary API calls for some prototyping.
There are a few different approaches we could take:
- Create a script that we can trigger after selecting a specific call to
xorString. We could even select all the relevant lines in the listing for each call so that the script knows exactly where to get the input from. - Find all references to the
xorStringfunction and try to find the correct input values automatically.
Let’s try the second approach for maximum convenience. This will allow us to run the script once and hopefully identify all obfuscated strings. The requirement is of course that Ghidra has identified all the correct cross-references to the xorString function.
The general structure is as follows:
- Retrieve all references to the chosen decryption function
- Check each reference to make sure it’s a function call
- Go up from the function call until we find correct values for all parameters (
x0,x1,x2,x3) - Extract correct values from memory (e.g. collect the byte array at
x0) - Use a custom python function to decrypt
- Assign the decrypted string as the label of the encrypted byte array in the listing
The most difficult part is definitely step 3 and will be very specific to your application. In the test application, it’s not too difficult. We actually only need x0 (string) and x1 (key) since we can calculate the length of the string ourselves and we don’t really need the status variable. x0 and x1 are defined across a few different statements, but we can actually make use of Ghidra’s calculations.
In the image below, we can see that at line 0x1018d4, Ghidra knows that x0 refers to string3, and at line 0x1018e0, Ghidra knows that x1 refers to key3. So let’s use that knowledge in our script, and search for the first occurrence (working backwards from the call) to where we have a resolved value for x0 and x1.

One useful trick here is to select the line that has the information you want, and right-mouse click > Instruction Info.
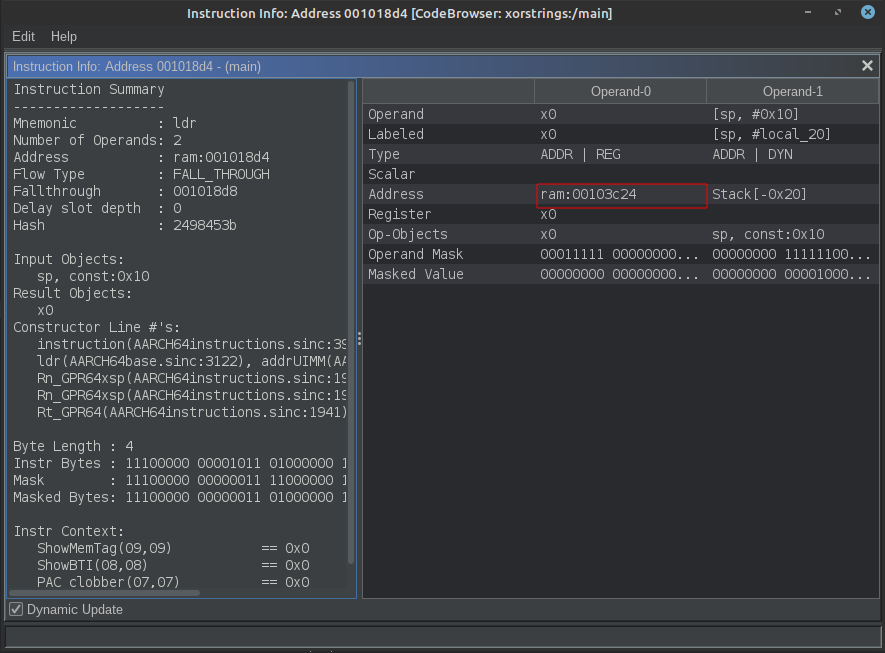
We can see that the value we are looking for (0x103c24: string3) can be accessed via the Address property of Operand-0. So we can scan the code looking for the first occurrence of x0 as Operand-0 and then extract the address.
The full script to resolve all the strings is given below. There might be better/faster ways to do this, but it works. This script can definitely fail for multiple reasons, but as a PoC it works very well. For each decrypted string, the label is updated and the data is converted into a TerminatedCString.
from __future__ import print_function
import os
import jarray
from ghidra.program.model.data import TerminatedStringDataType
from ghidra.program.model.mem import MemoryAccessException
from ghidra.program.model.symbol import SymbolTable, SourceType
from ghidra.program.model.data import CharDataType, ArrayDataType

global toAddr, getReferencesTo, getInstructionAt, currentProgram

def getCurrentProgram():
    return currentProgram

program = getCurrentProgram().getListing()
memory = getCurrentProgram().getMemory()

def main():
    decryptFunction = getState().getCurrentLocation().getAddress()
    functionStart = getStartOfFunction(decryptFunction)
    if decryptFunction != functionStart:
        print("Chosen instruction is inside of a function. Using first instruction of function instead")
        decryptFunction = functionStart

    print("Decrypt function: " + str(decryptFunction))

    # Obtain all references to the chosen function
    xrefs = getReferencesTo(decryptFunction)

    for xref in xrefs:

        # Find the caller, which is an address
        caller = xref.getFromAddress()

        # Get the instruction at that address
        inst = getInstructionAt(caller)

        if inst:

            mnemonic = inst.getMnemonicString()
            # Interested in function calls
            if mnemonic == "bl":
                # Find x1, x2, x3 and x4
                x0 = getValue("x0", inst)
                x1 = getValue("x1", inst)
                x2 = getStringLength(x0)
                x3 = getValue("x3", inst)
                print("Found call at", caller,"Decoding with arguments: ", x0, x1, x2, x3);

                encryptedString = getMemoryBytes(x0, x2)
                status = getMemoryBytes(x3, 1)
                key = getMemoryBytes(x1, 4);
                decryptedValue = str(xorDecrypt(encryptedString, key))

                print("Decryption: ", decryptedValue, "n")
                assignPrimaryLabel(x0, "s_" + toCamelCase(decryptedValue))
                # Include the x00, so x2 + 1
                tagAsCharArray(x0, x2 + 1)

def assignPrimaryLabel(address, label_name):
    try:
        # Get the current program's symbol table
        symbolTable = getCurrentProgram().getSymbolTable()

        symbol = symbolTable.getPrimarySymbol(address)

        if symbol:
            symbol.setName(label_name, SourceType.USER_DEFINED)
        else:
            symbol = symbolTable.createLabel(address, label_name, SourceType.USER_DEFINED)
            symbol.setPrimary()

    except Exception as e:
        print("Error assigning label:", e)

def toCamelCase(input_string):
    words = input_string.split()
    # Capitalize the first letter of each word except the first one
    camelCaseString = words[0].lower() + ''.join(word.capitalize() for word in words[1:])
    return camelCaseString

def getValue(registerName, inst):
    # A safeguard to only go back 20 lines max
    c = 0
    while True:
        inst = inst.getPrevious()

        register = inst.getRegister(0)

        if register and register.getName() == registerName:
            primRef = inst.getPrimaryReference(0)
            if primRef:
                return primRef.getToAddress()
        c += 1
        if c > 20:
            return None

def assignString(addr, name):
    existingData = program.getDataContaining(addr)

    if not existingData or not isinstance(existingData.getDataType(), TerminatedStringDataType):
        program.clearCodeUnits(addr, addr, False)
        program.createData(addr, TerminatedStringDataType())

def tagAsCharArray(address, length):
    dataManager = getCurrentProgram().getListing()
    charDataType = CharDataType()  # Define the char data type
    charArrayDataType = ArrayDataType(charDataType, length, charDataType.getLength())  # Create an array of chars

    try:
        endAddress = address.add(length)
        dataManager.clearCodeUnits(address, endAddress, False)

        # Apply the char array data type at the given address
        dataManager.createData(address, charArrayDataType)
    except Exception as e:
        print("Error creating char array at address:", e)

def getStringLength(address):
    # print("String length of ", address)
    length = 0
    while True:
        # Read a single byte
        byteValue = memory.getByte(address)

        # Check if the byte is the null terminator
        if byteValue == 0:
            break

        # Move to the next byte
        address = address.add(1)
        length += 1
    return length

def getStartOfFunction(address):
    return program.getFunctionContaining(address).getEntryPoint()

def xorDecrypt(encodedString, key):
    result = bytearray()
    key_length = len(key)
    for i in range(len(encodedString)):
        result.append(encodedString[i] ^ key[i % key_length])
    return result

def getMemoryBytes(address, length):
    try:
        # Create a byte array to hold the memory contents
        byte_array = jarray.zeros(length, 'b')

        # Read memory into the byte array
        if memory.getBytes(address, byte_array) != length:
            print("Warning: Could not read the expected number of bytes.")

        return byte_array
    except MemoryAccessException as e:
        print("Memory access error:", e)
        return bytearray()
    except Exception as e:
        print("An error occurred:", e)
        return bytearray()

main();
Note: It’s not possible to use a bytearray as the second argument for memory.getBytes (see this Ghidra issue). Using a python bytearray will result in an empty bytearray.
To run this script, open the Script Manager (Window > Script Manager) and click ‘Create New Script’ in the top right. Choose Python and give it a name (e.g. xorStringDecrypter). Paste the content of the script, make sure you select a line of code somewhere inside the xorString function and finally click Run. You should see the following output:
xorStringDecrypter.py> Running...
Decrypt function: 00101754
Found call at 0010188c Decoding with arguments:  00103c00 00103c34 11 00103c0c
Decryption:  Hello World

Found call at 001018bc Decoding with arguments:  00103c10 00103c38 15 00103c20
Decryption:  Auto Decryption

Found call at 001018ec Decoding with arguments:  00103c24 00103c3c 11 00103c30
Decryption:  With Python

xorStringDecrypter.py> Finished!
The decompiler output is automatically updated, and the data is tagged correctly:


Conclusion
There are many ways to solve the different problems listed in this mini-tutorial, and it’s always good to have multiple techniques in your toolbelt. Automation can help tremendously, but you’ll often have to write custom scripts that work for your specific problem.
Finally, if you know of some interesting additional techniques, or maybe faster ways to do something, leave a comment!

Jeroen Beckers
Jeroen Beckers is a mobile security expert working in the NVISO Software Security Assessment team. He is a SANS instructor and SANS lead author of the SEC575 course. Jeroen is also a co-author of OWASP Mobile Security Testing Guide (MSTG) and the OWASP Mobile Application Security Verification Standard (MASVS). He loves to both program and reverse engineer stuff.
如有侵权请联系:admin#unsafe.sh