2020-08-06 02:02:09 Author: bbs.pediy.com(查看原文) 阅读量:424 收藏
1.本实验在Ubuntu16下进行操作
root@Ubuntu16:/data/armhf_u18# uname -a
Linux Ubuntu16 4.15.0-107-generic #108~16.04.1-Ubuntu SMP Fri Jun 12 02:57:13 UTC 2020 x86_64 x86_64 x86_64 GNU/Linux
root@Ubuntu16:/data/armhf_u18#
2.安装qemu用于模拟arm平台
root@Ubuntu16:/data/armhf_u18# apt-get install qemu # 出问题就google吧。
3.下载ubuntu cloud image
# 下载bionic-server-cloudimg
root@Ubuntu16:/data/armhf_u18# wget http://cloud-images.ubuntu.com/bionic/current/bionic-server-cloudimg-armhf.img
root@Ubuntu16:/data/armhf_u18# ls
bionic-server-cloudimg-armhf.img

# 校验一下MD5,确认下载是正确的,减少不必要的麻烦
root@Ubuntu16:/data/armhf_u18# md5sum bionic-server-cloudimg-armhf.img
bba5e8c7d1dcd363d3639f1e1ab5ba60  bionic-server-cloudimg-armhf.img

# 查看下载的镜像文件的格式
root@Ubuntu16:/data/armhf_u18# qemu-img info bionic-server-cloudimg-armhf.img
image: bionic-server-cloudimg-armhf.img
file format: qcow2
virtual size: 2.2G (2361393152 bytes)
disk size: 557M
cluster_size: 65536
Format specific information:
    compat: 0.10
    refcount bits: 16
root@Ubuntu16:/data/armhf_u18#
下载完成后,别忘了校验一下MD5或SHA256或SHA1。尽量减少不必要的麻烦。
以下三个网址存放这对应镜像的MD5,SHA256,SHA1:
hxxp://cloud-images.ubuntu.com/bionic/current/MD5SUMS
hxxp://cloud-images.ubuntu.com/bionic/current/SHA256SUMS
hxxp://cloud-images.ubuntu.com/bionic/current/SHA1SUMS
注:
为了描述的方便,将工作的环境称为host,将来要在qemu中运行的Ubuntu 18.04也是下载的cloud img,称为guest。
其实,我们的操作总结成一句话就是:使用host中的工具修改guest中的配置文件,以使得guest符合我们的需求。
1.挂载ubuntu cloud image
# 首先将cloud img的格式转换为raw格式
# 这里之所以将img的格式进行转换,主要是为了方便起见。
# 转换之后我们可以直接使用kpartx命令对img进行分区的映射。
# 如果直接使用img原始的qcow2格式,则需要安装额外的工具。
root@Ubuntu16:/data/armhf_u18# qemu-img convert bionic-server-cloudimg-armhf.img bionic-armhf.raw

# check一下是否转换为需要的格式,减少不必要的麻烦
root@Ubuntu16:/data/armhf_u18# qemu-img info bionic-armhf.raw
image: bionic-armhf.raw
file format: raw
virtual size: 2.2G (2361393152 bytes)
disk size: 1.4G
root@Ubuntu16:/data/armhf_u18#

# 创建挂载点
# 这个挂载点就是我们进入cloud img的入口。
root@Ubuntu16:/data/armhf_u18# mkdir -pv /mnt/armhf_u18

# 为转换格式后的cloud img文件映射分区
root@Ubuntu16:/data/armhf_u18# kpartx -av bionic-armhf.raw
add map loop0p1 (253:0): 0 4405215 linear 7:0 206848
add map loop0p15 (253:1): 0 202753 linear 7:0 2048
root@Ubuntu16:/data/armhf_u18#

# 根据kpartx命令的输出,挂载cloud img文件
# 注:一定要注意kpartx的输出。它会告诉我们img被映射的是哪个loop设备
root@Ubuntu16:/data/armhf_u18# mount /dev/mapper/loop0p1 /mnt/armhf_u18/
root@Ubuntu16:/data/armhf_u18# cd /mnt/armhf_u18/
root@Ubuntu16:/mnt/armhf_u18# ls
bin   dev  home  lost+found  mnt  proc	run   snap  sys  usr
boot  etc  lib	 media	     opt  root	sbin  srv   tmp  var
root@Ubuntu16:/mnt/armhf_u18#
至此,我们已经可以进入/mnt/armhf_u18目录,操作cloud img中的配置文件了。
2.准备QEMU需要的文件
在模拟ARM平台的时候,需要为QEMU提供三个额外的文件,一个是kernel文件,一个是initrd文件,一个是设备树文件。这一步不需要复杂操作,只是进入挂载点,将需要的文件拷贝出来即可。
root@Ubuntu16:/mnt/armhf_u18# cp /mnt/armhf_u18/boot/vmlinuz-4.15.0-112-generic-lpae /data/armhf_u18/
root@Ubuntu16:/mnt/armhf_u18# cp /mnt/armhf_u18/boot/initrd.img-4.15.0-112-generic-lpae /data/armhf_u18/
root@Ubuntu16:/mnt/armhf_u18# cp /mnt/armhf_u18/lib/firmware/4.15.0-112-generic-lpae/device-tree/vexpress-v2p-ca15-tc1.dtb /data/armhf_u18/
root@Ubuntu16:/mnt/armhf_u18# ls /data/armhf_u18/
bionic-armhf.raw		  initrd.img-4.15.0-112-generic-lpae  vmlinuz-4.15.0-112-generic-lpae
bionic-server-cloudimg-armhf.img  vexpress-v2p-ca15-tc1.dtb
root@Ubuntu16:/mnt/armhf_u18#
至此,需要的文件都已经准备好了。
小结一下:
Step1:将镜像的格式从qcow2转换为raw;
Step2:使用工具kpartx为raw格式的文件映射分区,并挂载到/mnt/armhf_u18目录下;
Step3:拷贝kernel,initrd,设备树文件到/data/armhf_u18目录下;
查看一下在目录/data/armhf_u18下,需要的文件是否都存在;
root@Ubuntu16:/mnt/armhf_u18# ls /data/armhf_u18/
bionic-armhf.raw		  initrd.img-4.15.0-112-generic-lpae  vmlinuz-4.15.0-112-generic-lpae
bionic-server-cloudimg-armhf.img  vexpress-v2p-ca15-tc1.dtb
root@Ubuntu16:/mnt/armhf_u18#
3.创建用户
经过上面的操作,已经可以操作guest中的文件了。下面在guest中创建orcsir用户。
这里介绍两种创建用户的方式,一种是使用host中的工具,另一种是直接修改系统的配置文件。
Method 1:使用工具qemu-arm-static,chroot,adduser创建用户
# 首先查找qemu-arm-static在host中存放的位置
root@Ubuntu16:/mnt/armhf_u18# whereis qemu-arm-static
qemu-arm-static: /usr/bin/qemu-arm-static /usr/share/man/man1/qemu-arm-static.1.gz

# 将qem-arm-static工具拷贝到/mnt/armhf_u18/usr/bin/ 目录下
root@Ubuntu16:/mnt/armhf_u18# cp /usr/bin/qemu-arm-static /mnt/armhf_u18/usr/bin/

# 确保qemu-arm-static具备执行权限
root@Ubuntu16:/mnt/armhf_u18# ls -l /mnt/armhf_u18/usr/bin/qemu-arm-static
-rwxr-xr-x 1 root root 3011840 8月   3 13:36 /mnt/armhf_u18/usr/bin/qemu-arm-static
root@Ubuntu16:/mnt/armhf_u18#

# 使用chroot命令,将rootfs切换为/mnt/armhf_u18
# chroot:切换rootfs
# /mnt/armhf_u18: rootfs存放的位置
# qemu-arm-static /bin/bash:切换到新的rootfs后,要运行的程序为qemu-arm-static,它的参数为/bin/bash
root@Ubuntu16:/mnt/armhf_u18# chroot /mnt/armhf_u18  qemu-arm-static /bin/bash
# 此时,我们已经处于guest提供的rootfs环境下了
root@Ubuntu16:/# /bin/ls
bin   dev  home  lost+found  mnt  proc	run   snap  sys  usr
boot  etc  lib	 media	     opt  root	sbin  srv   tmp  var
# 从file的输出可以看出,我们使用的ls工具是ARM平台。
# 我们的host环境是x86_64。
# 之所以能在x86平台运行arm文件,就是在qemu-arm-static的帮助下完成的。
root@Ubuntu16:/# file /bin/ls
/bin/ls: ELF 32-bit LSB shared object, ARM, EABI5 version 1 (SYSV), dynamically linked, interpreter /lib/ld-linux-armhf.so.3, for GNU/Linux 3.2.0, BuildID[sha1]=e7851e06fb117fe1dfb713fa72ff374529598798, stripped
root@Ubuntu16:/#

# 添加orcsi用户并设置密码
root@Ubuntu16:/# adduser orcsir
perl: warning: Setting locale failed.
perl: warning: Please check that your locale settings:
	LANGUAGE = (unset),
	LC_ALL = (unset),
	LC_TIME = "zh_CN.UTF-8",
	LC_IDENTIFICATION = "zh_CN.UTF-8",
	LC_TELEPHONE = "zh_CN.UTF-8",
	LC_NUMERIC = "zh_CN.UTF-8",
	LC_ADDRESS = "zh_CN.UTF-8",
	LC_NAME = "zh_CN.UTF-8",
	LC_MONETARY = "zh_CN.UTF-8",
	LC_PAPER = "zh_CN.UTF-8",
	LC_MEASUREMENT = "zh_CN.UTF-8",
	LANG = "en_US.UTF-8"
    are supported and installed on your system.
perl: warning: Falling back to a fallback locale ("en_US.UTF-8").
Adding user `orcsir' ...
Adding new group `orcsir' (1000) ...
Adding new user `orcsir' (1000) with group `orcsir' ...
Creating home directory `/home/orcsir' ...
Copying files from `/etc/skel' ...
Enter new UNIX password:
Retype new UNIX password:
passwd: password updated successfully
Changing the user information for orcsir
Enter the new value, or press ENTER for the default
	Full Name []:
	Room Number []:
	Work Phone []:
	Home Phone []:
	Other []:
Is the information correct? [Y/n] Y
root@Ubuntu16:/# id orcsir
uid=1000(orcsir) gid=1000(orcsir) groups=1000(orcsir)
root@Ubuntu16:/# exit
exit
root@Ubuntu16:/mnt/armhf_u18#
上面这种方法简单便捷,推荐使用。
下面使用一个比较折腾的方法。
Method 2:修改系统文件
这种方式需要对系统添加用户的的工作原理有一定的了解。不难,就是有一些繁琐。
注意:以下修改的文件的父目录都是/mnt/armhf_u18,千万要注意,千万要注意,千万要注意。不要把host的文件修改了。
step1:首先修改/mnt/armhf_u18/etc/passwd文件,添加用户orcsir(按照自己的喜好起名字)
# 注意此时我们操作的是/mnt/armhf_u18下面的文件
root@Ubuntu16:/mnt/armhf_u18# vim ./etc/passwd
orcsir:x:1000:1000:orcsir,,,:/home/orcsir:/bin/bash
step2:修改/mnt/armhf_u18/etc/group文件
# 编辑group文件,添加如下行;
root@Ubuntu16:/mnt/armhf_u18# vim ./etc/group
liuyang:x:1000:
step3:修改/mnt/armhf_u18/etc/shadown文件
# 编辑shadow文件,添加如下行;
# 下面行中的内容是从host环境中的/etc/shadow文件中拷贝出来的。
# 第2个字段中是加密后的密码。密码为ge,这里直接拷贝host环境中的内容主要是为了方便。
# 可以在guest启动后使用passwd进行修改。
root@Ubuntu16:/mnt/armhf_u18# vim ./etc/shadow
orcsir:$6$LHW4Plbb$BFVWX3ZL68Dn7nQgWM6lDcw3xXwRQqEMOCO8yv76ODOkn419uLHVdJ/rU0yAI2yUc7ChyqubpKeFMCmqfXRuK0:18402:0:99999:7:::
step4:创建orcsir用户的家目录
root@Ubuntu16:/mnt/armhf_u18# cp -rf ./etc/skel ./home/orcsir
root@Ubuntu16:/mnt/armhf_u18# ls -l home
total 4
drwxr-xr-x 3 root root 4096 8月   3 10:24 orcsir
# orcsir家目录下文件的属主/属组都是root,这是不正确的。需要将其修改为orcsir用户
root@Ubuntu16:/mnt/armhf_u18# ls -alht ./home/orcsir
total 20K
drwxr-xr-x 2 root root 4.0K 8月   3 10:32 .
drwxr-xr-x 3 root root 4.0K 8月   3 10:32 ..
-rw-r--r-- 1 root root  220 8月   3 10:32 .bash_logout
-rw-r--r-- 1 root root 3.7K 8月   3 10:32 .bashrc
-rw-r--r-- 1 root root  807 8月   3 10:32 .profile
root@Ubuntu16:/mnt/armhf_u18#
step5:修改orcsir家目录文件的属主/属组
# 使用这种方式修改会出现invalid user的错误,因为host环境中不存在orcsir用户。
root@Ubuntu16:/mnt/armhf_u18# chown -R orcsir:orcsir ./home/orcsir
chown: invalid user: ‘orcsir:orcsir’

# 使用如下方法进行修改。
# 1000:1000,这里的1000就是在Step1中修改etc/passwd时指定的orcsir用户的UID/GID
# -R 选项是告诉chown进行递归修改。
root@Ubuntu16:/mnt/armhf_u18# chown -R 1000:1000 ./home/orcsir
root@Ubuntu16:/mnt/armhf_u18#
上面这种方法比较折腾。不推荐使用。
4.将用户orcsir加入sudoers
# 为文件sudoers增加写入权限
root@Ubuntu16:/mnt/armhf_u18# chmod +w ./etc/sudoers

# 编辑suders文件,在root	ALL=(ALL:ALL) ALL行下面添加如下行
root@Ubuntu16:/mnt/armhf_u18# vim etc/sudoers
orcsir	ALL=(ALL:ALL) ALL

# 这一步很重要,如果不将w权限去除,在使用sudo时会提示说你不是sudo用户。(ubuntu是这样的,其它发行版本不清楚)
root@Ubuntu16:/mnt/armhf_u18# chmod -w ./etc/sudoers
root@Ubuntu16:/mnt/armhf_u18#
5.删除cloud-init相关文件
# cloud这个服务,我们不需要,而且会影响启动速度。
# 因此将其删除。这一步不是必须的。
# 不过如果不删除这些,将忍受漫长的启动时间。
# 也可以启动系统后,使用systemd将cloud服务关掉,这里就不演示了。
# 选择简单粗暴的直接删除文件
root@Ubuntu16:/mnt/armhf_u18# rm -rf ./etc/init/cloud*
root@Ubuntu16:/mnt/armhf_u18# rm -rf ./etc/systemd/system/cloud*
root@Ubuntu16:/mnt/armhf_u18# rm -rf ./lib/systemd/system/cloud*
6.禁用idt_89hpesx内核模块
# 编辑blacklist.conf文件,在文件末尾添加如下内容
root@Ubuntu16:/mnt/armhf_u18# vim ./etc/modprobe.d/blacklist.conf
blacklist idt_89hpesx
这里需要将内核模块idt_89hpesx禁用,不然systemd-udevd会把CPU占满,导致系统的负载超高,根本无法进行操作。
7.设置网络
因为Ubuntu 18.04 使用netplan进行网络设置,取代了之前的ifupdown。因此需要做一些额外的设置
# 在目录./etc/netplan/下,创建文件60-net-init.ymal,添加如下内容
root@Ubuntu16:/mnt/armhf_u18# vim etc/netplan/60-net-init.ymal
network:
        ethernets:
                eth0:
                        dhcp4:yes
至此,所有的对于guest的修改已经全部完成
小结一下:
Step1:添加用户,用于登陆系统;
Step2:删除cloud-init相关文件,加快系统系统速度;
Step3:禁用内核模块,不然系统负载超高,根本无法操作;
Step4:设置netplan;
8.打扫战场
# 卸载镜像文件
root@Ubuntu16:/data/armhf_u18# umount /mnt/armhf_u18
# 删除为镜像文件映射的分区
root@Ubuntu16:/data/armhf_u18# kpartx -d /data/armhf_u18/bionic-armhf.raw
loop deleted : /dev/loop0
# 最后check一下,我们需要的文件是否都已经准备就绪。减少不必要的麻烦。
root@Ubuntu16:/data/armhf_u18# ls
bionic-armhf.raw		  initrd.img-4.15.0-112-generic-lpae  vmlinuz-4.15.0-112-generic-lpae
bionic-server-cloudimg-armhf.img  vexpress-v2p-ca15-tc1.dtb
root@Ubuntu16:/data/armhf_u18#
1.将raw格式的img转换会qcow2格式。
这里将格式重新转化为qcow2,主要是为了保存虚拟机快照。
root@Ubuntu16:/data/armhf_u18# qemu-img convert -f raw -O qcow2 /data/armhf_u18/bionic-armhf.raw /data/armhf_u18/bionic-armhf.qcow2
root@Ubuntu16:/data/armhf_u18# qemu-img info /data/armhf_u18/bionic-armhf.qcow2
image: /data/armhf_u18/bionic-armhf.qcow2
file format: qcow2
virtual size: 2.2G (2361393152 bytes)
disk size: 1.4G
cluster_size: 65536
Format specific information:
    compat: 1.1
    lazy refcounts: false
    refcount bits: 16
    corrupt: false
root@Ubuntu16:/data/armhf_u18#
如果使用raw格式,在savevm时会出现如下错误。
QEMU 2.5.0 monitor - type 'help' for more information
(qemu) pulseaudio: set_sink_input_volume() failed
pulseaudio: Reason: Invalid argument
pulseaudio: set_sink_input_mute() failed
pulseaudio: Reason: Invalid argument

(qemu) savevm init
Device 'sd0' is writable but does not support snapshots.
(qemu)
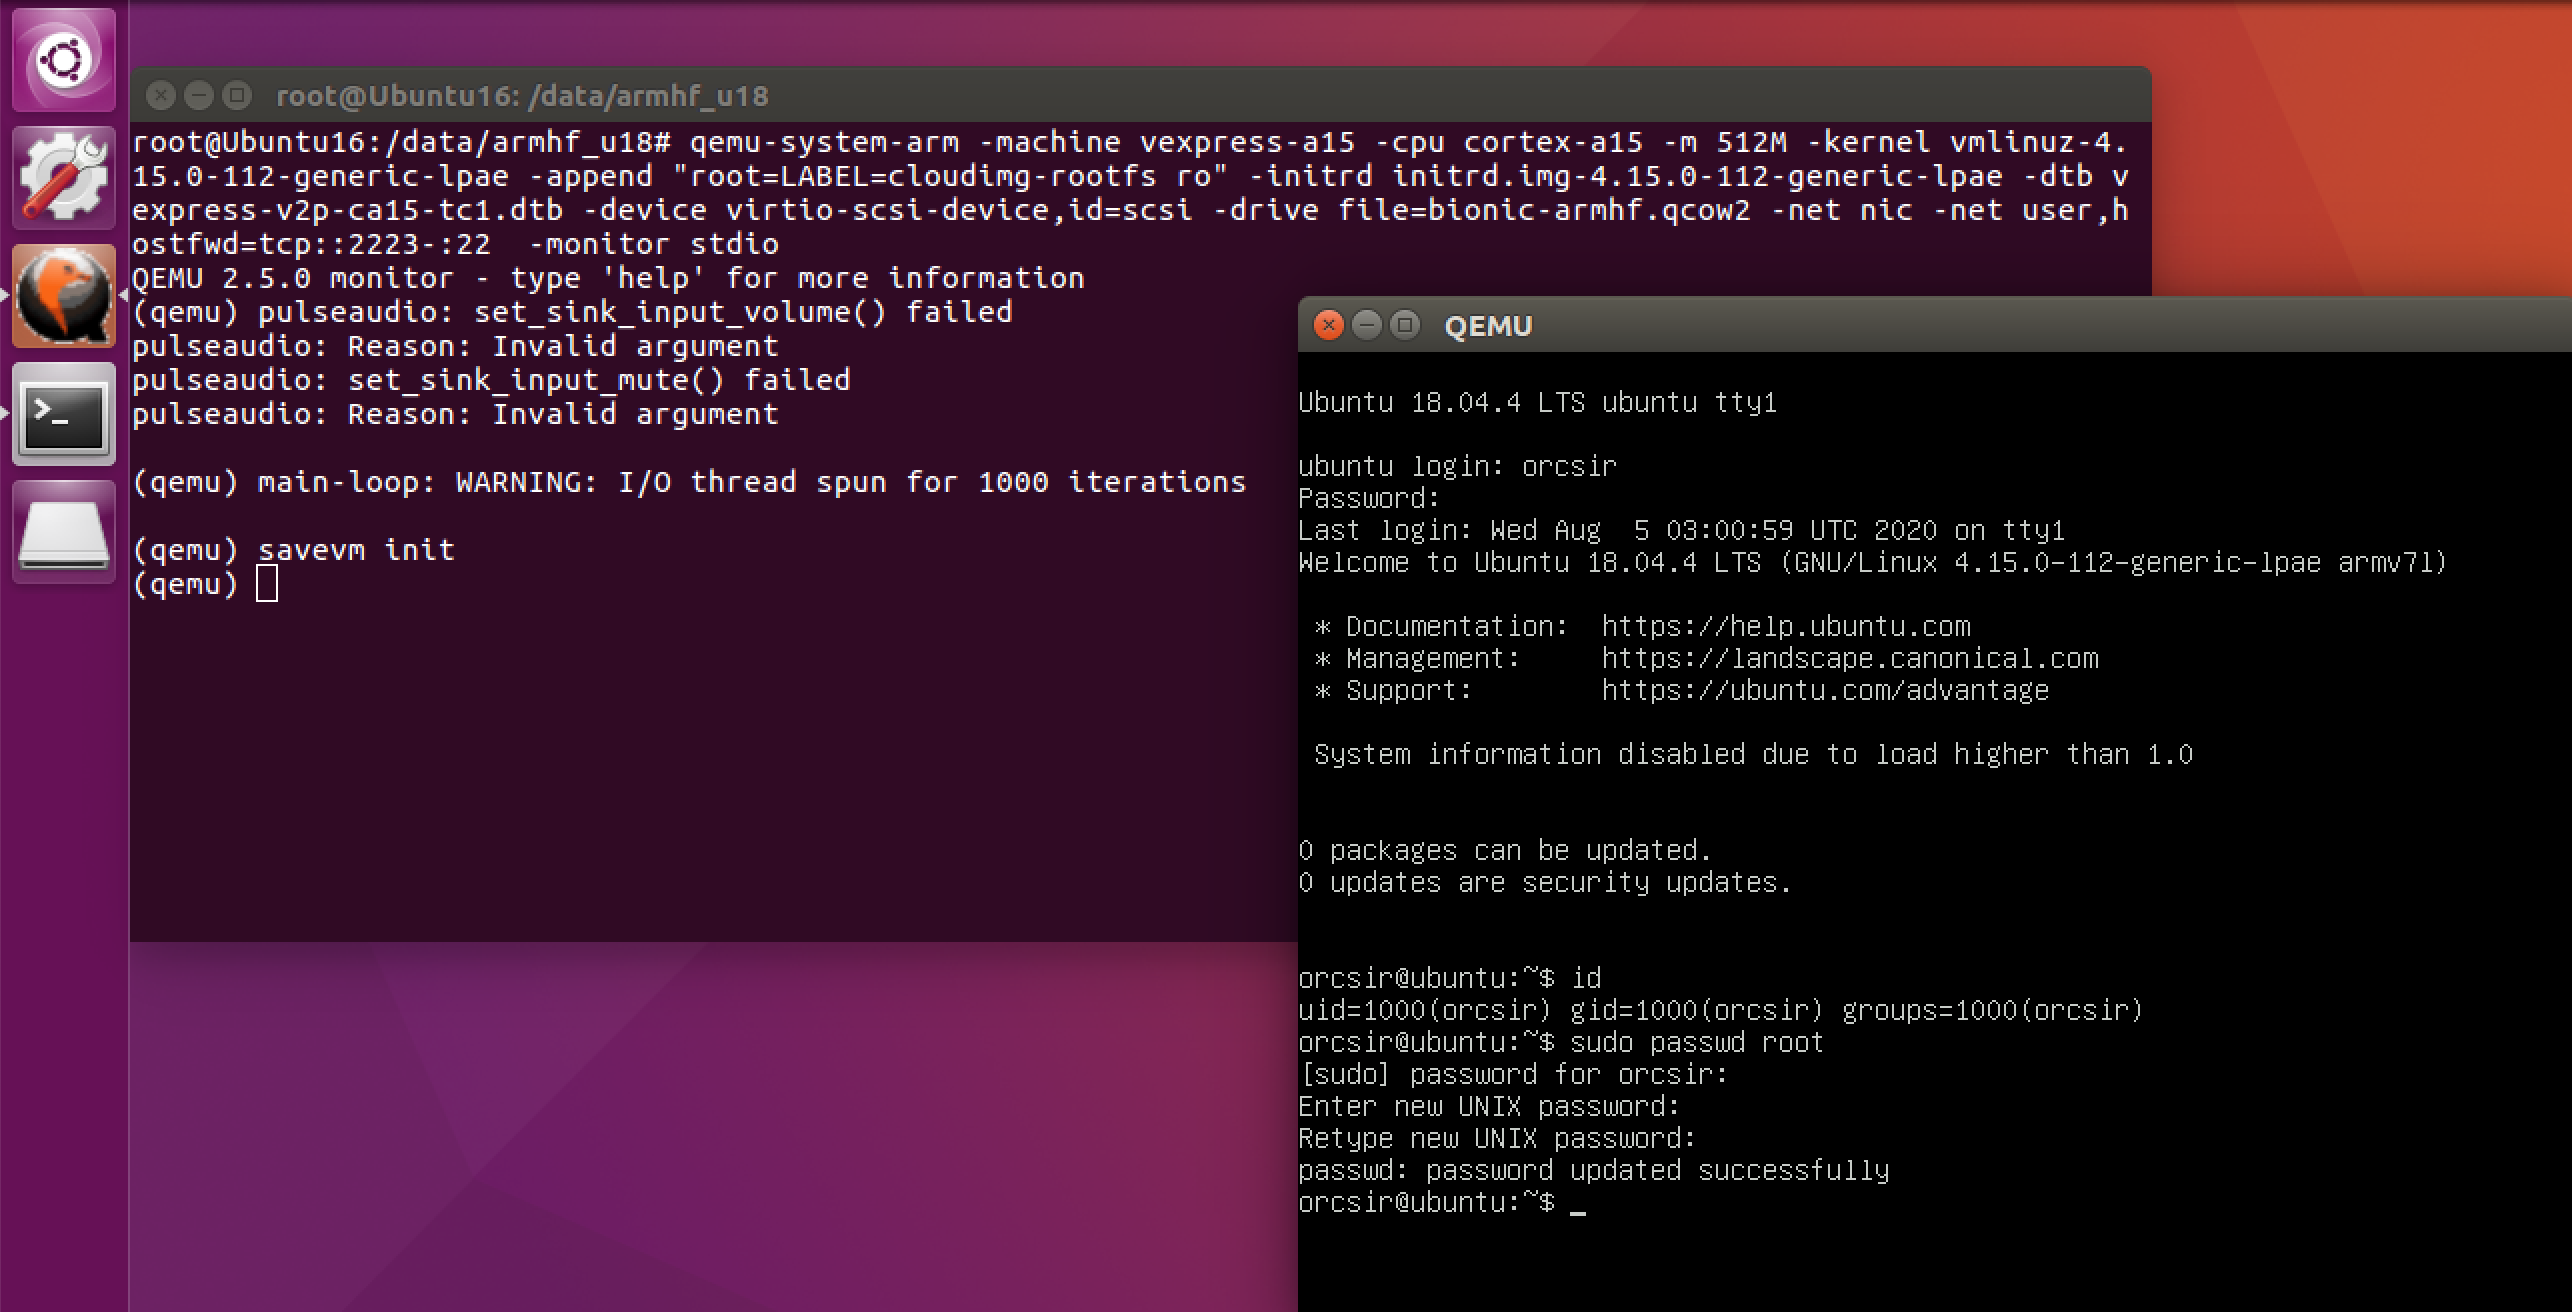
2.启动guest
# 命令运行后没有(qemu)提示符。只需按回车键即可。
root@Ubuntu16:/data/armhf_u18# qemu-system-arm -machine vexpress-a15 -cpu cortex-a15 -m 512M -kernel vmlinuz-4.15.0-112-generic-lpae -append "root=LABEL=cloudimg-rootfs ro" -initrd initrd.img-4.15.0-112-generic-lpae -dtb vexpress-v2p-ca15-tc1.dtb -device virtio-scsi-device,id=scsi -drive file=bionic-armhf.qcow2 -net nic -net user,hostfwd=tcp::2223-:22  -monitor stdio
QEMU 2.5.0 monitor - type 'help' for more information
(qemu) pulseaudio: set_sink_input_volume() failed
pulseaudio: Reason: Invalid argument
pulseaudio: set_sink_input_mute() failed
pulseaudio: Reason: Invalid argument
# 在做完一些自己需要的设置后,待系统满足自己的需求后,可以做个快照。
# 以后直接loadvm init即可
(qemu) savevm init
# 下面解释一下部分参数
-machine vexpress-a15 -cpu cortex-a15 -m 512M #设置模拟的arm平台

-kernel -initrd -dtb #用于向qemu传递我们准备好的三个文件。

-device virtio-scsi-device,id=scsi -drive file=bionic-armhf.qcow2 #设置rootfs

-monitor stdio # Using `-monitor stdio` will send the monitor to the standard output, this is most useful when using qemu on the command line.
结束,收工。

HWS计划·2020安全精英夏令营来了!我们在华为松山湖欧洲小镇等你
最后于 8小时前 被orcsir编辑 ,原因:
如有侵权请联系:admin#unsafe.sh