
Introduction
In this post, I will introduce fpicker. Fpicker is a Frida-based coverage-guided, mostly in-process, blackbox fuzzing suite. Its most significant feature is the AFL++ proxy mode which enables blackbox in-process fuzzing with AFL++ on platforms supported by Frida. In practice, this means that fpicker enables fuzzing binary-only targets with AFL++ on potentially any system that is supported by Frida. For example, it allows fuzzing a user-space application on the iOS operating system, such as the Bluetooth daemon bluetoothd – which was part of the original motivation to implement fpicker.
Apart from the AFL++ proxy mode, fpicker implements various other modes and configurations that resulted from the different experiments I did in the past year. However, they are mostly experimental and not as mature as the AFL++ proxy mode.
When I first started experimenting with AFL++ and Frida about a year ago, there was an experimental branch in the AFL++ repository that, I assume, aimed to implement something similar to fpicker. However, the branch has since been removed and the implementation have presumably been abandoned.
There have been previous efforts to combine Frida and AFL++. Firstly, there is hotwax. With hotwax, binary-only libraries can be dynamically instrumented and fuzzed. Hotwax directly uses Frida’s GUM API. It requires a small harness program to load and call the target library. However, the fact that it only works for fuzzing libraries makes it unsuitable for fpicker’s initial target. Nonetheless, if your goal is to fuzz a binary-only library, hotwax is probably the better performing tool over fpicker.
Background
Before getting into the details of fpicker’s inner workings, I will first provide a few details about Frida and AFL++. In addition to that, I will briefly get into ToothPicker, a tool I developed during my master thesis, which can be considered as fpicker’s predecessor. Readers that are already familiar with Frida and AFL++ can skip the background section and go straight to the fpicker section.
To establish a common ground, I want to briefly explain a few terms that will be used throughout this blog post. These are not necessarily textbook definitions but rather a short rundown.
Coverage-Guided Fuzzing
In coverage-guided fuzzing, the fuzzing process is guided by the coverage that individual inputs achieve. A general approach uses a standard set of inputs – often referred to as corpus – and on each iteration, take one of the files in this corpus and randomly mutate it. If the execution of this mutated corpus entry results in new coverage, it is added to the corpus. Coverage can have different meanings. A basic form of coverage could be the list of basic blocks executed when supplying the input in question.
Basic Block
Basic blocks in the context of compiled machine code refer to a consecutive set of instructions without branches. The instructions in a basic block are always executed in consecutive order.
In-Process Fuzzing
In-process fuzzing can be explained best with an example. Assume that a given application accepts encoded data (e.g., Base64) over HTTP. When fuzzing the application with regular use, i.e., over the network, a lot of time and energy is lost in transmission. The payload has to go through encoding and multiple network layers. Twice. On the sender and receiver side. Let’s assume we are only interested in the code that parses and handles this data once it was received and decoded. With in-process fuzzing, we would skip the encoding/decoding and network parts and directly call the targeted function from within the application itself. This usually requires an instrumentation or emulation platform and some sort of preparation within the target. This will be elaborated on in more detail later on.
Frida
Frida is a “[d]ynamic instrumentation toolkit for developers, reverse-engineers, and security researchers” [frida.re]. Frida makes it extremely easy to inject code into an application to intercept or modify its code flow. In the past, it has gained many great features, such as Stalker, which is a central component for coverage-guided fuzzing. I’ll get into more details about Stalker in the following sections. Additionally, Frida makes in-process fuzzing very easy. A targeted function, such as a protocol reception handler or a parsing function can easily be called in the process using Frida. An example of a Frida agent script that does that is shown below:
// resolve symbol and obtain function handle to call from JavaScript
const addr = Module.getExportByName(null, "target_function");
const target_fn = new NativeFunction(addr, "void", ["int", "pointer"]);

// prepare arguments
const data = Memory.alloc(16);
Memory.writeUtf8String(data, "Test string12345");

// call the function
target_fn(16, data);
To implement a fuzzer, the above script could be executed in a loop, and different random data could be written to the data memory location in each iteration.
Frida can be used in different modes. Usually, when testing mobile apps a frida-server is running on the mobile device and a corresponding client can be used to start an interactive JavaScript CLI. In this CLI, Frida’s JavaScript API can be used to manipulate the target. Alternatively, the frida-core library can be used to build a standalone tool that injects Frida’s agent and a JavaScript file into the target. This tool can then take over the communication with the injected script. Fpicker uses the frida-core library as a central component.
Of course, there’s much more to Frida than what was just mentioned in these two paragraphs. I recommend checking it out for anyone that has never used Frida before. It has become one of the main tools I’m working with, far beyond the fuzzing use cases.
ToothPicker
ToothPicker is a Frida-based in-process fuzzer I built during my master thesis. It is built on top of the fuzzer frizzer, which already brought input mutation and coverage collection. To do that, it uses Frida’s Stalker API. Stalker can be configured to operate in different configurations. One of them is to return a summary of which basic blocks were covered when stalking an execution thread. This makes it pretty easy to obtain basic block coverage. Most of ToothPicker’s actual implementation efforts were put into preparations and manipulations that made it possible to do in-process fuzzing on iOS’s Bluetooth daemon, such as virtual Bluetooth connections, not the fuzzer itself. When the thesis was finished, I took some time to look into potential improvements in the fuzzing approach.
A general approach, and the one ToothPicker implements, to use Frida’s Stalker to gather execution coverage in terms of basic blocks executed can look as follows:
- Intercept a specific function where coverage collection should start
- Start stalking once the function is reached
- Stop stalking when the function is exited
- Receive collected coverage from Stalker
A corresponding Frida script can look like the following:
// configure Stalker to follow each BB
const stalker_event_config = {
    call: false,
    ret: false,
    exec: false,
    block: false,
    compile: true,
};

// the function where coverage collection should start
const target_function = ... ;

let stalker_events = undefined;
let gc_counter = 0;
Interceptor.attach(target_function, {
    onEnter: function(args) {
        Stalker.follow({
            events: stalker_event_config,
            onReceive: function (events) {
                stalker_events = Stalker.parse(events, {
                    stringify: false,
                    annotate: false}
                );
            }
        })
    },
    onLeave: function() {
        Stalker.unfollow();
        Stalker.flush();
        if (gc_counter > 300) {
            Stalker.garbageCollect();
            gc_counter = 0;
        }
        gc_counter++;

        // at this point, stalker_events should contain the executed basic
        // blocks in the following form:
        // [["START_ADDR", "END_ADDR"], ["START_ADDR2", "END_ADDR2"], ...]

        // the collected coverage can be returned to the fuzzer
        send(stalker_events);
    }
});
The collected coverage would then be sent back to the fuzzer to parse and store the coverage and its corresponding payload.
AFL++
AFL++ is an actively-developed fork of the well-known fuzzer AFL, which incorporates many of the scattered improvements that were developed on top of AFL in the past years. There are many resources on AFL and AFL++ online, so I will not get into any details here. However, this post will cover some of the implementation details useful as background knowledge for fpicker.
Coverage Bitmap
AFL++ collects and stores coverage in a shared memory location. On each basic block that is executed, the following code is executed (taken from AFL++’s documentation):
cur_location = <COMPILE_TIME_RANDOM>;
shared_mem[cur_location ^ prev_location]++;
prev_location = cur_location >> 1;
With this bitmap, AFL++ can determine whether a specific input causes new execution paths to be visited. Due to the mingling of the current and previous location, this approach results in edge coverage, a coverage metric with a higher resolution than basic block coverage. The fuzzing target needs to open this shared memory location to collect and write the coverage data.
Input
There are two different ways (there could be more, but these are the relevant ones for this post) to transfer the generated input data from AFL++ to the target application. Either through a file or standard input. This means that AFL++ will generate, through one of its various input mutation methods, an input payload. It will then either write it to a file that the target can open and read from or write it to the standard input of the target application.
AFL++ Forkserver and Proxy
The last part that is missing is the communication between AFL++ and its target, i.e., how does the generated input get from AFL++ to any arbitrary target application, and how does AFL++ know when the application has finished processing the input? For applications where source code is available, this communication can be compiled into the target application. For binary-only targets, other solutions have to be found. In general, dynamic instrumentation (with Frida, for example) can be used to do that, which is what we are going to look at in the next section.
FPicker
Now that common ground and the motivation have been established, the focus is on some of the technical details of fpicker. First, I will go over the concept of the AFL++ proxy implementation, then some of the implementation details will be provided. Lastly, an overview of the various configuration options of fpicker is given.
Frida-Based AFL++ Proxy
As shown below, the fpicker proxy acts as a middlebox between AFL++ and the target. It is fully transparent, as in, AFL++ assumes fpicker is its actual target, while fpicker itself handles attaching to, communicating with, and setting up the real target.

As mentioned in the previous section, AFL++ implements a protocol that handles the scheduling of input transmission. For this, AFL++ creates and manages two file descriptors that the target – or the proxy – uses to read from and write to. While the protocol is relatively simple, I didn’t find proper documentation. Luckily, the AFL++ repository already contains a sample project that contains a boilerplate for an AFL++ proxy. With that, it is relatively easy to implement such a proxy. Thus, it is used in fpicker as a baseline for its proxy implementation. To provide an overview of what is happening when fpicker is run in AFL++ proxy mode, we will take the following command line and go over what is happening.
afl-fuzz -i ./in -o ./out -- ./fpicker -m afl -u send -e attach \
                                    -p target -f harness.js
- AFL++ (
afl-fuzz) spawns fpicker. - fpicker attaches to a process called
target. - fpicker injects the Frida agent and the harness script (
harness.js) into the target. - The harness agent script opens AFL++’s coverage shared memory and prepares Frida’s Stalker for coverage collection (+ any other user-defined preparation functions).
- Once the preparation is done, the harness signals fpicker that it’s done, followed by fpicker telling AFL++ to start.
- AFL++ writes its mutated payloads to stdout.
- fpicker reads these payloads and sends them to the injected harness script.
- The harness calls the user-defined fuzz function with the fuzzing input.
- During the execution and processing of the input, the target will, due to the injected code, automatically gather coverage and write it to AFL++’s coverage bitmap.
Implementation Details
In the previous list, the focus was on the proxy implementation. However, there are many more things that, depending on the configuration, are happening. In the following, the injected coverage instrumentation and the communication between fpicker and the harness are explained in more detail.
Coverage Instrumentation
Frida’s Stalker allows to instrument its target’s code in different ways. Simply put, this means that one or more instructions can be inserted in different places within the binary. For example, it could be used to count how many instructions of a particular type are executed by inserting the code that does the counting before every instruction that should be counted. In fpicker’s proxy case, we are interested in instrumenting each basic block of the target binary.
Essentially, the coverage bitmap code that was shown above needs to be injected at the beginning of each basic block. At least of each basic block that we are interested in. To inject code at each basic block, the Frida GUM API can be used as follows:
Different to the example before, the Stalker.follow() function is now called with a parameter called transform. This is a function that is, when the compile: true option is used, called for each basic block in the target binary.
Stalker.follow({
    events: {
        call: false,
        ret: false,
        exec: false,
        block: false,
        compile: true,
    },
    transform: transform,
});
The corresponding transform function can be seen below. Essentially, it inserts a callout at the beginning of the block and then iterates through every instruction and keeps (i.e., it does not delete or overwrite these instructions).
void transform (GumStalkerIterator * iterator, GumStalkerOutput * output,
        gpointer user_data) {
    cs_insn *insn;

    gum_stalker_iterator_put_callout(iterator, afl_map_fill, NULL, NULL);

    while (gum_stalker_iterator_next(iterator, &insn)) {
        gum_stalker_iterator_keep(iterator);
    }
}
In this case, the callout is a jump to the afl_map_fill instruction. This function then implements the AFL++ coverage bitmap logic. The snippets above were shortened for better readability. The complete implementation can be found in the fpicker GitHub repository.
Harness Communication
Frida offers a send API that can be used by the injected Frida agent script and the hosting application to communicate with each other. In early versions, the fpicker agent script was using the send API to signal fpicker that one fuzz iteration was completed (i.e., the targeted function is returning). In addition to the send API, the hosting application can trigger function calls in the injected Frida agent script. In fpicker’s case, this is required to trigger the fuzz function in each iteration. This trigger also contains the current iteration’s payload.
This approach has drawbacks in performance for multiple reasons. Firstly, Frida’s documentation says that “the total overhead of sending a single message is not optimized for high frequencies” [frida.re/docs/javascript-api]. Unfortunately, single messages in high frequency is a requirement a fuzzer has. The second problem is the encoding of data that is transmitted. For both the send API and the function calling API, the data and the payload are sent as JSON data. This means that each input first needs to be serialized into JSON, which does introduce some overhead. But, more importantly, it also introduces a new problem. The input data needs to be ASCII data. Otherwise, it has to be encoded in, for example, hex or Base64. Fuzzing input often contains binary data, which means that another encoding step needs to be introduced.
As a result, fpicker introduces a new communication mechanism between itself and its harness script. The communication is implemented by using semaphores and shared memory. Fpicker creates a shared memory region, which is called communication map that contains the current fuzzing iteration’s payload and its length.
During setup, fpicker creates the communication map and two communication semaphores, the iteration semaphore and the exec semaphore. Fpicker’s harness opens the communication map and opens the semaphores. When fpicker’s harness has finished its preparation steps, it locks the exec semaphore. On fpicker’s side, the first fuzzing input is read from AFL++ and written into the payload field in the communication map in addition to its length. Once that is done, fpicker unlocks the exec semaphore, which will allow the harness script to continue. After unlocking the exec semaphore, fpicker locks the iteration semaphore, which will be blocked until the harness is finished with its iteration. The harness will now read the payload and its length from the communication map. The huge advantage here is that firstly, the harness does not need to decode the payload, and secondly, the payload does not have to be copied or moved as it is already inside the target process’s memory. With the payload and its length, the user-defined fuzz function is called. Once the execution of the target function is done, and Stalker has finished collecting coverage, the harness will unlock the iteration semaphore and subsequently lock the exec semaphore until it can do its next execution iteration. After the iteration, fpicker can now signal AFL++ that the iteration is done and read the next fuzzing input.
The following image shows an overview of the fuzzing process with shared memory and semaphores. The individual steps are explained below.
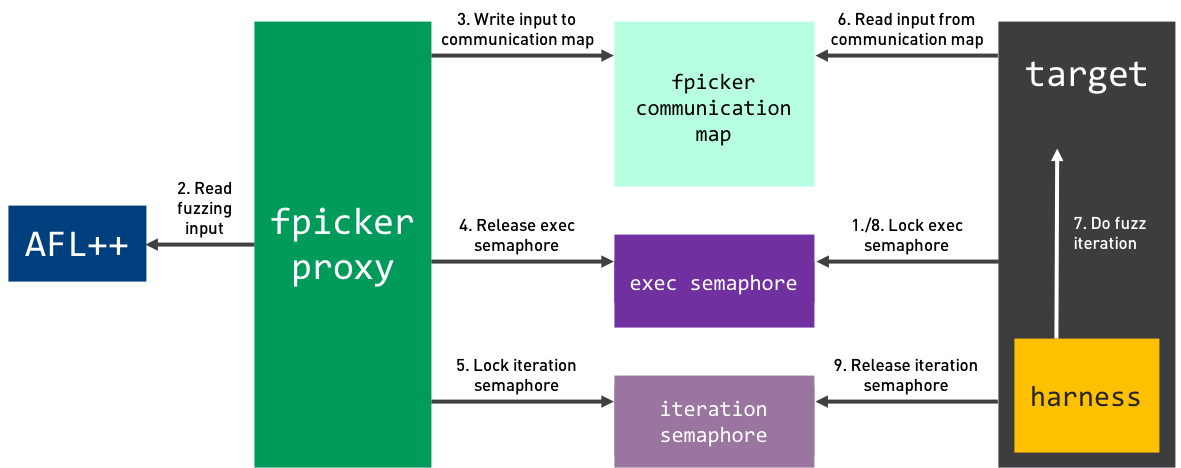
Once the harness is injected and prepared successfully, the process is as follows:
- The harness locks the exec semaphore.
- fpicker reads the generated fuzzing input payload from AFL++.
- fpicker writes the payload into the communication map.
- fpicker unlocks the exec semaphore.
- fpicker locks the iteration semaphore.
- The harness reads the current fuzzing input payload from the communication map.
- The harness executes the target function with the current fuzz input.
- The harness locks the exec semaphore.
- The harness releases the iteration semaphore. GOTO STEP 2.
Fpicker still implements both options as SHM (shared memory-based) or send (Frida send API-based) communication modes. In some cases, for example, when semaphores or shared memory are not easily available, the send mode is the only option. This might be the case if either the target does not use a library that contains the shared memory and semaphore-related functions or when it is not possible to execute fpicker on the same device or operating system that the target is running on.
User-Defined Harness Script
Fpicker’s goal is to work against any kind of target. However, in-process fuzzing always requires some kind of customization as each target is different. For this purpose, the harness provides a JavaScript class that implements all of the necessary harnessing steps but can easily be subclassed for each target. The fpicker harness, which is injected into the target in the form of a Frida agent script, consists of the following components:
- The main script that handles the harnessing setup and, if in use, shared memory and semaphores
- The Stalker configuration and instrumentation
- A user-defined script that implements an optional
preparefunction and afuzzfunction
The fuzz function is mandatory and implements the actual call to the target function. It receives the fuzzing input and its length as a parameter. Depending on the target function, it can call the function with these parameters and implement, if required, any preparations or modifications to the input. In simple cases where the target function accepts only the two arguments buffer and size (e.g., with a function signature like void parse_input(void *data, uint32_t len)), the implementation of the fuzz function can look as follows:
function fuzz(data, len) {
    const parse_input = ...; // Frida function object that calls the
                             // parse_input function
    parse_input(data, len);
}
The prepare function is optional. It is intended to provide the user a way to implement any necessary in-process preparations. In the case of iOS’s Bluetooth daemon, this function takes care of the virtual Bluetooth connection creation and other patches that make the daemon more fuzzing resilient. The implementation of the more complex prepare and fuzz functions can be found in the ToothPicker repository. Note that the design of the harness has changed, and the one in the ToothPicker repository is not the same as was described here. However, the relevant prepare and fuzz functions still exist.
The complete skeleton of the user-defined harness looks as follows:
// Import the fuzzer base class
const Fuzzer = require("../../harness/fuzzer.js");

// The custom fuzzer needs to subclass the Fuzzer class to work properly
class TestFuzzer extends Fuzzer.Fuzzer {
    constructor() {
        // The constructor needs to specify the address of the targeted
        // function and a NativeFunction object that can later be
        // called by the fuzzer.

        const target_fn_addr = Module.getExportByName(null, "TARGET_FN");
        const target_fn = new NativeFunction(
            target_fn_addr,
            "void", ["pointer", "int64"], {
        });

        // The constructor needs:
        //      - the module name
        //      - the address of the targeted function
        //      - the NativeFunction object of the targeted function
        super("test", target_fn_addr, target_fn);
    }

    // The pepare function is called once the script is loaded into the
    // target process in case any preparation or state setup is required.
    // In this case, no preparation is needed (see the bluetoothd
    // example for a preparation function that does something)
    prepare() {
    }

    // This function is called by the fuzzer with the first argument
    // being a pointer into memory where the payload is stored and the
    // second the length of the input.
    fuzz(payload, len) {
        // This writes a log back to fpicker if debug mode is enabled
        this.debug_log(payload, len);
        this.target_function(payload, parseInt(len));
    }

}

const f = new TestFuzzer();
exports.fuzzer = f;
In the end, Frida’s frida-compile tool can be used to compile this into one compact JavaScript file. The resulting file is then used as fpicker’s harness script.
Configuration Options
As fpicker is aimed to be highly configurable and customizable, it offers various modes and configuration options that can be a bit overwhelming at first glance. In the following, I will give a short overview of the different modes and the thoughts behind them.
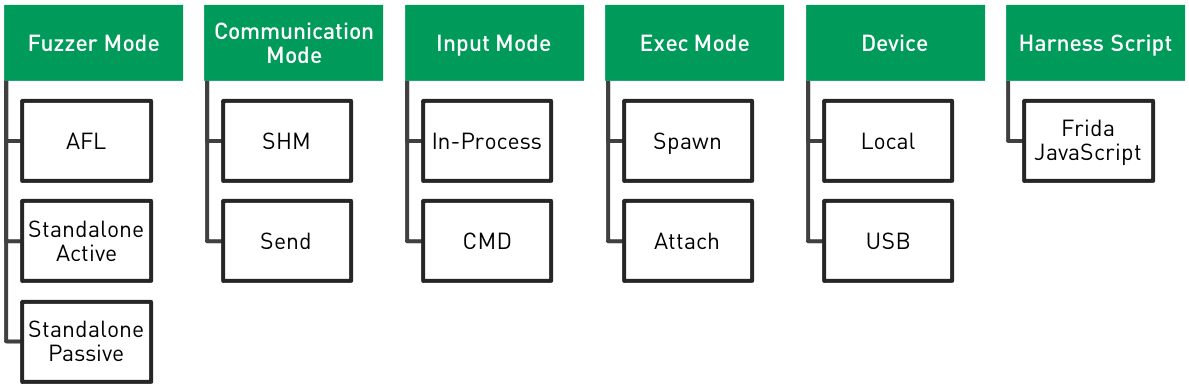
Fuzzer Mode
Fpicker’s fuzzer mode is the main configuration option that determines which fuzzing approach it takes. There are three different modes:
- AFL++ Mode: In AFL++ mode, fpicker acts as a proxy between AFL++ and the target process. Using Frida’s instrumentation capabilities, AFL’s shared memory coverage bitmap is populated while the target is fuzzed with input data generated by AFL++. For most people, this is probably the most interesting contribution of fpicker.
- Standalone Active Mode: In standalone active mode, the fuzzer uses Frida’s Stalker call summaries to gather coverage in the form of basic blocks that are executed during an iteration. This is nothing new and has been implemented in various forms before. However, in combination with some of the other fuzzer settings, this can have various benefits. It is also a good alternative if AFL++ is not applicable or desired in a given environment or case.
- Standalone Passive Mode: Passive mode is more like a tracer than a fuzzing mode. Essentially, it does the same as standalone active mode. However, it does not send its own inputs. It just attaches to a certain function and collects coverage. Once new coverage is observed, both the coverage and the input can be stored.
Input Mode
While fpicker is primarily designed as an in-process fuzzer, it also supports fuzzing via an external command. For this, fpicker offers two input modes.
- Input Mode In-Process: In in-process input mode, the injected harness script directly calls a specified function in the target process. The fuzzer sends the payload to the harness, and the harness prepares the payload in such a way that it can call the targeted function.
- Input Mode CMD: In command input mode, the payload is redirected to an external command. This is useful if it is too complex to prepare the parameters other states when directly calling the target function. The coverage collection still needs to be attached to a specific function. Maybe there is a client that can be supplied with a payload which then triggers the target function.
Communication Mode
Communication mode determines how the injected harness communicates with the fuzzer. This largely depends on the target application. Frida offers an API to send and receive messages from the injected agent script. This type of communication is quite costly. One of the factors is that the transported message needs to be encoded in JSON. So sending binary data is not straight-forward (i.e., it needs to be encoded in hex or – how fpicker does it – in base64). Therefore, fpicker offers a second communication mode via shared memory. However, this only works if it is possible to establish shared memory between the fuzzer and the target application, which means that this mode cannot be used when the target is attached to the fuzzer host via USB. In CMD input mode, the communication mode only refers to how the coverage information is communicated back to the fuzzer, not how the payload is sent. This is deferred to an external command.
Regardless of the communication mode, a few messages required for setup and crash detection are always sent via Frida’s send API.
- Communication Mode Send: In send communication mode, the payload is sent by using Frida’s RPC calling mechanism. This lets the fuzzer execute a JavaScript function within the injected harness script. This function inside the harness can then do all the necessary preparations to call the target function (i.e., prepare buffers, structures, or whatever the target requires). Once the target function is returned, coverage collection will stop, and the harness can signal the fuzzer that the iteration is finished. This is done by sending the coverage information back to the fuzzer using Frida’s send API. As the payload (which often involves binary data) cannot be directly included in JSON (which is the required data format for Frida’s send API), fpicker encodes the payload in Base64. On the target’s end, the fuzzing harness decodes the payload before entering the user-defined fuzzing function.
- Communication Mode SHM: In SHM communication mode, the fuzzer and the harness script communicate via shared memory and semaphores. A buffer in shared memory is used to send the payload and receive the coverage information. Instead of sending and receiving, the two components wait and post to the semaphore to communicate. Depending on the system and the target, this introduces quite some performance gains. Especially because the binary payload is written to memory once and does not have to be encoded and decoded or copied into other memory locations. Unfortunately, this mode sometimes leads to low stability when running with AFL++ on iOS.
Exec Mode
Exec mode can be either spawn or attach. This is pretty self-explanatory. Fpicker can either attach to a running process or spawn a process. One thing that is a significant difference between the two modes is that, should the attached target crash, fpicker will not try to respawn.
Standalone Mutator
In standalone mode, fpicker offers three different input mutation strategies. Nicely put, standalone input mutation certainly has lots of room for improvement.
- Standalone Mutator NULL: This mutator does not mutate the payload and just returns a copy of the same payload. Mostly for testing purposes. Otherwise not really useful.
- Standalone Mutator Rand: A very bad random mutator. All it does is randomly replace values at random locations in the original payload. It does not change the payload length.
- Standalone Mutator Custom: This mutator can call an external command to mutate payloads. It writes the payload to stdin and receives the mutated payload from stdout. Due to its implementation, it has quite a performance impact.
Conclusion
Fpicker is the result of many experiments I did in the last few months. While it’s not necessarily a revolutionary fuzzer, it enables fuzzing in specific configurations and environments where fuzzing was not easily available before. I hope that it might be useful to some people, if only due to some of its ideas and concepts. Fpicker can be found on GitHub. The repository also contains two rudimentary example applications and corresponding commands to test fpicker. In the future, the iOS Bluetooth daemon sample might also be added to show how a more complex target can be fuzzed with fpicker.
I’m happy about any comments, ideas, or potential contributions. In addition to GitHub, you can reach me via Twitter for any comments or questions or just leave a comment below.