Traffic analysis is one of the crucial parts of any successful penetration test. In this a 2021-03-18 23:25:19 Author: www.hackingarticles.in(查看原文) 阅读量:505 收藏
Traffic analysis is one of the crucial parts of any successful penetration test. In this article, we’re going to discuss some of the different techniques that can be used to analyze thick client applications. If a thick client using HTTP traffic then it is pretty straight forward to intercept the traffic. We can use tools like
To Intercept the HTTP like Traffic: –
- Burp Suite
To Intercept TCP like Traffic: –
- Wireshark
- MITM Relay + Burp Suite
- Echo Mirage (Properly Maintained)
As we’re pen-testing Damn Vulnerable thick client applications and DVTA is using non-HTTP protocols for example., FTP. It doesn’t make any HTTP connections so we can’t use Burp Suite directly. So, we have another option to monitor the traffic by using a tool like Wireshark but it doesn’t allow you to tamper with the traffic you can only monitor and understand the traffic. But if our goal is to intercept and modify the traffic, we will have to go with a tool called Echo Mirage.
So, without wasting much time let’s begin the Traffic Analysis.
Table of Content
- Prerequisites
- What is Traffic Analysis
- Traffic Analysis Via Wireshark
- Traffic Analysis Via Echo Mirage
- Traffic Analysis Via Burp Suite + MITM Relay
Traffic Analysis
Any Thick client application communicating with the backend means they are sending some data to its backend components like web server, FTP Server, database server, etc. Analyzing the data during transfer is a very crucial part of the analysis of an application. some applications perform data transit without enforcing any encryption. So, the concept of intercepting traffic of thick clients is not much different than thin clients, the tools will differ depending on the protocols used by the application also these applications are non-proxy aware as well the intercepting techniques also will slightly vary.
Prerequisites
- Wireshark
- Python 3
- Burp Suite
- Echo Mirage
- Python pip script
- MITM Relay
Traffic Analysis via Wireshark
As a penetration tester, you must have good knowledge of how to use a network packet sniffer is essential for day-to-day operations. Whether you are trying to understand a protocol, debug a network client or analyze traffic, you’ll always end up needing a network sniffer.
Examining the traffic between the tested thick client application and the server might reveal sensitive and unencrypted data such as:
- Most Sensitive data transferred over an unencrypted tunnel such as clear-text credentials/secrets/API Keys etc.
- HTTP and HTTPS web endpoints
- File blobs/chunks sent over the wire
- Proprietary protocols used by the program
We are going to analyze FTP traffic that’s generated by DVTA. For this, we are going to use the LoopBack address. So, first of all, Launch Wireshark and choose “Adapter for loopback Traffic Capture”.

Then after launch modified DVTA application and login to the application by using admin credentials as shown below.

As you can see, we have successfully logged in and it showing Backup data to FTP server

When you click backup data to FTP server it will make an FTP connection with the FTP server and it will try to upload some data to FTP server. After uploading the data, it will show you a Success message as shown below.

Just after Backup data to the FTP server come back to Wireshark and stop capturing the data so that it won’t capture unnecessary data as shown in the below image. Apply the filter of FTP protocol so that only shows the traffic captured of DVTA application while uploading data to the FTP server.

Now what we are interested in is the credentials that might be used by the DVTA application to login to the FTP server. We can check them by observing the captured FTP traffics. If you notice the first packet is the response from the FileZilla server and then we have a command “USER and the USER name: DVTA”. Then after in the third line, there is a response from the FTP server saying the password is Required for DVTA and in the next line, there is a “Password: [email protected]” that was sent by the client.

Now it’s pretty clear that the user name and password are available for us. So, let’s quickly open a browser and surf to ftp://127.0.0.1 and try to use the credentials here that we have captured as shown below.

And here you go…, as you can see, we have successfully connected to the FTP server and we can download everything that is available in that folder as shown below. This is how an attacker grab credentials that are being used by the application in the client site. They can probably do some Wireshark capture and if the credentials are found in clear text, they can easily login to the FTP server and can tamper or download the data easily.

Traffic Analysis via Echo mirage
Download and Extract Echo Mirage into your desirable folder. You can download Echo Mirage from here: https://mega.nz/file/bHhQ3QrA#l4d-lc3bL1tm8AOUcMzlkbN6SaMYFPXNjRr1caD0m1E
Let’s open up the EchoMirage application.

and it will open EchoMirage for us

But also remember one thing don’t forget to delete the FTP CSV file that you have uploaded earlier by using DVTA application so that we can upload a new copy again. Now again open the DVTA application and login into the Application by using admin credentials.

So, we have successfully logged into DVTA application and when we click on “Backup data to FTP server” then we want to be able to see what’s going on using EchoMirage. To do this create a new Rule by going to “Rule > New Rules” choose the direction to “Any” as we want to capture traffic only from the port of 21 so “set the Port to Port no. 21” then after click on “intercept” and then save the configuration by hitting “ok” as shown below 
Now here we can see the Rules created by us, as we can see we are going to intercept all the traffic that’s going to outbound and inbound also we are going to intercept the traffic of port 21 only.

Now, navigate to Process and click on inject

and we are going to see all the process that is running on your machine. But we are interested to see the traffic only from DVTA.exe so select it and inject it into a process

Navigate to the tab of Traffic.Log then go to the DVTA application and click on Backup Data to FTP Server. Come back to Echo Mirage and here If you see it started capturing traffic from DVTA.exe.
But we’re not interested in this so just hit OK and forward the traffic.

If you see there is a response coming from files FileZilla server and click ok once again..

And if you see here the user name is being sent to the FTP server

And the response from FTP server says that password required for DVTA. Hit ok and forward the Traffic.

As you can see the password can bee is seen in clear text “[email protected]”. The DVTA client is sending its password to the FTP server

And as you can see, you’re logged in now

If you are still observing the traffic then you should see some file being uploaded onto their FTP server just hit ok and forward the traffic.

You can see here that ftp-admin.csv is being uploaded here.

In the last, you can see the response successfully transferred ftp-admin.csv and you can find that file on your desktop

Traffic Analysis via Burp Suite + MITM Relay
First of all, you need to download MITM Relay from GitHub or also you can directly download it from here: – https://github.com/jrmdev/mitm_relay

Download and Extract in your work folder

MITM Relay is a python script and it works fine with Python 3 so download and installs it by going to the official website of python or you can also download it from here: –
https://www.python.org/ftp/python/3.9.2/python-3.9.2-amd64.exe

In manner to download repositories from python, “get-pip” needs to be available in your system you can get it from here: – https://bootstrap.pypa.io/get-pip.py
All you need to do is save the source code by giving it a right-click and select the option “save as” and save it into your working folder by the name of get-pip as shown below

Let’s quickly open up the Power Shell and navigate to the directory of python3. It can easily be founded in c drive and then run get-pip.py script from here as shown below

As you can see pip is successfully downloaded in the above Image now let’s install the Requests module because if you look at MITM Relay it makes use of a module called Requests. To check this all you need to do is go to the directory of MITM Relay and open MITM relay with the option of “Edit with IDLE”

As you can see here MITM Relay makes use of a module named Requests

And by default, the Requests module is not installed. This can be installed by running this command
python3 -m pip install requests |
And it will install the requests module for us.

Let’s install Burp Suite
You can download the Burp Suite community edition from here: – https://portswigger.net/burp/releases/professional-community-2020-11-3

The installation is straight forward you don’t need to change anything during the installation process. After downloading the Burp Suite open it

Start the Burp Suite and go to the proxy and select options and if you see it is listening on the “port 8080”

Let’s open up the DVTA.exe application and configure the server to the IP address of the local machine such as 192. 168.0.103.

Now open up the FileZilla Server interface and stop the FTP server interface
and then go to “Edit > Settings” and change the value of “Listen on these ports: 2111” because in this scenario our MITM Relay is also running on port no. 21 and FileZilla server is also listening on port no. 21 and it is not possible to run both services on same port so, that’s why we change the port 21 to 2111 here. This happens just because of we are running FileZilla server and MITM relay in same machine in the real-life penetration testing these services are running on different machines so we don’t face these problems there. There is another setting that you have to change in security settings that is to “Disable IP check”.

Then go to “Edit > Settings”

and change the value of “Listen on these ports: 2111” because in this scenario our MITM Relay is also running on port no. 21 and FileZilla server is also listening on port no. 21 and it is not possible to run both services on same port so, that’s why we change the port 21 to 2111 here. This happens just because of we are running FileZilla server and MITM relay in same machine in the real-life penetration testing these services are running on different machines so we don’t face these problems there.

There is another setting that you have to change in security settings that is to “Disable IP check”. If you don’t do this the file upload will fail because the source which is originating the file transfer and the address where the data connection is controlled are not going to match that’s why we disabled the IP check.

And at last start the FTP server.

Come back to the Power Shell and start the MITM Relay
All you need to do is go to the directory of MITM Relay and copy the location of MITM Relay and open it into a power shell by just running these commands.
cd (directory of MITM Relay)
python3.exe .\mitm_relay.py -l 0.0.0.0 -r tcp:21:192.168.0.103:2111 -p http://127.0.0.1:8080 |
where -l is the listening address which is 0.0.0.0 so that we can listen to all the interfaces.
-r stands for the relay. We are setting up relay here using tcp:21 and the destination address is going to be 192.168.0.103 this is the destination address where FTP server is running and the port on which the FTP server on the destination server is running is 2111.
And in last -p stands for the proxy. We set it up to 127.0.0.1:8080 this is the address where the Burp Suite is running.

Let’s come back to the DVTA application and log In to the application using the admin credentials

And then come back to Burp Suite and navigate to the tab of “proxy > Intercept” and “Turn on the Intercept” and so that it will start capturing the traffic coming from DVTA.

Now, come back to DVTA application and hit “Backup Data to FTP Server”

Come back to the Burp Suite and look at where it started intercepting the Traffic from DVTA that is a response coming from the FTP server.

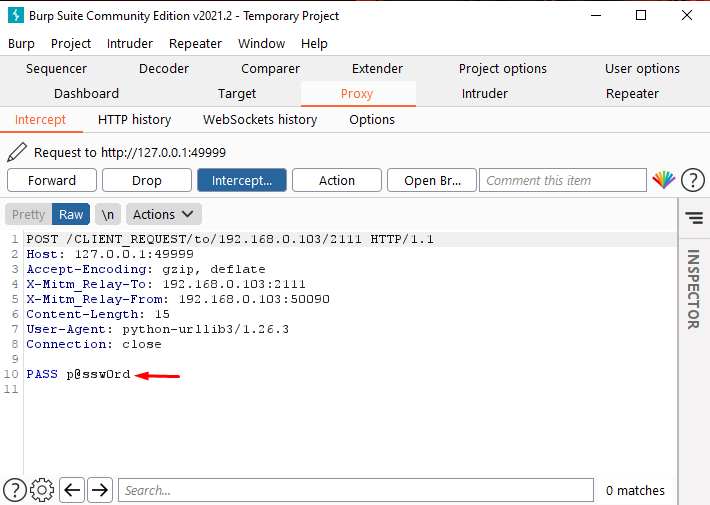
Click forward and look on the next screen there is a user name with the user command being sent from the client. On the first line there you can see the client request and forward this

Now we’re getting server response which is the password required for the DVTA. On the next screen, the client may send the password to see this just forward the Traffic

Look at the bottom using the pass command it sending the password: – [email protected]

Now the next subsequent request will upload the file onto the server so we can see that here on next request the user is logged on forward the traffic

After forwarding some of requests there is a store request which is uploading the “ftp-admin.csv” file. Forward the request to next

And on the next request there is a response from the server that is opening the data channel for the file upload

Let’s forward the traffic and it is completed the upload.

This is how we can use MITM Relay to intercept and analyze the TCP traffic using Burp Suite.
This is looking good we have grabbed the FTP username and password that is coming from the client. In the next part, we will perform some attacks on the thick client.
Author – Vijay is a Certified Ethical Hacker, Technical writer and Penetration Tester at Hacking Articles. Technology and Gadget freak. Contact Here
如有侵权请联系:admin#unsafe.sh