2021-09-02 23:19:26 Author: binary.ninja(查看原文) 阅读量:38 收藏
The Grand Reverse Engineering Challenge is an event that tests reverse engineer’s ability to break some of the strongest methods to protect software. The protections include control flow flattening/indirection, integer encryption, virtual machine protection, and anti-debugging, etc. Most of the challenges are protected by the Tigress obfuscator. Tigress offers plenty of methods to obfuscate and protect software. It is well-known for these challenges. Attempts to solve them often lead to interesting results.
One noticeable difference from other CTFs is that the reverse engineers are asked to install a piece of monitoring software on their machine (presumably a dedicated virtual machine). The software collects data on how reverse engineers deal with the challenges. The collected data will be later used for research purposes. I am glad to contribute to the research community, so I do not feel these requirements intrusive. After all, I did it on a clean VM.
In this blog post, I will explain how I solved one of the obfuscated challenges with Binary Ninja. Also, it is worth mentioning that I am lucky to win the event and earn prize money of 5,000 USD!
The Challenge
For this blog post, I want to discuss one of my four solutions, specifically my solution for Challenge 7. I don’t want to give away all my secrets in case there are other challenges later! 😉
The challenge can be found here. Its description reads:
challenge-7-x86_64-Linux.exe and challenge-7-armv7-Linux.exe read two English
words from standard input and print a number to standard output. The words are
no longer than 12 characters, consist of the lower case letters a-z, and have
been taken from this list. For two particular words, the program will crash
with a segmentation fault. Your task is to modify the program to remove the
code that causes this crash (it will now print a number to standard output)
while maintaining the same behavior as the original program for all other
inputs.
In short, the program reads two English words and prints a hash value. However, two particular words will cause the program to crash. Our goal is to figure out the reason of the crash, patch the binary to fix it while retaining the old output values on other inputs.
This challenge is tagged with tamper, which means it has anti-tampering mechanisms which will make the fixing harder to carry out.
The event offers the challenge in both arm and x86, and we only need to solve one of them. I chose to deal with the x86 version of it.
Getting Started
I first loaded the binary into Binary Ninja and waited a minute or two for the initial analysis to complete. Once it is idle, the entry point looks like this:
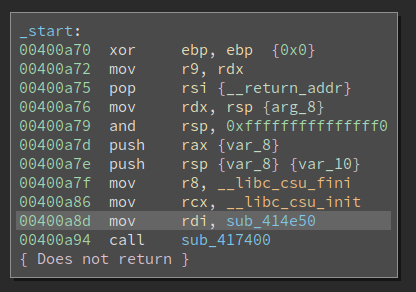
BN correctly identifies the function __libc_csu_fini and __libc_csu_init. This entry point is so familiar to me that I instantly recognized that the sub_417400 is actually __libc_start_main, and the sub_414e50 (being moved into rdi) is the main function.
The CFG of the main function does not look super crazy:
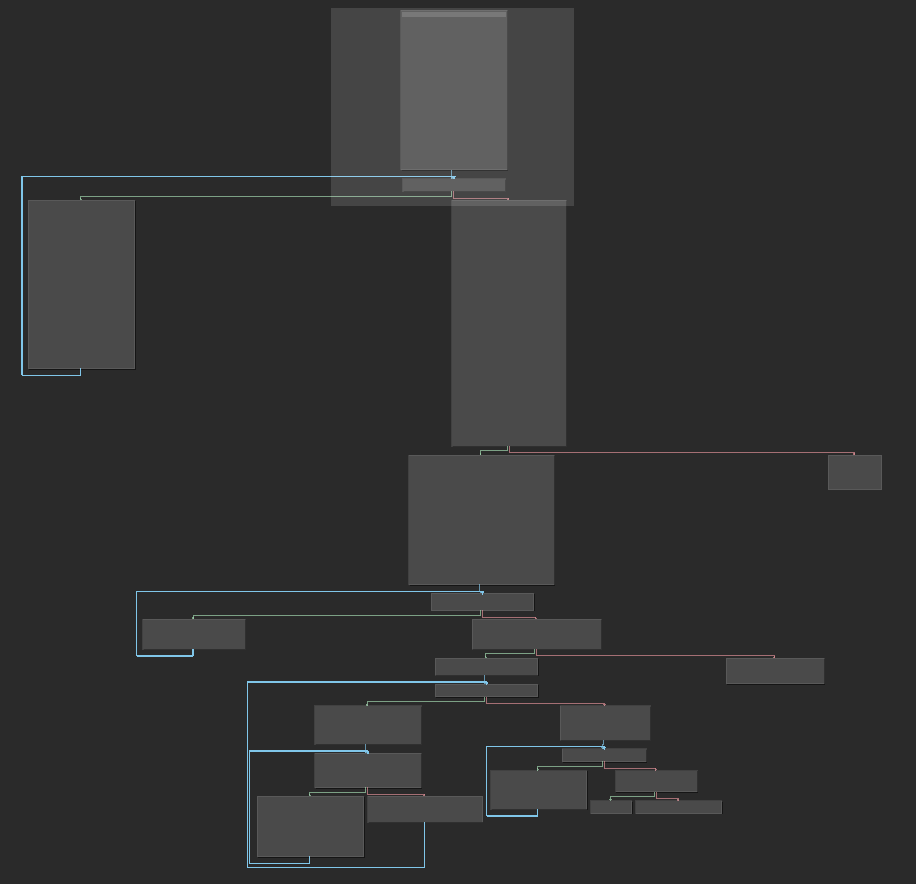
I looked at the first few basic blocks and did not immediately get what it is doing. I scrolled to the bottom of the function and see something that is familiar:
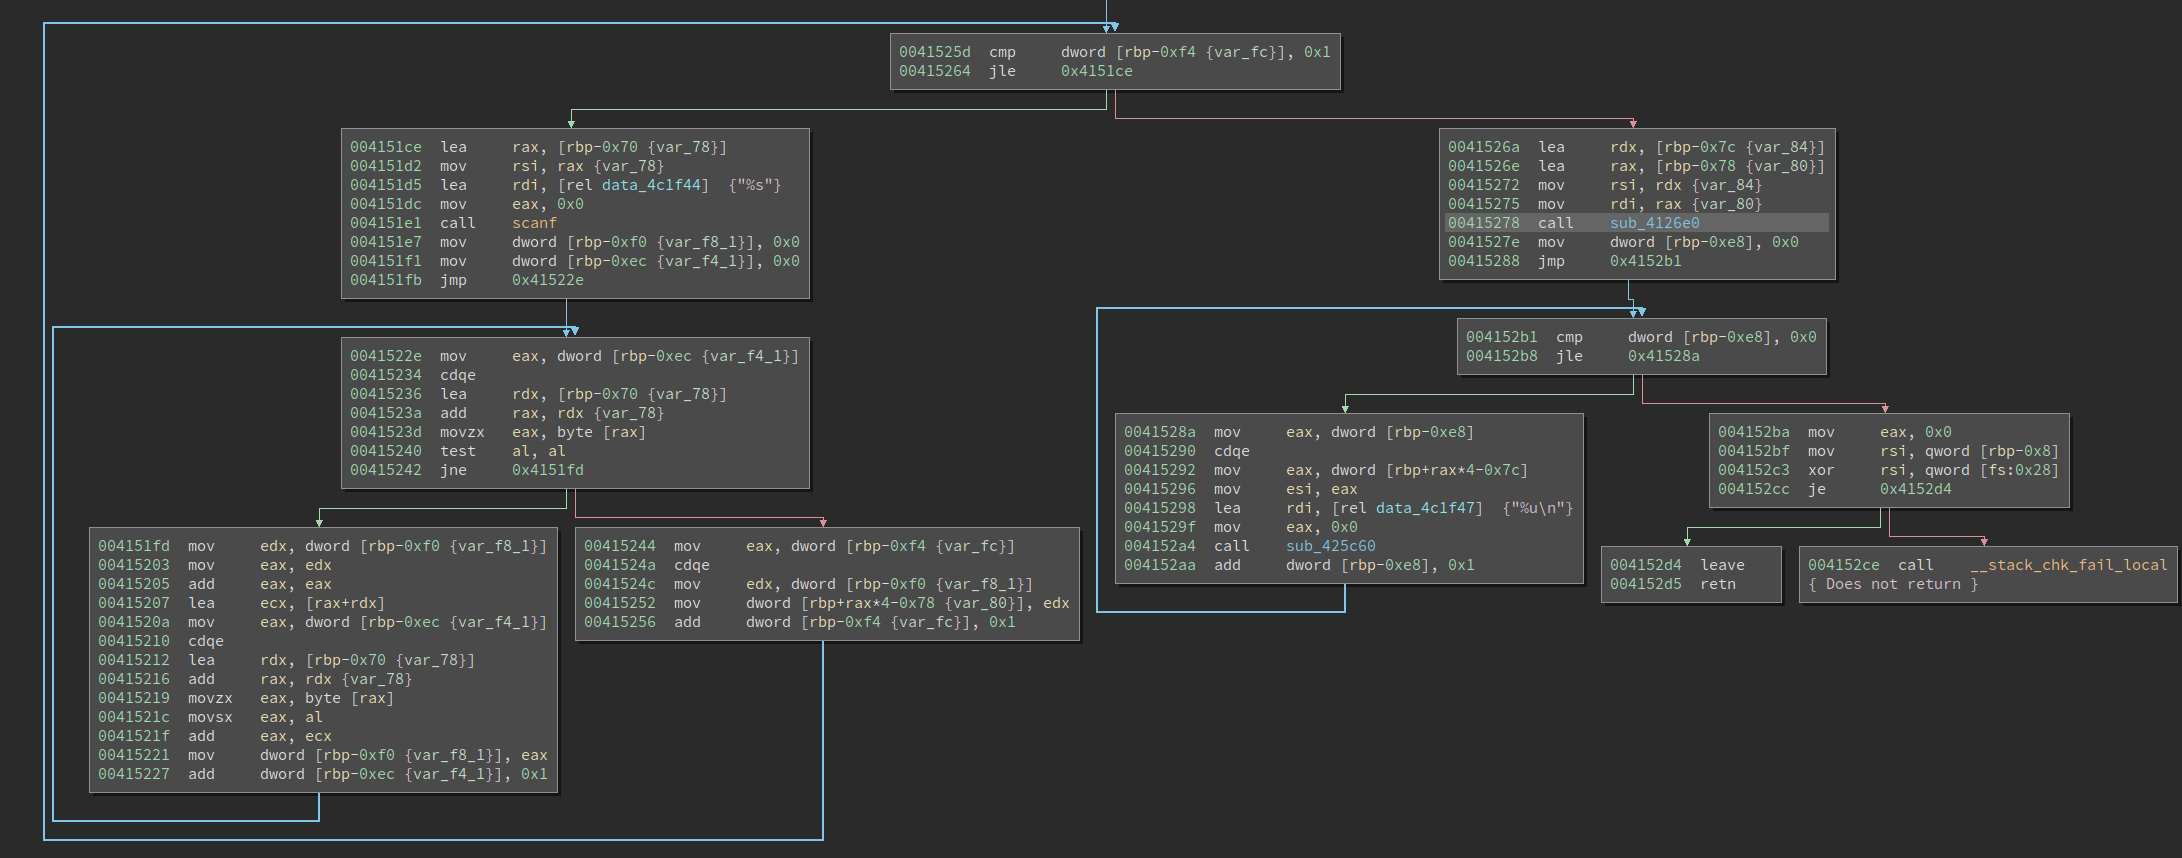
The code uses a loop to read the two inputs with scanf and then uses a simple hash algorithm to convert the two strings into two integers. Then it calls sub_4126e0, and eventually prints the result with sub_425c60, which I believe is printf. Now it seems the core processing happens within the sub_4126e0 – which I renamed to core.
Understanding the Control Flow Indirection
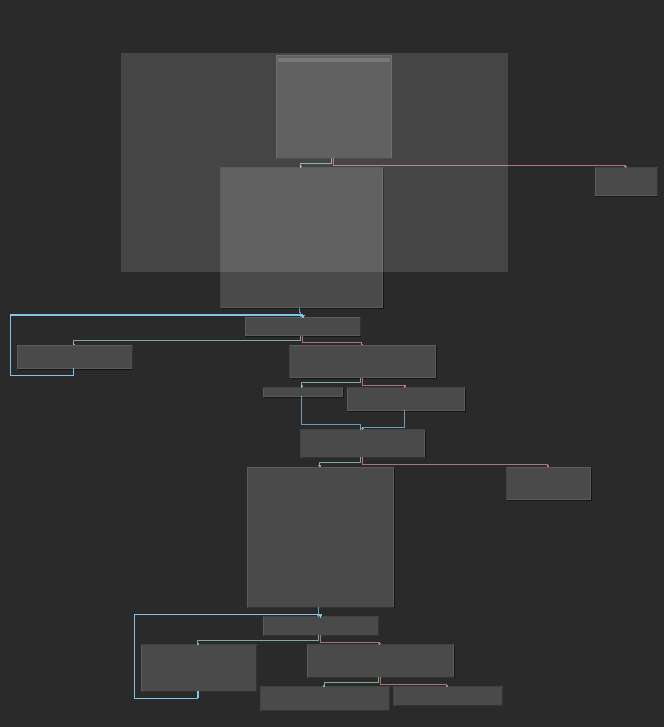
The CFG of the core is again, surprisingly, not very complex. However, I did spot some strange branches in it, whose false branch leads to meaningless code and illegal instructions.

This indicates either this branch is opaque, or the instructions are encrypted. Here I spent some time back-tracking the values used in the comparison, to see what is happening. However, again I did not immediately figure it out.
Then I decided I would better first understand the control flow of the entire program, e.g., which function calculates the final output.
Interestingly, there are not many function calls within core, and none of them seems to be calculating the result. Then I looked at the bottom of the function and saw this:

The sub_41274e only has one instruction: jmp rax.
Tracing back to the place the rax is assigned, I quickly notice that the variable var_2e8 is an array, and the var_390 is the index into it (in this case its value is 0x7). There is an address array, and the code will jump to the 7th item of it.
So we need to figure out the content of the array. The array is initialized at function entry, and it is a qword array with size 0x5a. Its content is copied from data_6eba60.
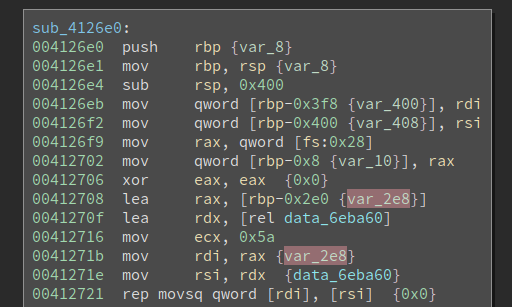
Then I navigated to the address and defined an array of the proper size.
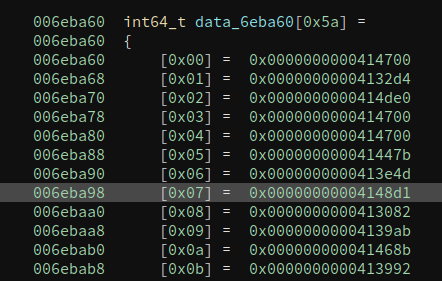
These are all pointers, so we will call this array a jump table. And the 7th entry has a value of 0x6eba98. The code at 0x6eba98 is a long basic block.
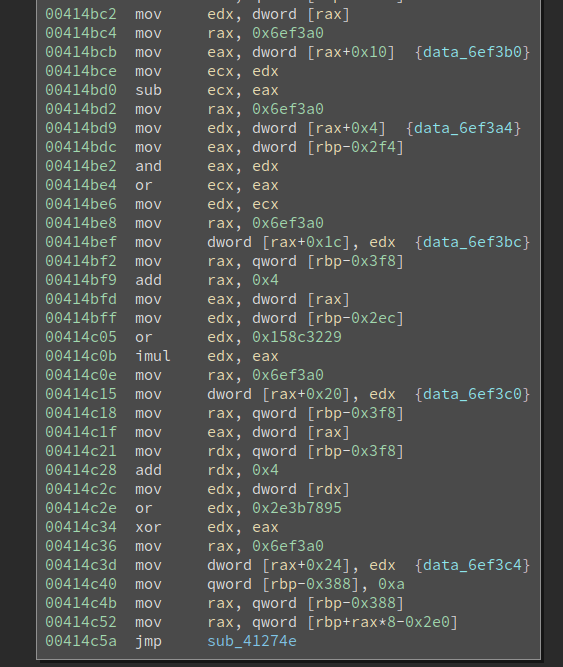
At the end of it, we see the same pattern of control-flow transfer. This time it jumps to the 0xa entry in the jump table. Then I browsed a few more basic blocks and they all end in the same way. Clearly, this is a way to use indirection to hide the control flow.
I studied the code more and realized that obfuscation is applied at the function level. For every function, all of its basic blocks are re-connected using this indirect control-flow transfer. We can trace the control flow manually, but it’s quite hard to get a big picture of the code. So I decided to remove the control flow indirection and restore the original layout of the basic blocks. Each function has its jump table, and we need to process them one by one.
Fixing the Control Flow
Now that we have a good understanding of the control flow in direction, it is time to get started on some scripting! Binary Ninja has the best support for scripting. The Python API can access and control almost every aspect of the software, making it extremely versatile and capable.
Below I will go through the deobfuscation script piece-by-piece. Certain details are removed to highlight the main idea. The entire script can be found here.
Using Undo Actions
The first tip for plugin and script authors is that we should use undo actions to mark the changes made to the binary so that we can undo (and redo) it easily. Otherwise, if a plugin makes multiple changes, there is no easy way to undo them. This can be a big pain.
We simply need two lines of code to avoid this problem:
bv.begin_undo_actions()
# do something with bv
bv.commit_undo_actions
Reading the Address Array
The first step is to read the array of addresses. I used BinaryReader to read it, which makes reading fixed size integers easier than using bv.read() and struct.unpack:
jmp_table_addr = 0x6eba60
n = 0x5a

br = BinaryReader(bv)
br.seek(jmp_table_addr)

for i in range(n):
    addr = br.read64le()
    if not bv.get_function_at(addr):
        bv.add_function(addr)

bv.update_analysis_and_wait()
Note: I also defined a function at every address if one didn’t already exist. The reason is that if BN fails to notice these addresses are code, the jump at the end of it will not be processed. Defining a function informs BN to disassemble the code, so we do not miss any basic blocks. After the loop, I update the analysis and wait for it to complete before getting into the next step.
Finding the Jump Table Index
Now that we have all addresses in the jump targets, we only need to find all places where such indirection is used, and then replace the indirect control-flow transfer with a direct jump. Initially, I thought this was trivial. However, subtle differences in the code made it hard to write a script to process all functions without change.
Let us have a look at the indirection again:

For this particular function, all such indirection comes with a signature jmp sub_41274e. To deal with it, we can get all code xrefs to function sub_41274e, and then go back several instructions to find the jump table index. However, slight variations make it non-trivial to find the index, if we start from the final jump:
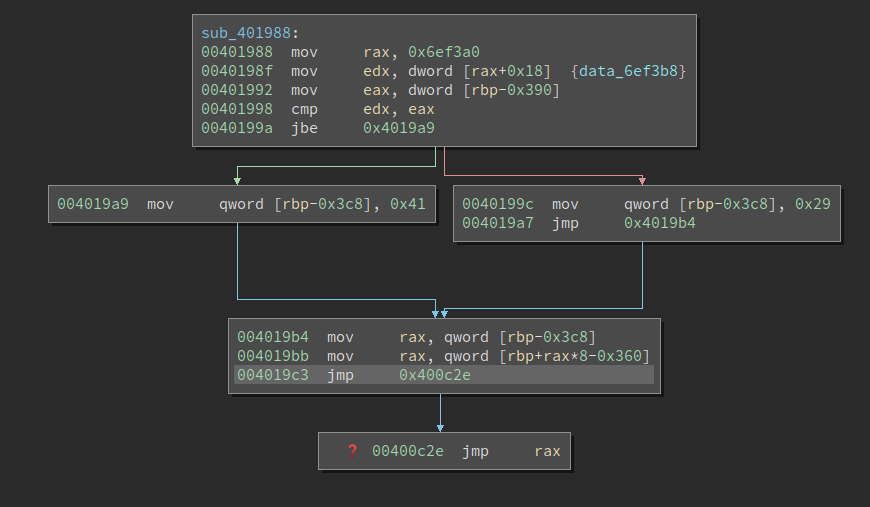
As we can see, there is a branch, and the control flow gets to different places based on the comparison. This is a very common in this binary. Of course, we can start from the final jump, and get to the basic block at 0x4019b4, then check all of the incoming_edges of the block, and process them one by one. I feel like eventually, it should work, but this is not the most robust way to deal with it.
I ended up finding the text mov qword [rbp-0x3c8], 0xXX a quite unique pattern. So I decided to use that as a way of finding all these indirect control flows. Note, the offset 0x3c8 is different in every function so we need to provide it to the script. To remove ambiguity, we require that the write to the index variable is followed by a read from the jump table. Remember the jump table is copied onto the stack at the entry of the function, so we can also know its offset on the stack. In the image above, the jump table stack offset is 0x360.
Combining these two values still does not remove ambiguity. There happens to be two functions whose jump table index variable and jump table are at the same offset, respectively. If we do not resolve it, we will be redirecting the control flow of one function to a certain basic block in another function, creating chaos.
To deal with this, I noticed that we know the address of all the basic blocks of a function (they are in the jump table). For every such address, we already defined a function at it. Now we can take the lowest address and the highest address of every such function, and calculate a union of them. The result is the legal range of addresses that we should process. For example, if I search for mov qword [rbp-0x3c8], and found a match at 0x123456, which does not belong to the union, then I know it is from another function. So I simply skip it, and it will be processed when I deobfuscate the other function.
The skeleton of the code looks like this:
index_offset = 0x388

for result in bv.find_all_text(bv.start, bv.end, search_text):
    addr, s, line = result
    if not is_in_ranges(addr, valid_addr_range):
        continue

    log_info(f'{addr: #x}')
    func = bv.get_functions_containing(addr)[0]
    llil_func = func.llil
    instr = func.get_llil_at(addr)

    if instr.operation == LowLevelILOperation.LLIL_STORE:
        if instr.src.operation == LowLevelILOperation.LLIL_CONST:
            const = instr.src.constant

    new_addr = addrs[const]
    log_warn(f'jumping to {new_addr: #x} at {addr: #x}')
Basically, I use bv.find_all_text() to find all matches. The result is a list of tuples, which contains information about the match: the address of the match, the actual string that satisfies the search, and the LinearDisassemblyLine that contains the matching line.
There are two ways to use the API: one can provide a callback function which is called every time a match is found. This is suitable for huge binaries which have a lot of matches. The second way, if we are not in a hurry, is to simply call the function with no callback and it will collect all of the matches into a list.
After that, we get the low-level IL function at the address and find the low-level IL instruction. Finally, we access the instr.src.constant, which is the value we are looking for. Note, to keep the code brief, I removed the part that checks for valid address ranges, and verifies jump table stack offset. They can be found in the complete version of the script.
A very helpful plugin that I use to explore the IL is BNIL Graph by Ryan Stortz(@withzombies). An IL instruction is a tree structure this plugin displays it in a graph. The plugin can be installed from BN’s plugin manager, or by directly cloning this plugin into the user plugin folder. More details on installing plugins can be found here.
Here is what we see for the instruction:
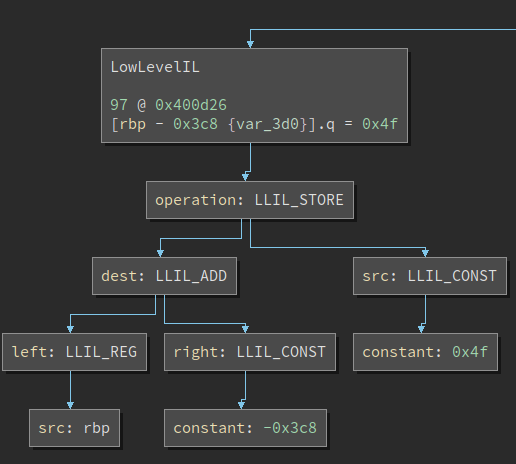
Now we know clearly that we should check the LLIL instruction’s operation is LLIL_STORE, its src is LLIL_CONST, and we need to extract the instr.src.constant from it.
Removing the Indirection and Improving the Graph
Alright, so we now know the actual address of the indirect jumps and can patch the binary to make it a direct jump. Since the mov qword [rbp-0x3c8], 0xXX instruction’s sole purpose is to config the indirect jump, we can do the patch at its address. Patching is quite simple in BN:
code = arch.assemble(f'jmp {new_addr: #x}', addr)
bv.write(addr, code)
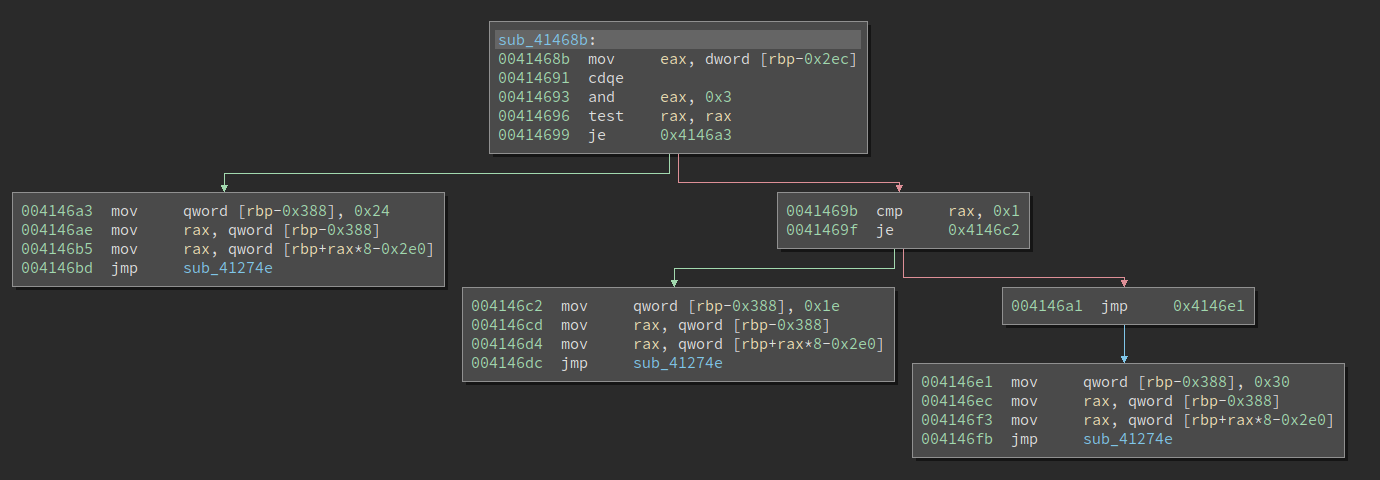
Below is the before and after patch comparison:
Before:
After:
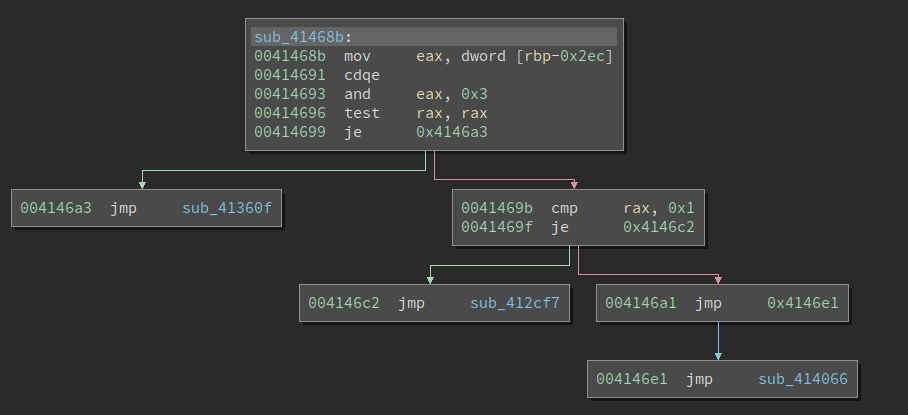
It does work – the indirect jump is removed and replaced with the actual target. However, this does not make it a lot easier to read the code. The graph is still quite fragmented and we need to go back and forth a lot to read the code.
The problem here is we have a function defined at address 0x41360f which is indeed just a basic block of a larger function. The result is BN shows the jump to the 0x41360f function, rather than showing the actual code of it. To fix this, we need to undefine all of the functions we created earlier:
for addr in addrs:
    func = bv.get_function_at(addr)
    if func:
        bv.remove_user_function(func)
And the graph immediately looks like what I want:
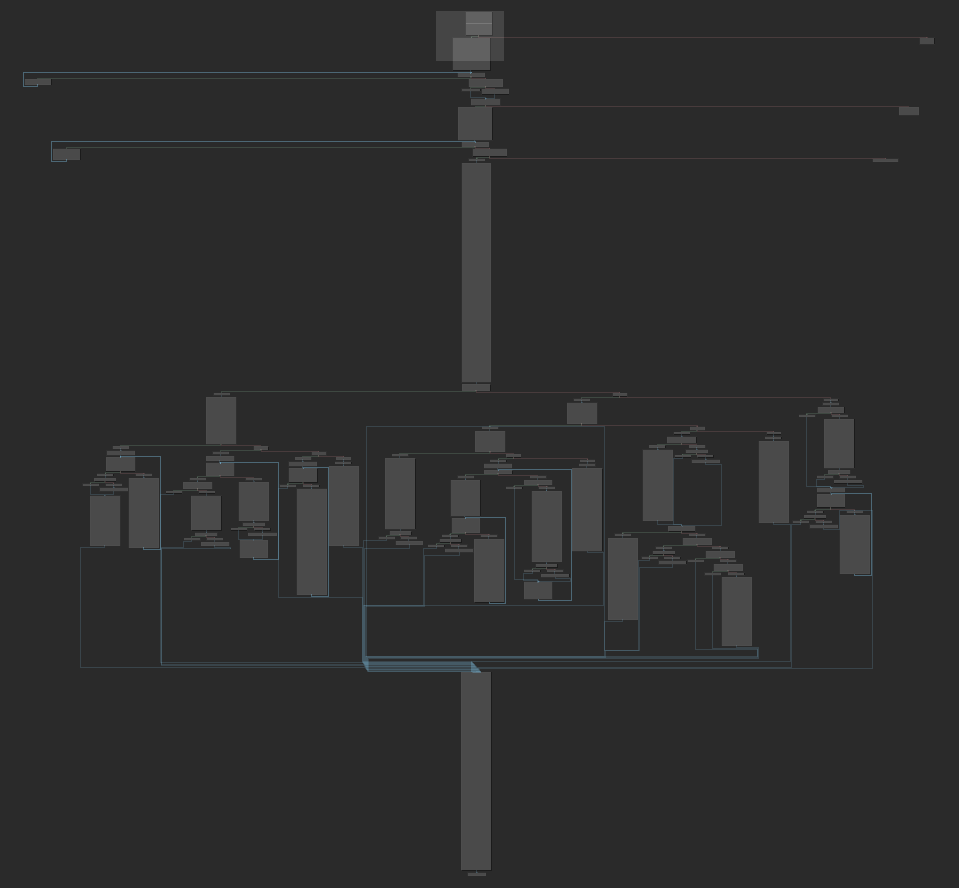
Although this is still quite large and complex, at least we can see what it is doing. The entire program has 10 functions, and the script can deal with all of them.
If you wish to try my script, I highly recommend another plugin: the Snippet Editor. The editor makes it easier to write longer scripts like the one I did for this challenge. Also, feel free to check out the deobfuscated binary.
Breaking Anti-temper and patching the binary
Great! We have circumvented the indirect control flow. However, this only enables me to analyze the binary more easily, it does not solve the challenge. Remember the challenge says the binary will crash on particular inputs. So the next thing is to figure out the crash and then fix it.
From experience from previous challenges, I am pretty sure the crash is injected into the program. It is probably something like:
if ((input[0] == 0x1234) && (input[1] == 0x5678))
    crash();
This type of crashing is resistant to fuzzing because the possibility of we hitting the value is almost zero. I also assume the crash() is a null-pointer dereference, since it is used in another challenge. So I browsed the code and tried to look for abnormal things.
There are many places where the code looks like this

If var_3d8 can be 0x0, then the program will crash. However, when I backtrack the data flow, I realize it is impossible to be 0x0. One of the examples is:

So it means as long as the variable at offset 0x448 is non-zero, then it crashes. However, the offset 0x448 variable is initialized to 0x0 at the function entry and is never changed. So this is an opaque predicate and a fake crash! What a nice way to trap reverse engineers.
There are many of these fake crashes. But I did not give up. The amount is manageable so I verified them one by one. Finally, I found a different one:
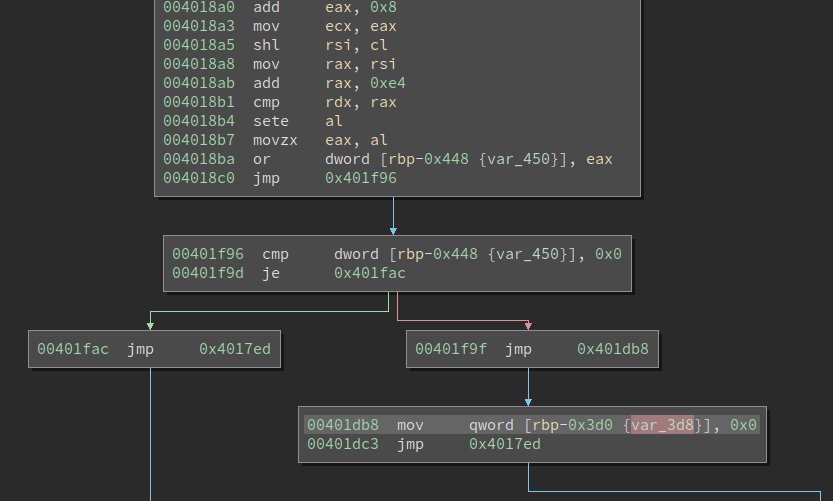
As long as the comparison at 0x4018b1 (cmp rdx, rax) is equal, var_3d8 becomes 0x0. And this comparison depends on the two inputs (the English words), so it could be controlled! Yikes.
I still need to verify this is a true crash. I need to figure out what inputs can make the comparison equal. The program itself is calculating a hash, and there are lots of branches in it. I tried to manually track the dataflow, but got lost soon. Even z3 cannot give me a result quickly. So I cleaned the binary a little bit, and throw it to z3 on a VPS, hoping it will give me the result.
The next day when I check the VPS, the Python process that ran z3 has exited. Great, it finishes! However, when I checked the result, I found it neither succeeded nor failed – it crashed at a certain point. Yeah, z3 crashed and I got nothing. I tried multiple times and every time the result is the same.
So I am not even sure whether the crash is indeed at the place I found it. But I also did not find another place that could crash at all. No divide-by-zero. And all other potential crashes are fake. So I convinced myself I must have found out the correct place of the crash, despite that I did not know the actual input.
Also, I read the challenge description again. It asks for a patched binary that does not crash. It does not ask for the words that crash the program! So even if I do not know them, I can still solve the challenge if the location is correct. Also, since the program is a hashing algorithm, maybe it is not trivial to find the input that crashes it. Just like it is hard to reverse a SHA1 hash, it may not be possible to find out the crashing input at all! I plan to discuss this with the challenge author as well. Maybe this is their intention, or maybe they just forget to verify there is a viable way to find out the input.
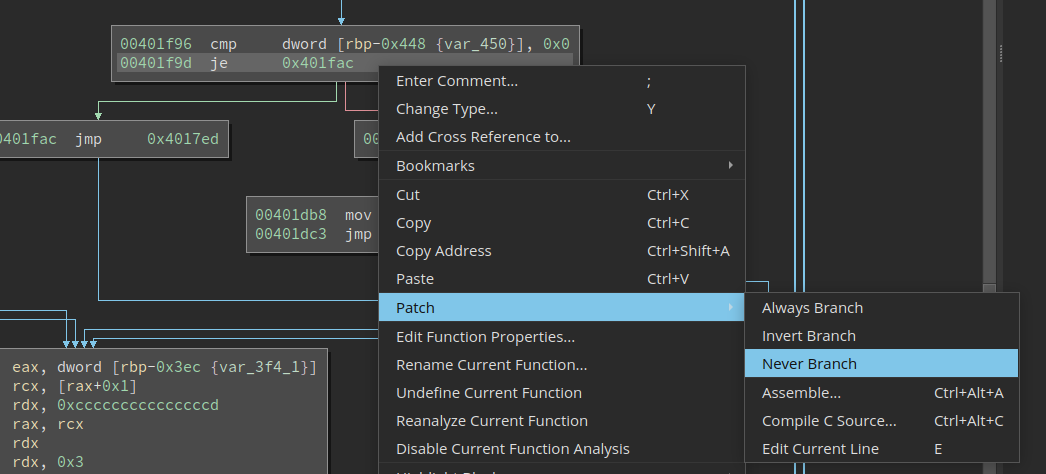
Anyways, fixing the crash is simple enough, I change the branch at 0x40150a and make it never branch. In case you do not already know, patching is extremely fast in BN:
Defeating the Code Checksum
I then saved the binary and executed it. However, it crashes on any input. I ran it in GDB and see the execution gets to one of the branches on the right side with illegal instructions in it:

Well, so it seems the branch should not have been taken. And it is likely to be some sort of code checksum. Since I have patched the binary, the hash no longer matches, the comparison is no longer equal, and the execution goes wild.
I had a look at the code and quickly confirmed my guess. And BN helped a lot:

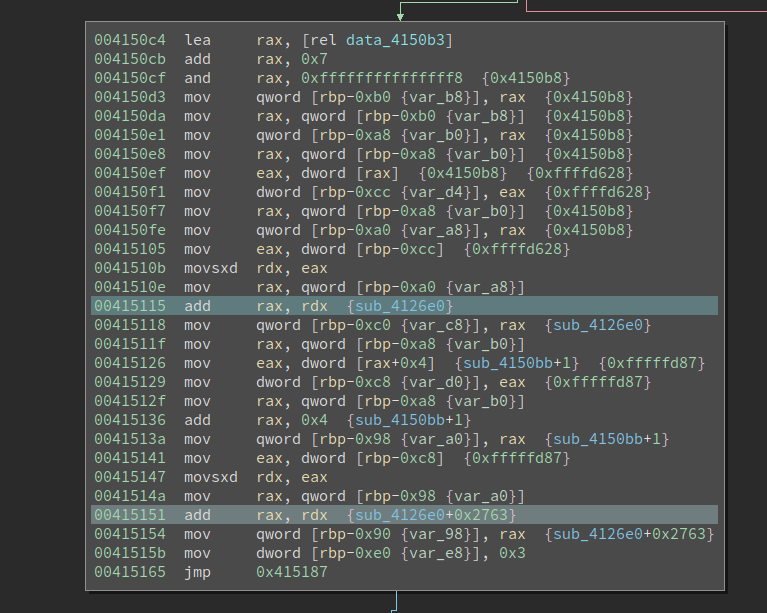
The constant propagation has figured out that, at 0x415115, a function pointer to the function sub_4126e0 is calculated. If BN does not calculate and annotate it for me, it would not be obvious to see. Below, at 0x415151, we see it references sub_4126e0+0x2763, which is probably the end of the function. With this in mind, I then analyzed how the code loop over the bytes of the function, calculate a hash, and then compare it with a pre-defined value.
So yeah, the anti-tempering consists of a code checksum. This is easy to fix, simply patching the comparison will work. There are many of them, so I first put the addresses to patch in a list, and then use a script to patch them all at once:
bv.begin_undo_actions()
for addr in addr_list:
    bv.never_branch(addr)

bv.commit_undo_actions()
bv.update_analysis_and_wait()
Again, I can do it in the UI, but this makes it easier to undo/redo them all at once.
Fixing one function does not solve the problem – since functions are hashing each other. In other words, they form a network of cross-checking. This concept is discussed in the book Surreptitious Software: Obfuscation, Watermarking, and Tamperproofing for Software Protection. One of the authors of the book is professor Christian Collberg, who also develops the Tigress protector and organizes this Grand-RE challenge event (thanks!). So yeah, I know this protection pretty well. And defeating it requires me to patch all of the checksums altogether. The amount is manageable, so I manually added all of the addresses into the above code snippet. Had the binary been larger, I would need to figure out a way to automate discovery.
After I made all the necessary patches, the binary runs fine. I submitted the binary which is accepted as a correct answer. I am the only person who solved this challenge.
Alright, this is the entire story of this challenge! I quite enjoyed the process. I hope you also like this blog!
如有侵权请联系:admin#unsafe.sh