
2021-09-09 01:47:40 Author: www.nowsecure.com(查看原文) 阅读量:75 收藏
Reverse engineering iOS mobile applications is no simple task. Compared to reverse engineering Android with tools like apktool, jadx and similar, reversing tools for iOS are scarce due to security measures implemented by Apple and iOS being less open source in general. This makes the reversing process slightly more complicated but not impossible by any means.
In this blog we will learn the basics of reverse engineering iOS binaries by utilizing some of the more popular tools provided by Apple (Xcode Command Line Tools) and some third-party tools as well. These will help us obtain valuable information about the mobile application we’re analyzing.
Note that we will be using macOS to perform these tests because it provides the most useful utilities and commands to achieve our goal. If you don’t have access to macOS you can always grab the ideas portrayed in the contents of this blog and utilize similar tools available in other operating systems to achieve a similar goal.
Tools and Utilities for Reverse Engineering iOS Apps
First, let’s take a quick look at some of the tools and utilities that we will be using to gain additional knowledge about the app we’re working with:
- nm: displays the name list (symbol table) of each object file in the argument list. https://www.unix.com/man-page/osx/1/nm/
- otool: The otool command displays specified parts of object files or libraries. https://www.unix.com/man-page/osx/1/otool/
- codesign: Xcode utility that adds signatures to built projects. https://developer.apple.com/library/archive/documentation/Security/Conceptual/CodeSigningGuide/Procedures/Procedures.html
- strings: looks for ASCII strings in a binary file or standard input. https://www.unix.com/man-page/osx/1/strings/
- Hopper Disassembler: Hopper is an amazing tool that will allow us to disassemble an executable and inspect the machine-level code that composes the binary. https://www.hopperapp.com/
These are fairly straightforward to use and can provide a lot of information related to the binary that we are attempting to reverse engineer. Before we get started, make sure to set up all the tools above and ensure they are functioning correctly. A good way to test this in terminal-based tools is to issue the help command, which in most cases will be a variation of --help, --h, or similar. If a list of commands related to the tool is returned by the --help call, the tool is most likely functioning properly.

Getting Started
Once our environment is set up, we’re ready to get started. We’ll be working with iGoat, an intentionally vulnerable iOS app publicly available on GitHub and brought to us by OWASP. Let’s go ahead and download the binary: https://github.com/OWASP/iGoat-Swift
After we’ve downloaded the .ipa file, let’s locate it and open it with macOS’ Archive Utility tool. This will unzip the binary and reveal some folders. All iOS binaries have a Payload folder that contains a .app file, often named the same as the binary we’re analyzing. Right-clicking this file and selecting ‘Show Package Contents’ will display the different files that make up the binary itself.

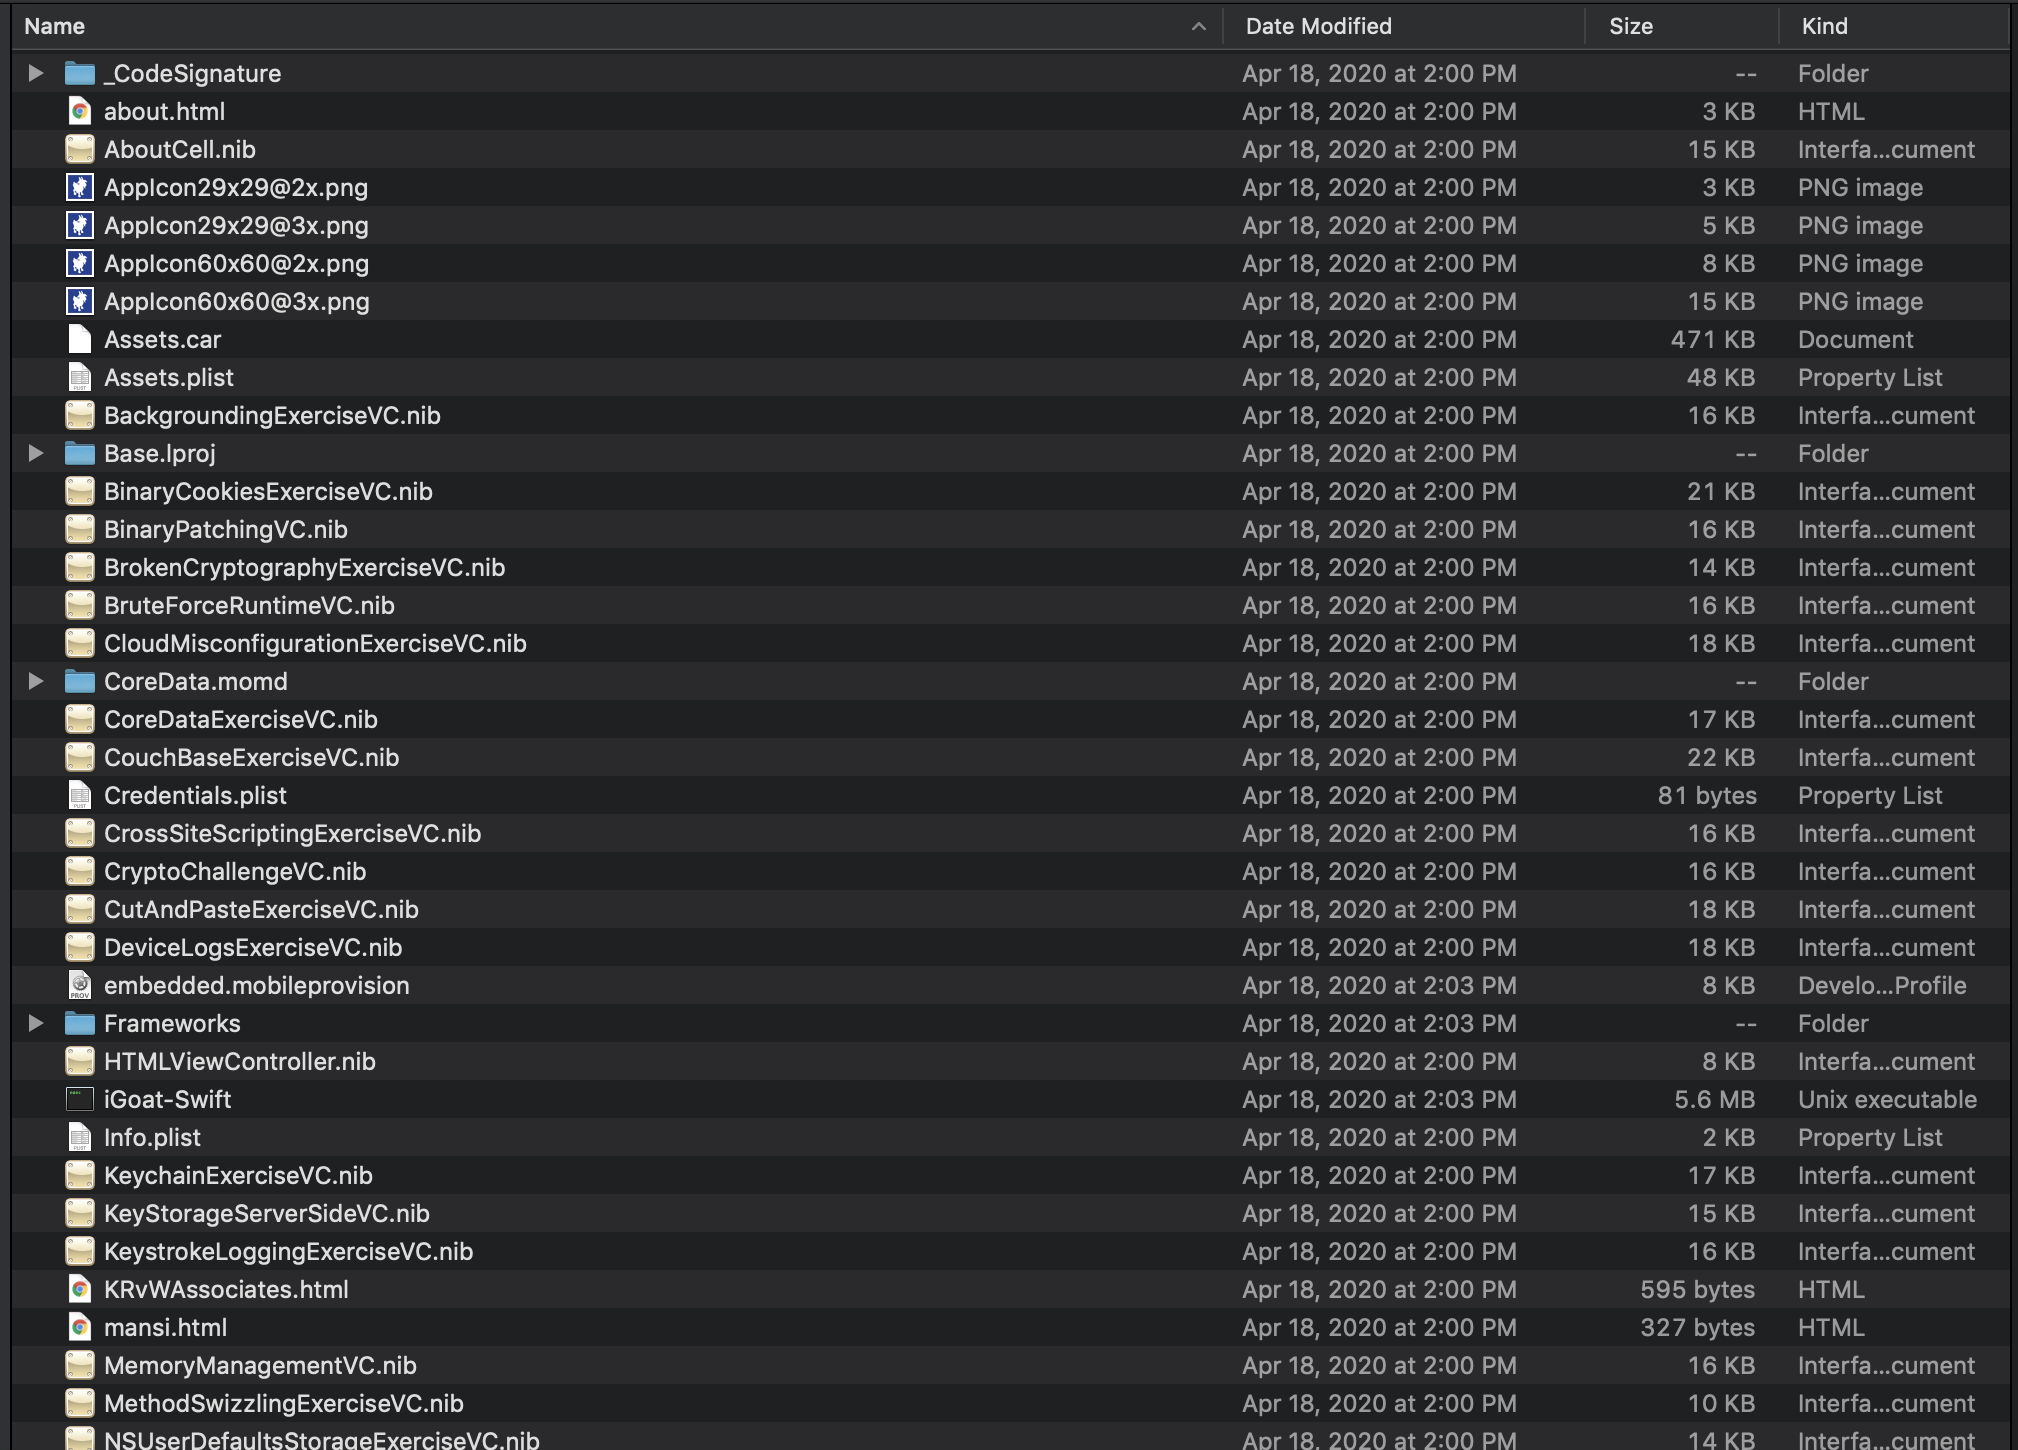
When displaying the package contents of any .app file belonging to an .ipa, we’ll notice that there is also a Unix executable file with the same name as the .app. This will be the app’s main binary file while the other files in there are supportive components that keep the app running.
Now that we’ve gone over the components of an iOS binary, let’s start reversing! Open the terminal and navigate to the Payload folder we just decompiled. Once in that directory, we’re ready to begin.
nm
We’ll get started with nm. As previously mentioned, this utility will help us in displaying different app components for information gathering. I mostly use it when performing compliance-related tasks in which I need to verify if the application that I’m testing implements a certain method that goes against a certain standard, when performing reconnaissance tasks (for example, when I’m looking for specific function names related to weak cryptographic implementations such as ‘SecRandomCopyBytes’ or similar), and when I want to view what function names have not been obfuscated by the developer. This is helpful as it helps make information gathering slightly easier by allowing us to formulate a plan on what functions we will be targeting next as a part of our reverse engineering process. In my experience, nm works best with the Terminal’s grep utility as it allows me to filter the content dumped by nm and quickly take a look at the results as opposed to having to scroll through lots of output. A very common compliance requirement is usage of the NSFileProtectionComplete data protection class so one way of looking at the different data protection classes implemented in the source code is to use the following command: nm iGoat-Swift.app/iGoat-Swift | grep -i protect
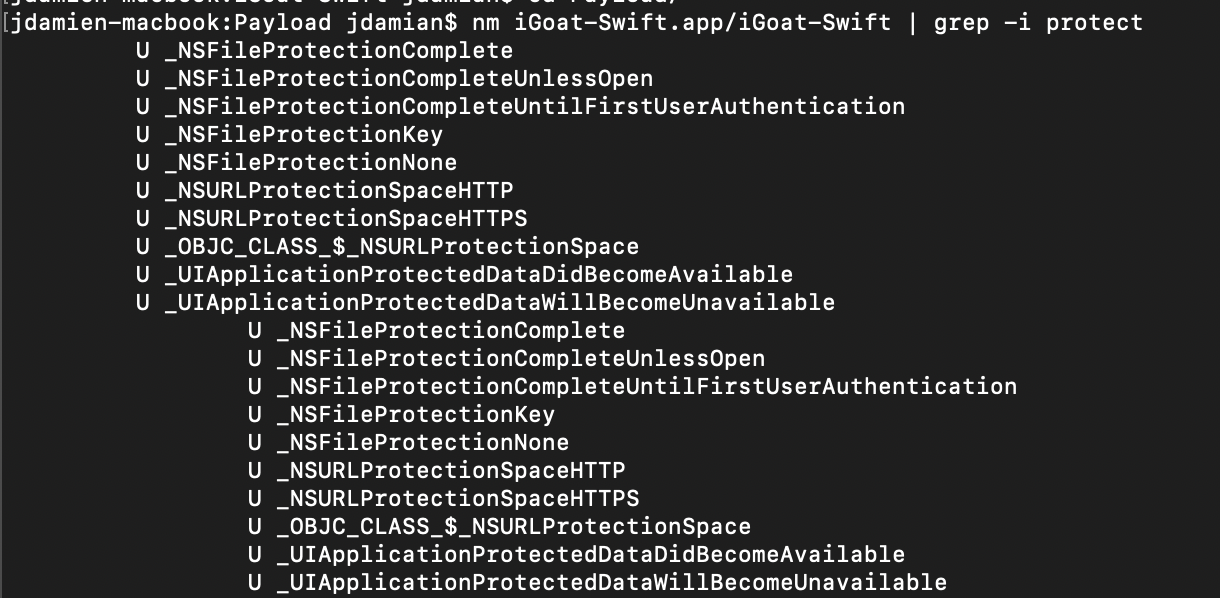
In the screenshot above we’re able to identify callouts to NSFileProtectionNone and similar, which could result in compliance failures for certain organizations. The nm utility can also be used in a similar manner to look for usage of deprecated methods (by including the desired method name after the grep command instead of ‘protect’), and revealing function names that haven’t been obfuscated (nm iGoat-Swift.app/iGoat-Swift | less will display these – long output warning!)

otool
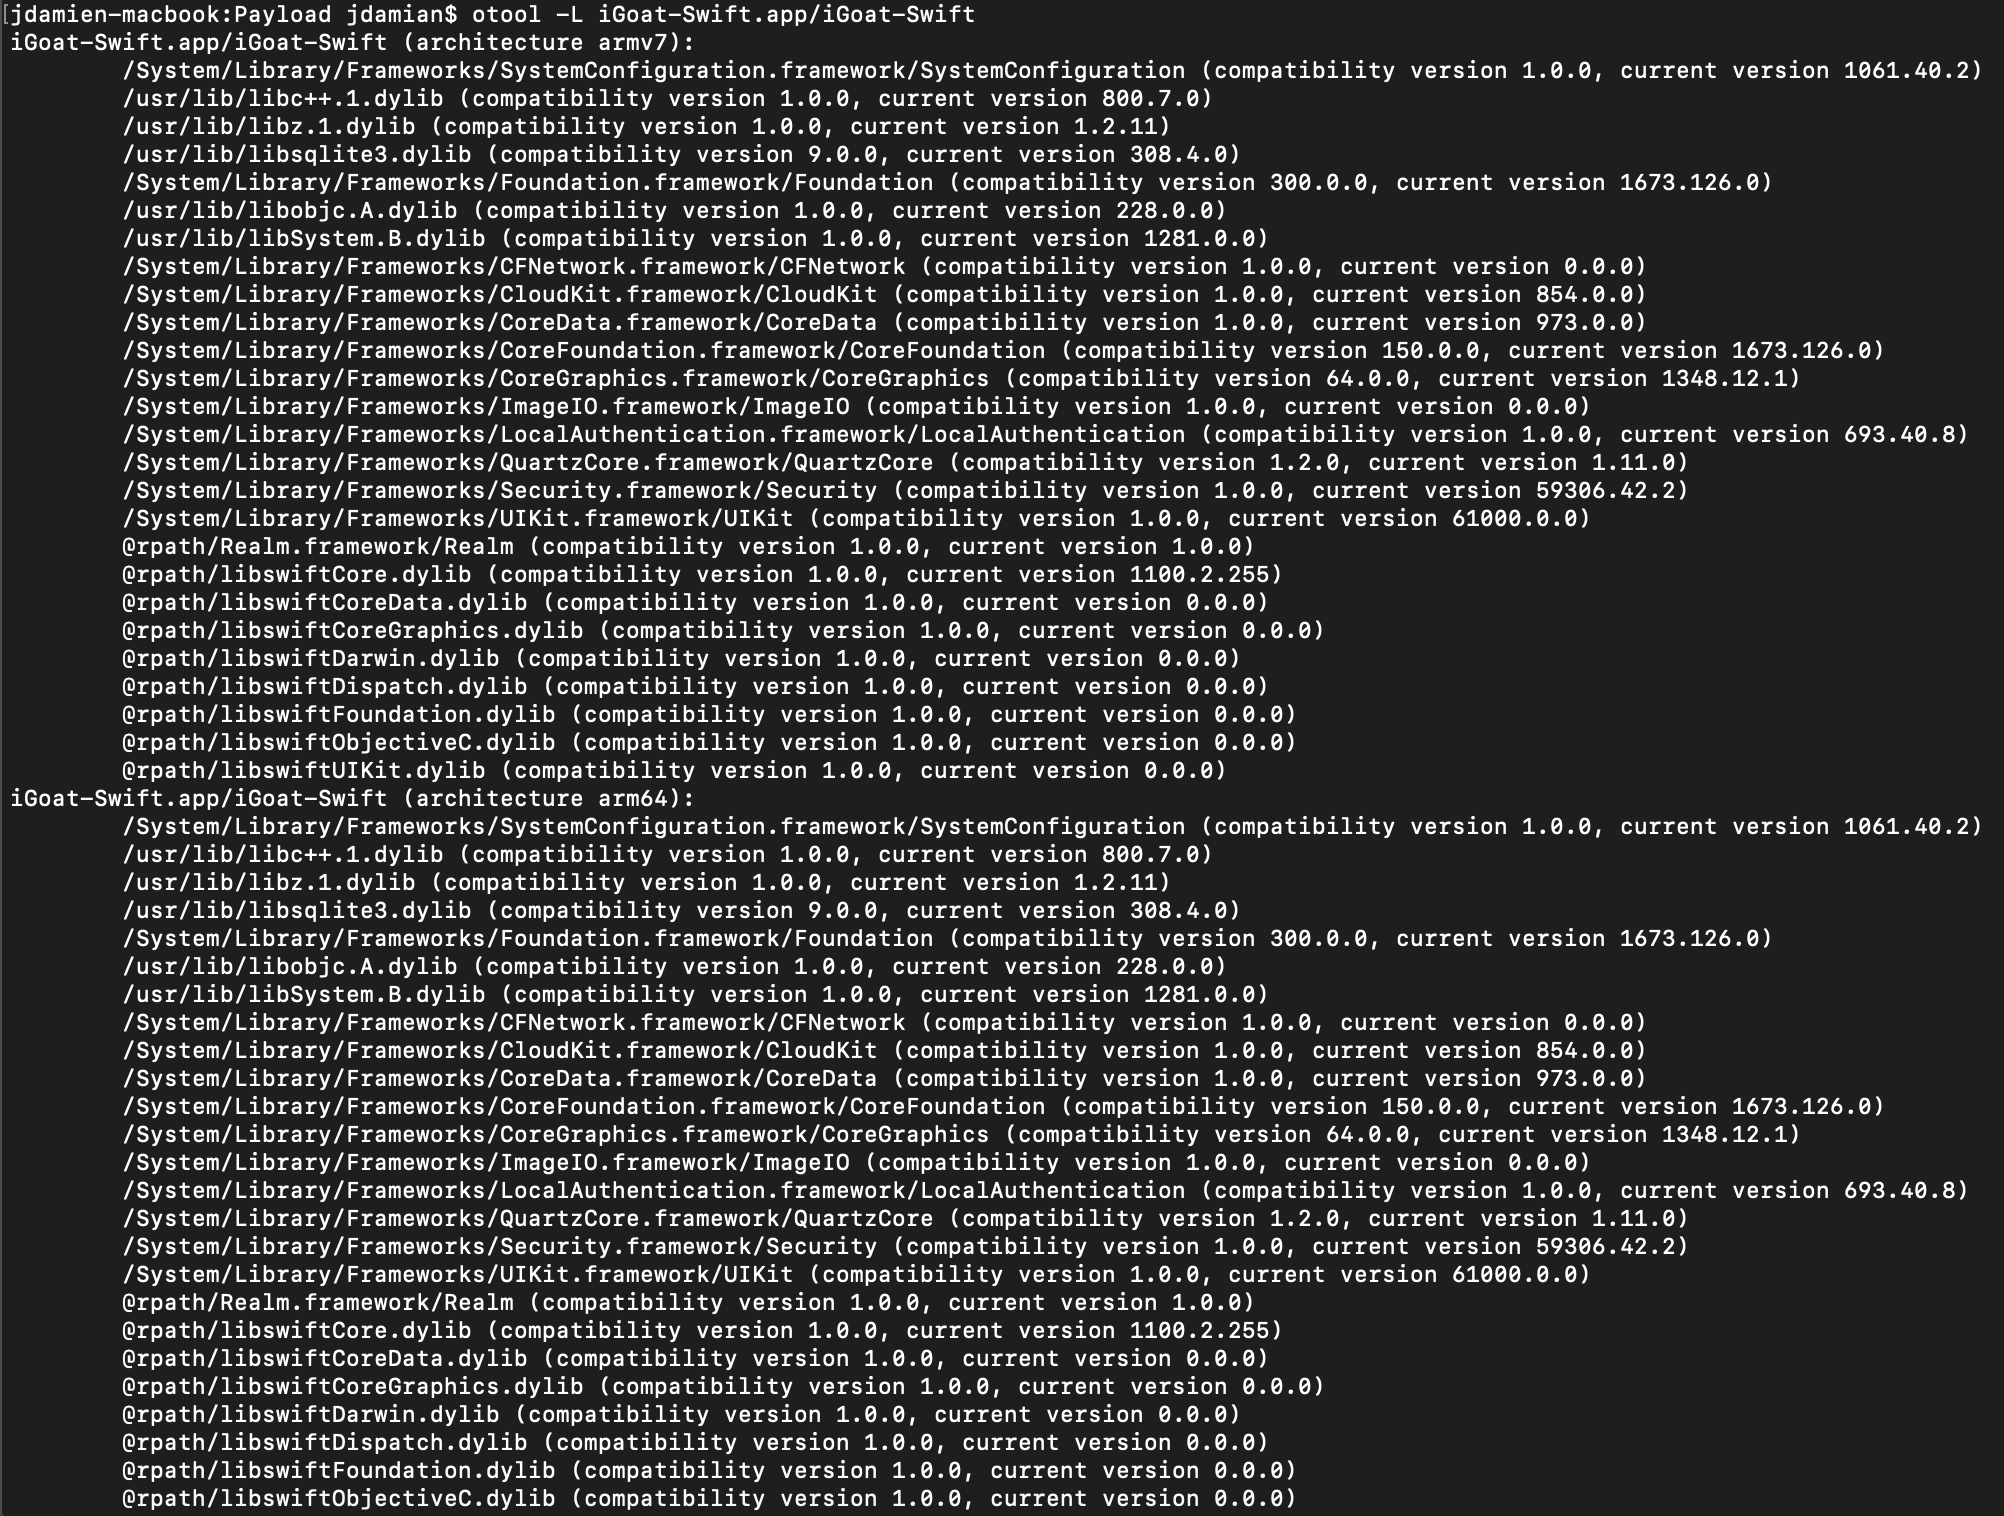
Next we have otool, which is one of the most useful tools for iOS reverse engineering as it’s very versatile and can be used to dump a lot of information about the application. A very common use is to dump the different libraries and scan for any deprecated or vulnerable ones, as these could result in the application being compromised. Issuing the following command will display the libraries in use by the app: otool -L iGoat-Swift.app/iGoat-Swift
strings
Let’s analyze the strings utility next. As the name suggests, this utility dumps all strings that are hardcoded in the binary, making it especially useful when looking for hardcoded credentials, secrets, and similar information that the app developer might have left in the source code by mistake. We can do this by executing strings iGoat-Swift.app/iGoat-Swift | grep -i <your_search_here>

codesign
The codesign tool, as previously mentioned, allows us to add and manipulate signatures, verify entitlements, and much more. Dumping app entitlements is often a good way to find out more about the app’s configuration (e.g. if the app is using a certain data protection class for all files it will show up here). Use the command codesign -d --entitlements :- iGoat-Swift.app/ to achieve this.

Hopper Disassembler
Last but certainly not least, we have the Hopper disassembler which is probably the most powerful tool out of all of these but, at the same time, the most complex to learn and utilize properly as it requires knowledge of machine-level code (assembly) in order to be able to understand what exactly is going on within the app. When using Hopper, we have the option of disassembling the whole .ipa if we would like to focus on the app itself and all the third-party components it implements, or we can also select only the Unix executable if we’d like to examine the source code. Because we’ve been working only with the source code thus far, let’s go ahead and continue to do so. Right-click on the Unix executable and select open with Hopper Disassembler. It’ll take Hopper a few minutes to load and perform its automated source code analysis, but once it’s done we’ll see a screen similar to the one in the screenshot below.
Nly

In the menu that appears on the left side of the screen, right below the yellow bar up top we can see a few different options including Labels, Processes, and Strings. The Labels contain the different memory addresses with their associated name/instruction. The Proc. tab contains all the methods used by the application. Last, Strings displays all the strings in the binary (similar to the utility we used previously.) One thing I like to do is utilize the previous tools to gather as much information as possible, then go into Hopper and look at the specific methods and how they interact with the application in more detail. For example, when dumping the app’s strings we noticed a few ones related to secrets. If we go ahead and search for ‘secret’ in the Str. tab these should show up and we should be able to access the function that contains them by double clicking it.
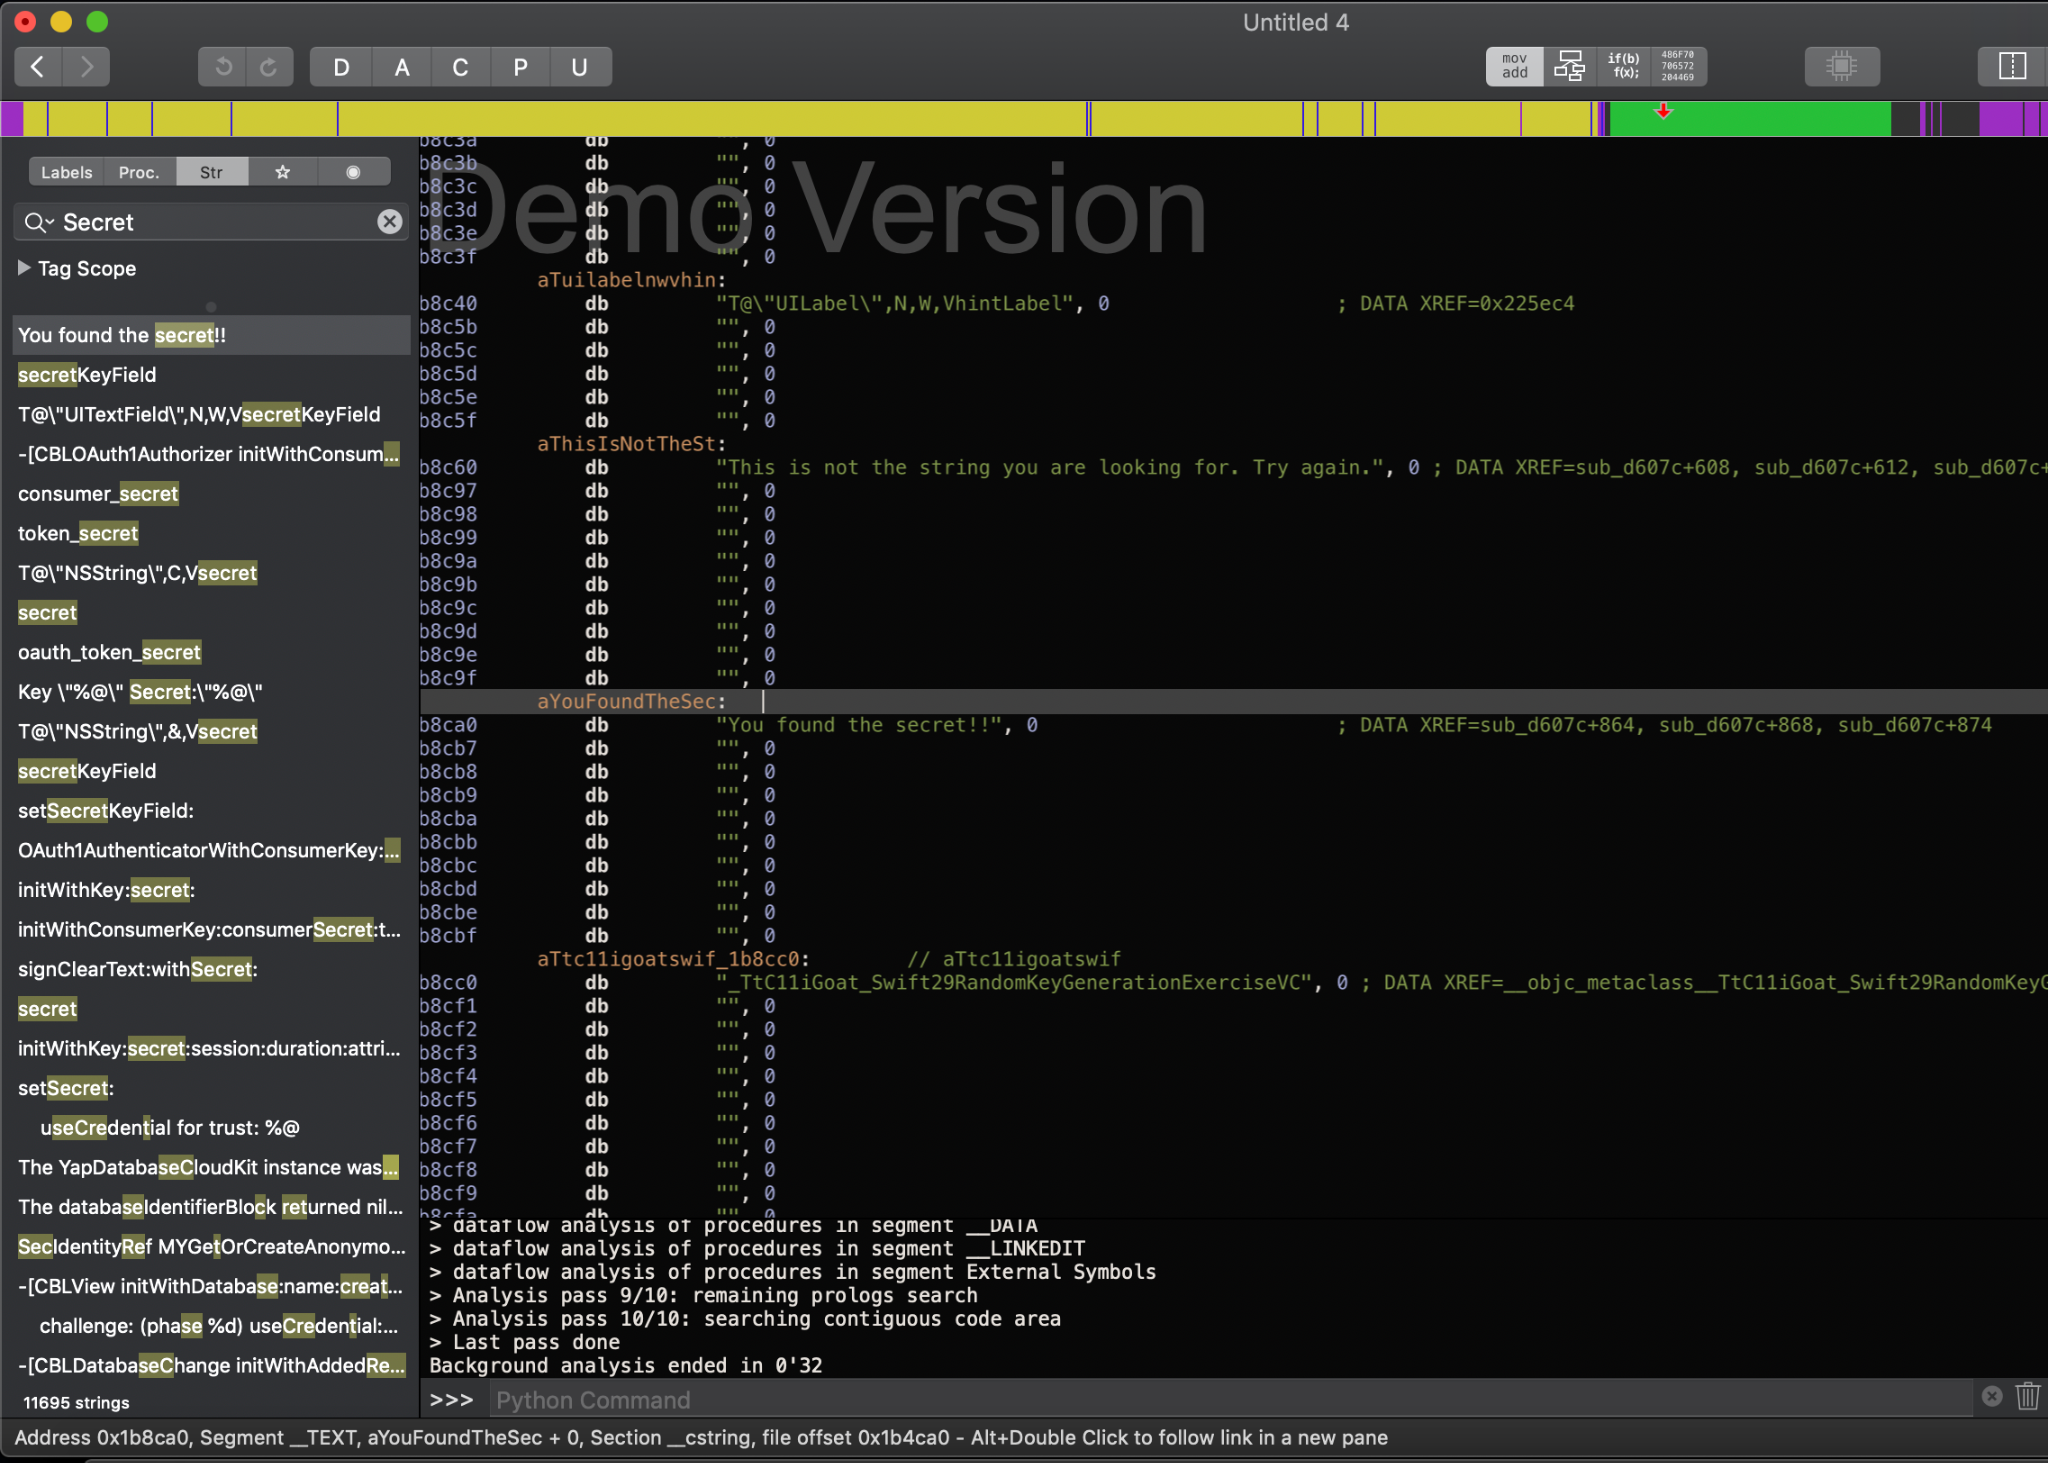
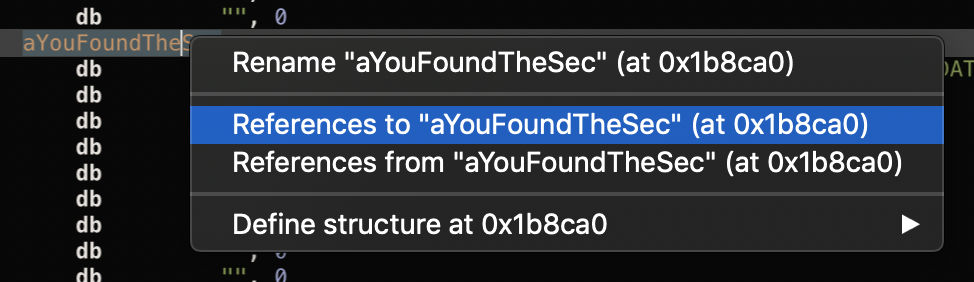
By right clicking on the aYouFoundTheSec method we can inspect all references to and from it that are made by the application.
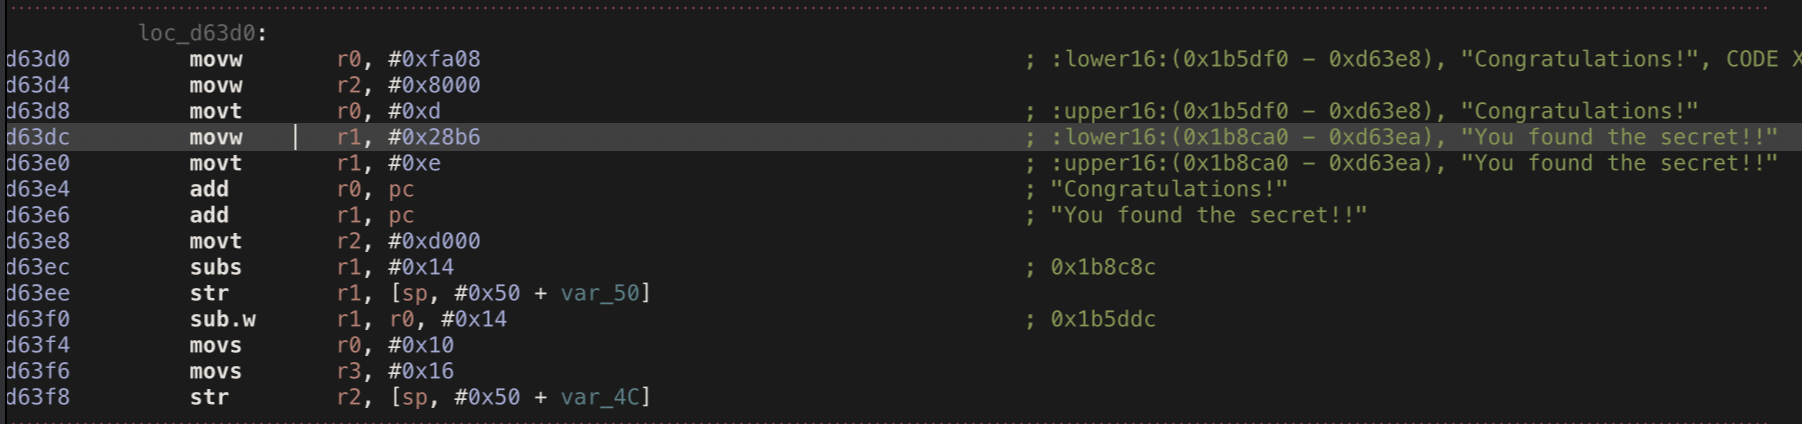
Clicking on ‘References to “aYouFoundTheSec” (at 0x1b8ca0)’ and selecting the first reference listed in the window that pops up leads us to the method in question.
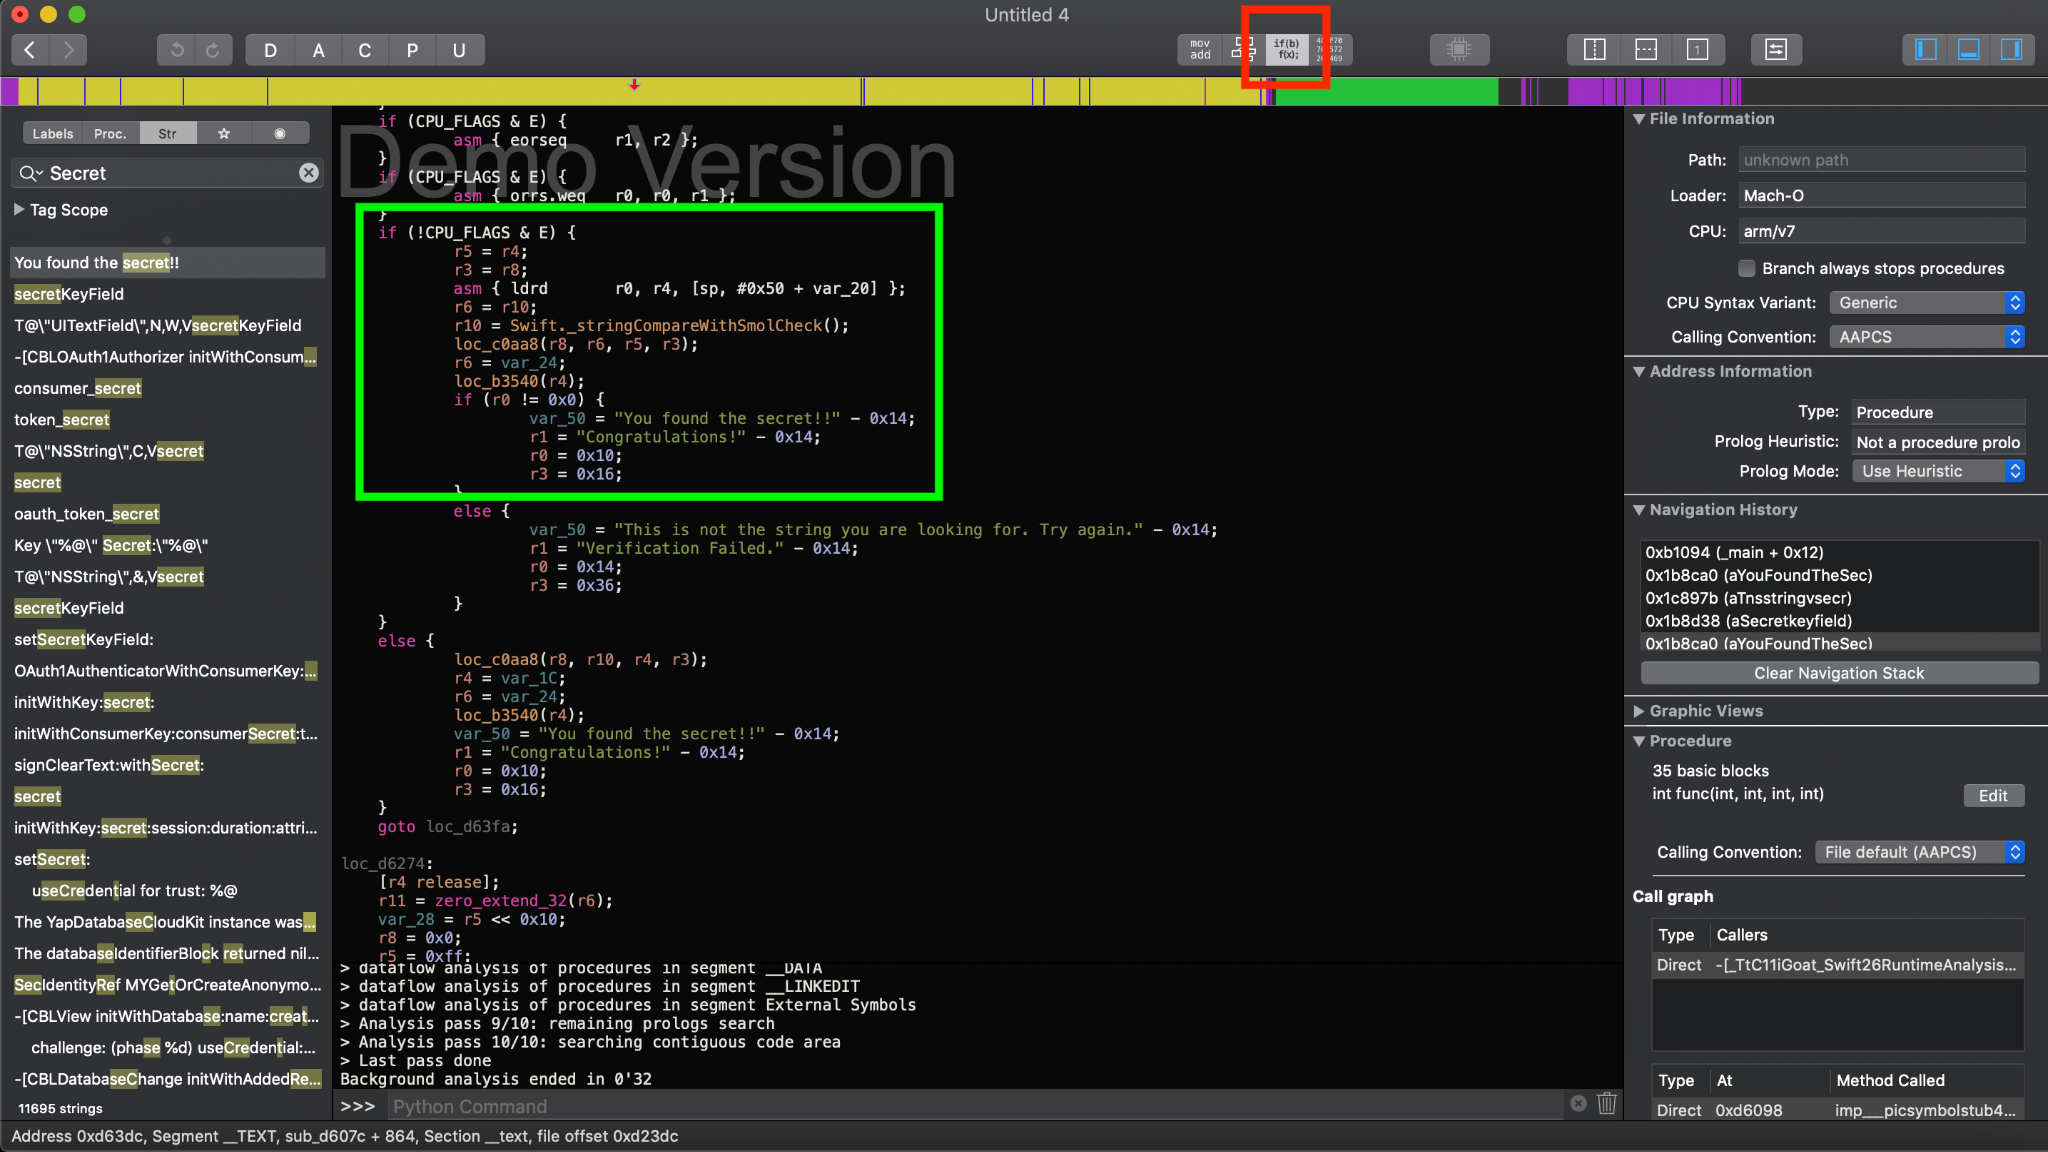
Additionally, Hopper has a very useful option that converts machine code into pseudocode for easier readability that can be enabled by clicking on the option highlighted by the red square in the screenshot below. The green square shows the pseudocode corresponding to the assembly instructions listed above.
Hopper is an amazing and very powerful tool that will allow us to perform so many reverse engineering activities. I haven’t installed this app on my iOS device just yet but by looking at the code I can tell that there’s some sort of challenge or validation that can be bypassed by digging deeper into these methods, identifying specific addresses that contain the different validations, and circumventing those to reach the specific function in which the string containing the actual secret code is stored.
Other Tools for Reverse Engineering iOS Mobile Applications
These are just some basic steps that will help us get started with reverse engineering iOS mobile applications. The tools explained above are very powerful and have lots of capabilities that were not explained in this blog post, so make sure to always list the available commands for each one of them and do a deeper dive by reading the official documentation for each of them. Additionally, there are many other amazing tools such as Frida and Radare that we can use to reverse engineer all sorts of iOS applications. On a similar note, if you’d like to learn more about the basics of reverse engineering on Android, refer to my previous blog post where I cover some basic terminology and demonstrate reversing techniques using jadx-gui. And to learn more about mobile app security try NowSecure Academy free courses.
如有侵权请联系:admin#unsafe.sh